Showing posts with label flimsy. Show all posts

Thursday, July 30, 2015

The One Hour Dress 1920s version


Once I knew what the One Hour Dress was, I saw them everywhere.

http://theclosethistorian.blogspot.com/2014/03/the-one-hour-1920s-dress.html

Go search on 'one hour dress 1920s'. Go ahead, I'm here all week.
https://youtu.be/VImcfqrqWKQ is the You Tube ad for the book (original link is dead)

but here it is on Amazon.

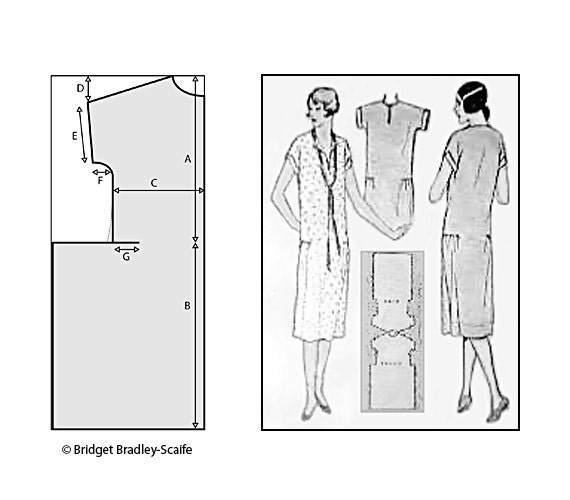
There are a million variations on the One Hour Dress. I based my pattern on this image I found online, which turns out to be from a pretty nifty pattern on Etsy. 
Give her your $3, you won't be sorry. 
the alder shirtdress does it too
It's a pullover design of the early 20s, a tube with  a horizontal slash at the hip that gathers the side fabric extension into the main body as a skirt. 

A one piece pattern that is easy to draft, uses fabric very efficiently.

Probably easy to make from flour sacks.

The versions out there are generally pretty dumpy, but if you look at the illustrations using this style, there's a lot of sweet details.

The slash goes from side to side, and is wrapped with the same white cotton on the vertical appliques


Another slash across the center front, with the red bias finish making either belt loops or something to pull your dishtowel through (seen it both ways).

In both of these examples, the seam is on the 'right side' and is covered with a different fabric trim.


The One Hour dress is on the upper left with the boatneck and the flowers

You're just laying the pattern over prepleated/tucked fabric here

Dear reader, of course I made one...


Yes, you are drafting your own pattern from a formula and measurements.

I should mention that the Superboard isn't the most accurate for cutting precise measurements; the grid gets shortened lengthwise with the folds in the board.
But it gets the job done

drew a neck hole based on my head

shoulder seam line

started drafting from the neckhole out. A plastic sword makes a good paper weight/spreading device


ripped to grain up the fabric, folded it crossgrain and doubled


The one pattern piece laid out

Marked a front and a back neckline; will cut both for the back and then one for the lowered front

I could have used the minimal scrap for a facing for the neck line, or pockets
I haven't added pockets.
Yet.

thread gathered the skirt extention to tack it to the bodice (seam G for those of you playing along at home)


I put black bias tape over the gathered seam G (sewed that with the seam allowance to the right side). Also finished the neckline with the stuff.

All the bits for this came from the stash, for once.

All the interior finishing was zig zag stitch over the seam allowance.
Period would have been pinked, but rayon can be ....capricious.


It is waaaaay too wide (the bodice should be your chest measurement plus 2", NOT plus 8". I also need to find a better place to take photos and find another face to make in those photos.
On the other hand, it's rayon so it's drapey and the finished object isn't out of scale for the period. Kinda a William Morris rose.

It's a sack dress, without darts or extra cuts. It's kinda sweet, kinda frumpy, and I plan on wearing it tomorrow night to the theater.
Not the theatre.


Wednesday, September 17, 2014

Grading up vintage patterns: proportion and preservation

It's beautiful! It's everything I want in a dress! It's a vintage 16 and I am...

bigger.


Tanya on Curvy Sewing Collective just covered the basics in a very clear tutorial

photo from Curvy Collective, Tanya http://tanyamaile.com/

But what about smaller pieces with darts and seams and connections to other pieces?

Let's say, a bodice with an angled collar. Like Mail Order 9213


I am going to trace the original pattern piece and cut that piece up, preserving the first one. I can trace and shift, but I get lost and forget where I've traced and shifted, and slicing the pieces gives me a chance to play around with proportions. And I've covered myself in the very likely event I make a hash of it.

The green lines are the ones I can mess with and no real design change will occur. The Red is super caution and the yellow needs thinking about.

The blue lines are sort of a standard bodice slice. Through the bust point vertically and horizontally, at the front edge and through the armsceye. I never want to add all the width at one point. Ever. It will look awful.

I measured myself vs the pattern's size measurements. I am assuming the pattern takes wearing ease into account, and won't get into the precise nitty gritty of fitting ME and MY SPECIAL ISSUES until later.

I need two inches all the way around, checking by my waist and upper bust #s. So, one inch in the whole front bodice; I want to add a half inch to each side of the front.

What I want is to keep the high angle of the collar. I don't want it floating as a little collar in a sea of bodice (which will happen if I just add width through the shoulder seam), and I don't want it suuuuper wide on either sloping angle. So I want to add a little here and a little there.

It is easier to manage adding the width first. Adding the same width to each cut keeps it even. So if I'm adding half an inch to this piece, each cut is 1/4 inch wide to keep things about the same. I tack this down with a little tape (usually there are strips of tracing paper flying around the table for backing purposes) .

Don't draw lines yet.


This is where you can play a little. I don't need adjusting in the armsceye, but I do need a little in the bodice below the bust point (usually I need to shorten this part).  I am NOT doing a bust adjustment in this manuever. I would lengthen by 1/4", but if you know you are a long torso from previous experience, measure yourself and do that deed NOW below the bust point.

If I think the collar has just gotten too small, I can grab it and move it. If I want it smaller, I can cut that section up and move the pieces around WITHIN the boundaries of how big the bodice needs to be.
(this is why I make the copy. I like to play with my toys!)

Redraw lines. The shoulder seam got a little longer, the collar a little longer and deeper.

 Time for one more think over on the v neck collar. I'm going to cheat it down a little in the center. I am a modest gal, but I like the sharp angle at center.

You will, eventually, retrace this on new paper. Move the marks (seam marks, bust point, original darts) to where they should be on the new piece. You should mark the bust point by trying this piece on you. That's when the bust adjustment happens (that is, I don't have one)

Keep in mind that if you add height to any seam, the other piece of that seam (a sleeve, a back bodice) will need to be adjusted similarly. This is where it works to do these pieces at the same time.

On a big table

I did the slide method for the skirt until I realized the waist yoke pieces were getting lost in my wiiiiiiiide new front piece. So there're a whole set of frankenpattern photos that follow this one. I'll just keep that to myself.

It is easier to make mistakes on paper than fabric. You will make a few truly huge boneheaded errors, from which you will become brilliant.

Tuesday, May 27, 2014

Making vintage-y buttons


This dress is not very interesting to sew. 
Sure, I had to trace and alter and add about ....gulp... eight inches altogether. But that's just two inches a piece.

And my backside requires a FbootyAdjustment, so there was more to do.
But not much.


Oh no, go back and add in piping for contrast. See, it's going to look much better. And I think I should keep the measuring tape as a belt....okay, maybe not.


I do love buttons. I love making bound buttons. I collect em. I have bags and jars and framed buttons.

The predomniant thing about this dress, besides the keen high curve of the front bodice, is the buttons! Ten! Ten one inch buttons!

Do you know how nasty and gappy the hole for a button like that can get?

But small buttons just don't 'read' right on this.

So here is button making time. 5/8" buttons, 1" plastic rings. Coffee not shown.

A tab of white fabric to prevent metal shine through on the inside of the fabric circle.


I used some 527 (much like e6000) to secure fronts to backs. Put some on a card and spread it with a stick. A nice coffee stirrer from the espresso shop around the corner. This is Seattle! 


After glue, assemble and push together. 

There were blurry action shots of shoving the back onto the front with the tiny metal shoving tool.

Ring measured!

And then I got lazy and used a premade circle template.....aka plastic holiday drink cup!


Traced, cut, even gathering stitches with silk thread...yes, this is more fun than making the dress.


I did two circuits of the back before I trimmed the extra fabric. Next circles were cut a little smaller.

The sample looks nifty! I have a very weak spot for cherry prints.

A fun afternoon later, I glue 'em. 


Two rounds of stitching.  They will dry before I continue on the other side.

Next day: poke holes in nice side.
Insert shank of button through hole

Pull out through on other side.

I lined them up on cut wire (from a coathanger. Joan Crawford would not approve) to dry. I think they look nice and turtle-like on my green library book. 

Oops.

If you work for the Seattle Public Library, I NEVER glue things on my books. Particularily the 1960's OOP book about servicing your own sewing machine.

And here we are. Snaps and a waist hook keep it from flapping open, but the high curve really does hold itself shut.