Showing posts with label free patterns. Show all posts

Friday, April 14, 2023

Mary Quant


I am a child of the 60s, and while everyone has their day and time,

I am a little sad and very wistful. Quant was the first designer I knew of (okay I was 8). Her looks resonate with me even now: that's my childhood view of the adult fashion world. Down to the typeface and the five petal flower that was her trademark


For a really nice page with loads of links and rich with information:

https://cinebeats.wordpress.com/2023/04/14/fashion-on-film-mary-quant-1930-2023/

Quant was a part of the Youthquake marketing whirlwind.

https://mubi.com/cast/mary-quant

Very well represented in film

You may be familiar with her from the recent V&A exhibition

https://www.vam.ac.uk/collections/mary-quant

And I would have adored this pattern 

https://www.vam.ac.uk/articles/sew-your-own-mary-quant-style-minidress

Tuesday, March 23, 2021

Roaring 20s And Swinging 60s And A One Hour Dress Challenge

 https://exhibitions.fitnyc.edu/roaring-20s-and-swinging-60s/pattern-project/

I will be sewing this one this spring. This is my catnip, even if I never finish it.
https://www.youtube.com/watch?v=2LFHtNMZxYg&t=8s
She makes a scale model of the pattern to show how it goes together. I do love a scale model

And of course, we can't not look at this

https://exhibitions.fitnyc.edu/roaring-20s-and-swinging-60s/hour-dress/


Who can actually sew the one hour dress in one hour?

Well, nobody, but certainly in an afternoon you could get most of it done. This video discusses the wisdom of that timetable, as well as a little history of the pattern, the woman who developed it and her story, and some general sewing pattern history. The One Hour really does want a few inches of ease to let that bodice drape (it's worked really well in rayon for me, and because it's almost all straight seams, you're less like to run into issues of stretching on the bias).

And the original pamphlet is available for free. Yes, I said FREE. So stop paying for this sweetie!

https://www.antiquepatternlibrary.org/html/warm/H-SW007.htm

\https://www.antiquepatternlibrary.org/pub/PDF/H-SW007.pdf

Don't forget to visit the online exhibition!

https://exhibitions.fitnyc.edu/roaring-20s-and-swinging-60s/exhibition/

Sunday, August 16, 2020

The Yamamoto Rectangle Dress

photos from SAM
I first saw this dress on the last day of the Future Beauty exhibit at Seattle Art Museum in 2013.
(I only got to go that one time)

https://erniekdesigns.blogspot.com/2013/09/future-beauty-finally.html
I was smitten.

From the Barbican book of the exhibit:


Black is such a bitch to see details on.
I took awful notes in a notebook, and then I lost the notes.
I made one for myself out of black poly crepe, and I put an instruction sheet up on Craftsy, but I wasn't happy with it. And Craftsy is no more. I'm still not satisfied with the original instructions from 2013, but I can't seem to correct them to my satisfaction, so I'm just putting up this illustration here. It's dead simple. The central pleats are the conceit, otherwise it's just another rectangle dress.
The trick on this is to cut the front piece in two, and make three big pleats up the center seam. Finish armholes and hem and neckline to taste. I suggest making a facing piece for the back of the neck for comfort and stability. 

After a crepe dress hangs for 5 years, the folds flatten out in front.
I needed to puff them up.
So I cut stuffing pieces from some super fat felt I have in the stash


And stuffed them into the seams
(yes, these are the overexposed versions of these photos)


I am going to redo this dress, probably in a different color of crepe, with the bigger gathers as in the original, and some organza in the folds for floofiness.
I even wore it out of the house to Seattle Frocktails 2018.
Yes, all photos taken in a cave, in the before-times.

Once again, a tip of the hat for the reminder that it's a rectangular world of free patterns
http://rhondabuss.blogspot.com/2020/08/the-magic-rectangle-dress.html

Sunday, July 12, 2020

Martha Stewart Free Pants Pattern - Ten Years Later

I missed this one when it came out in 2010, and I'd like to thank Rhonda Buss for bringing it to my attention
http://rhondabuss.blogspot.com/2020/07/fancy-pants-without-hasslewrap-pants.html

These are not fancy pants. They are simple, pocketless, pull on pants. You'll have to add some info to the pattern pieces. But you know, they are free, which means the price is your time.
And being a PDF pattern, some assembly required.


The materials list advises a yard of twill tape for the drawstring.
The large size goes up to 44" at the hip. You're going to need more tape than that (I'd add twenty extra past your waist number to get a good tie. Me, I use elastic for forgiveness)

Clearly, this is just an advisory list.

But now I'm curious and in for a penny......
This is what happens when you're avoiding running another post, and you have a lot of half used paper and a spare cartridge and an afternoon. 
The pages are not numbered. There is no size accuracy square, nor a preview of how the pattern appears on the pages. The pages do print almost (1/8th ") all the way out to the edge (which i usually can't get my printer to do) using Adobe acrobat (which is free and much more functional than the Google pdf things).

So I printed them out and taped them together
Well,  in progress. There are 30 pages, with 5 pages to each 'line'. If they were numbered, this is what they would look like.

 The pattern sits in the middle of the pages, with enough dead space it could have been moved up and saved five pages.

There is about 8.5" dead space on the top and the bottom, and the bottom of the pattern is only 3" onto those last pages. You could just print pages 1 - 25 and be happy enough.

The sizes are limited.
The length of the pattern pieces are 50" from top to bottom unfinished

I did create a new size for me, because there was 1.5" between the two pieces to expand into.
What I would like to commend is the page to page registration system.
You're joining circles!

It works really well and made it go very swiftly, especially with the very narrow margins. I did not trim any of the pages, and it was pretty easy to eyeball whether or not the circles were correct (and the dotted lines really helped)

I remembered to measure the crotch curve. It's one curve for all three sizes, and I know I need mooore. I may drop it a bit. I also added almost 2" to the tops to have an adequate foldover casing for elastic.

And then I realized when I added more to the hip I needed to finish that seam line.
(not shown, got too excited to take a photo),

I needed to gradually grade that seam line all the way down. And then the legs would be out of balance. So I took some off the inseam
 I was trying to draw a long curve for one inseam, and realized I could just cut out the other more-curved inseam and use that cut off part as a template for it.
So I did.
And here they are.
You can see the original side seam lines were not as curvy, and I did make them match.

Writing this, it occurs to me that I'm going to need more depth in the crotch. And I will have to mark the high hip dart in the back. And add some width in the front for pocket bag volumn.
But for an hour of work, I have a decent pull on pant pattern to add to the freebie arsenal. Because I'd be putting this much work into a Big 4 pattern to get it to work.

Sunday, May 3, 2020

The Best Free Clothing Pattern *GOAT

It takes less than a yard of fabric.
You can make out of woven or knit (drapier fabric is better with the long sleeve version).
It's a well balanced shape with great proportions.

ITS FREE


photo from Fancy Tiger website

My latest version of it has a scooped hem, minimal cuffs and a smaller, bound neck opening.

I am prompted to mention this pattern again after seeing numerous PDF patterns for $10 and up that are no better and give no better instructions or results than this one.

NUMEROUS.

Any Tina, Trina or Augustina can publish a PDF pattern for a boxy top if they like.
But this one is really good.

A few variations on this.

This one (inside out to show seams) got a turtleneck added to it

The dart takes some of the bulk out of it in a heavier fabric.  You can add a cowl or a turtle or a v-neck. You could extend it into a tshirt dress. This thing rocks in a crepe. The Lady Elroy knit crepe will give you a top in a yard or less (the following  ones took 3/4 yard, and for an expensive piece of yardage, a great 'sew the precious' project.
Just squeaks by on 3/4" yd. Pieced cuffs and neck trim came from scraps at the top and the sides.
This is what I had left from the bike shirt

This crepe knit needs to dry flat and be reshaped like a sweater; I swear that hem was even when I made it.
I add Hug Snug for stay tape at the back of the neck and the shoulders to prevent it from stretching out

To avoid headlights, with this fabric, I marked the bust point on the pattern


You could buy the fabric from them to support this amazing freebie!
https://fancytigercrafts.com/collections/jersey-knits/products/leafy-tropics
https://fancytigercrafts.com/products/bridal-boquet
https://fancytigercrafts.com/collections/jersey-knits

I get nothing from these folks except this amazing pattern. And so can you.


Sunday, December 1, 2019

Men's shirts and collar stays


Somebodies already did the work on this topic.
I'm just making mashup contrasty pictures of it.

I like her version the best. It's almost just like all the real ones I've seen, and she gives you the instructions for assembly.
But this is hard to see.
And there's a free pattern for a similar thing, which we're going to borrow. But let me make this clear, this is Mad Housewife's Idea. This is.... the children's book version.

https://threadtheory.ca/products/free-collars

If you combine her ideas with their pieces, you get a pretty nice collar for free. Her recommendation to stretching the smaller undercollar and showing the results is sweet.
Go read it on her page!
Then come back.

Looking at the shirts in the family closet, I mocked this example up. I used contrasting scraps to show the fabric layers.

The grey is the under collar, the dark grey is the pieced section. Make sure you cut them ongrain; small pieces go wrong so fast if you don't. You would make them of the same colors, unless you are Robert Graham and then you would not.
 https://www.robertgraham.us/
My spouse has a couple less flashy RG shirts. They can be very worth that extra money, though we bought his at the thrifts. They hold up well.

Folded over the edge once. I'm not anticipating a lot of fraying in this place, so I didn't finish it

I have wandering collar stays around the laundry area, picked a random one. They vary a little, but generally are about this big.

Roughly there

Marked it

Stitched it
It is important to leave enough clearance to get that stay into the slot next to the interior collar seam fold. You could leave a lot more and the stay wouldn't wander. Except in the wash, and they do that anyway.


This is the wrong side.


 Marked where seam lines go.
This collar point is a little weird to me, but to each their own.

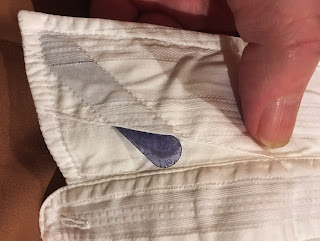
The actual stay in the actual shirt it was made for. My thumb is pointing to where the fold meets the collar stand seam. Yes, this collar point is a lot different.

With similar layered piece thinking and a button loop, you could do this

No finished products, just half samples today. The holidays are busy with family and managing disappointments.