Sunday, September 27, 2020

Nothing New Under The Sun, Jumpsuit Edition

 This week's hubbub on the interweb: the Zadie jumpsuit by paper theory.

Did someone buy a copy and then make versions of it for sale?

As soon as the flap emerged, it disappeared.

https://australianathelabel.com/pages/about-us


https://papertheorypatterns.com/products/zadie-jumpsuit-pdf-pattern

https://www.burdastyle.com/jumpsuits-129-05-2013.html 

That's 2013. May 2013.

But wait! There's more.
https://vintagepatterns.fandom.com/wiki/Advance_2795_A

https://vintagepatterns.fandom.com/wiki/Advance_2795_A?file=Advance2795A.jpg
There is just nothing new under the sun, kids.

I'm sewing. Work is hard. House has issues.
Or: I can sew, I have a job and a place to live.
I'm also starting a class this week, so I promise there will be actual content soon.


Sunday, September 20, 2020

Scale Model Fun / Single Layer Layout / In Praise of Tracing

This is an adorable video by Seamwork, and it beautifully illustrates working with scale model pattern pieces. 
image from Seamwork video
https://youtu.be/Tb_AyBwGTKs

On the instruction sheets of most patterns, there's an image of pattern pieces laid out on the fabric, to show you potential pattern pieces laid out for cutting.
Why, there's an example in the video at the beginning.
image from seamwork video
I outlined in this image; you can scan and enlarge and print similar from any pattern instructions sheet. You can make them as big as you need to. They will not be exact, but they will be in proportion to each other, and that's what you need.

You can use those scale model pieces in other ways.

BWAHAHAHAHAHA
hemlock vintage clothing


I love the back covers of vintage patterns for the preview drawing of the pattern pieces, for the very same reasons.

I can use the scale model pieces (sized up on the scanner/printer) to make a model of something I just can't see from the flat pieces. This is particularly useful in hat making, where it can be hard to see how you get from the flat shape to the three dimensional product.
yes, the wrong side of the paper will show with the pattern piece. 

This is necessary fun for me because, all too often, the pattern is one I can never afford or find a copy of. Sometimes this little paper model is the closest I will get to it.

This is enough information to make one of these

As for trying different layouts, I'm a big believer in single layer cutting.
Nancy has other ideas.

http://www.nancyzieman.com/blog/sewing-2/absolutely-easiest-way-to-layout-sewing-patterns/
This is now a Zieman stan account. Deal.

I have learned the hard way that it's easier to lay out a pattern on a single layer of fabric and not give yourself headlights, match designs, AND save fabric. Yes, tracing the 'cut two' pieces takes time and paper, but that's why we get the local newspaper.

I made one pattern piece for each piece. I also run the pattern edges off the sides at the corners, which would get cut off anyway. Facings are cut from different fabric - I need that fabric in the middle for the matching mask!
This was laid out on one yard. One precious special yard.
This is an actual shirt i just finished.  I am wearing it RIGHT NOW Yes, I am sewing. Just not telling.
Next to Philip Lynott, at work. The mask was in the wash.

You will want to trace your 'altered to fit you/final version' pattern.  You are committing to this version of this pattern for this fabric. You can cut it all up later on, but TRUST ME just do the deed now. If we're going to be thoughtful about fabric, we're going to trust the process. And you can see on that bias layout above that I run those pieces up to the edge and a little over. If I had to go back and add something, I'd be....really out of luck.

So, you take the one piece (let's call it Bob left back) and lay it out on the paper. And trace it. Pen, pencil, tracing wheel, whatever works.
And here's the kicker: when you're done, cut it out, flip it over so it's the reverse of the original AND MARK THAT SIDE accordingly: Bob, right back. The mirror of Bob, left back. Do it now before you forget. Also date your tracings and mark the seam allowances and pattern notches.

If this piece is one half of a piece cut on the fold, join it up right on the foldline. If you're splitting it into two pieces for a seamline, remember to add a seam allowance.

 I am the queen of forgetting the seam allowances.
I mark the grainline and the direction I want the pieces to go if this is meant to go on the bias*. I WILL FORGET. I will also add indicator marks at seams if I'm trying to match the print across the seam. Eventualluy I end up tracing a new copy because the old one has too many matching marks or lines on it.
It's quite a packed little video, and I hope they spend more time with all the ideas they raised.
-------------------
*reasons for this at https://erniekdesigns.blogspot.com/2019/08/bias-theory-with-flaming-skulls.html

Sunday, September 13, 2020

Gudrun Sjoden Exhibition finally opens at Nordic Heritage

Finally!
This show was due to open in April, got caught in the Coronavirus shut down, and just opened last weekend. 
https://www.gudrunsjoden.com/en-us/inspiration/spring-summer-2020/gudrun-sjoden-a-colourful-universe?


You've already seen the tunic from the online gift shop sale.

 I bought my timed ticket for Sept 6.
Of course, we are testing out how to maneuver in a museum now, so part of my interest was seeing how they would manage the space.

 Sorry, I did not take photos of the floor markers. Here's one from the Seattle Symphony offices.


The show is fine. The pieces aren't really separated by when they were designed, so there's no 'this is my design journey' here. More of a 'these are my influences' tour.
Which is a fine choice.


She does show her process with examples of inspirational items


these items were not identified either

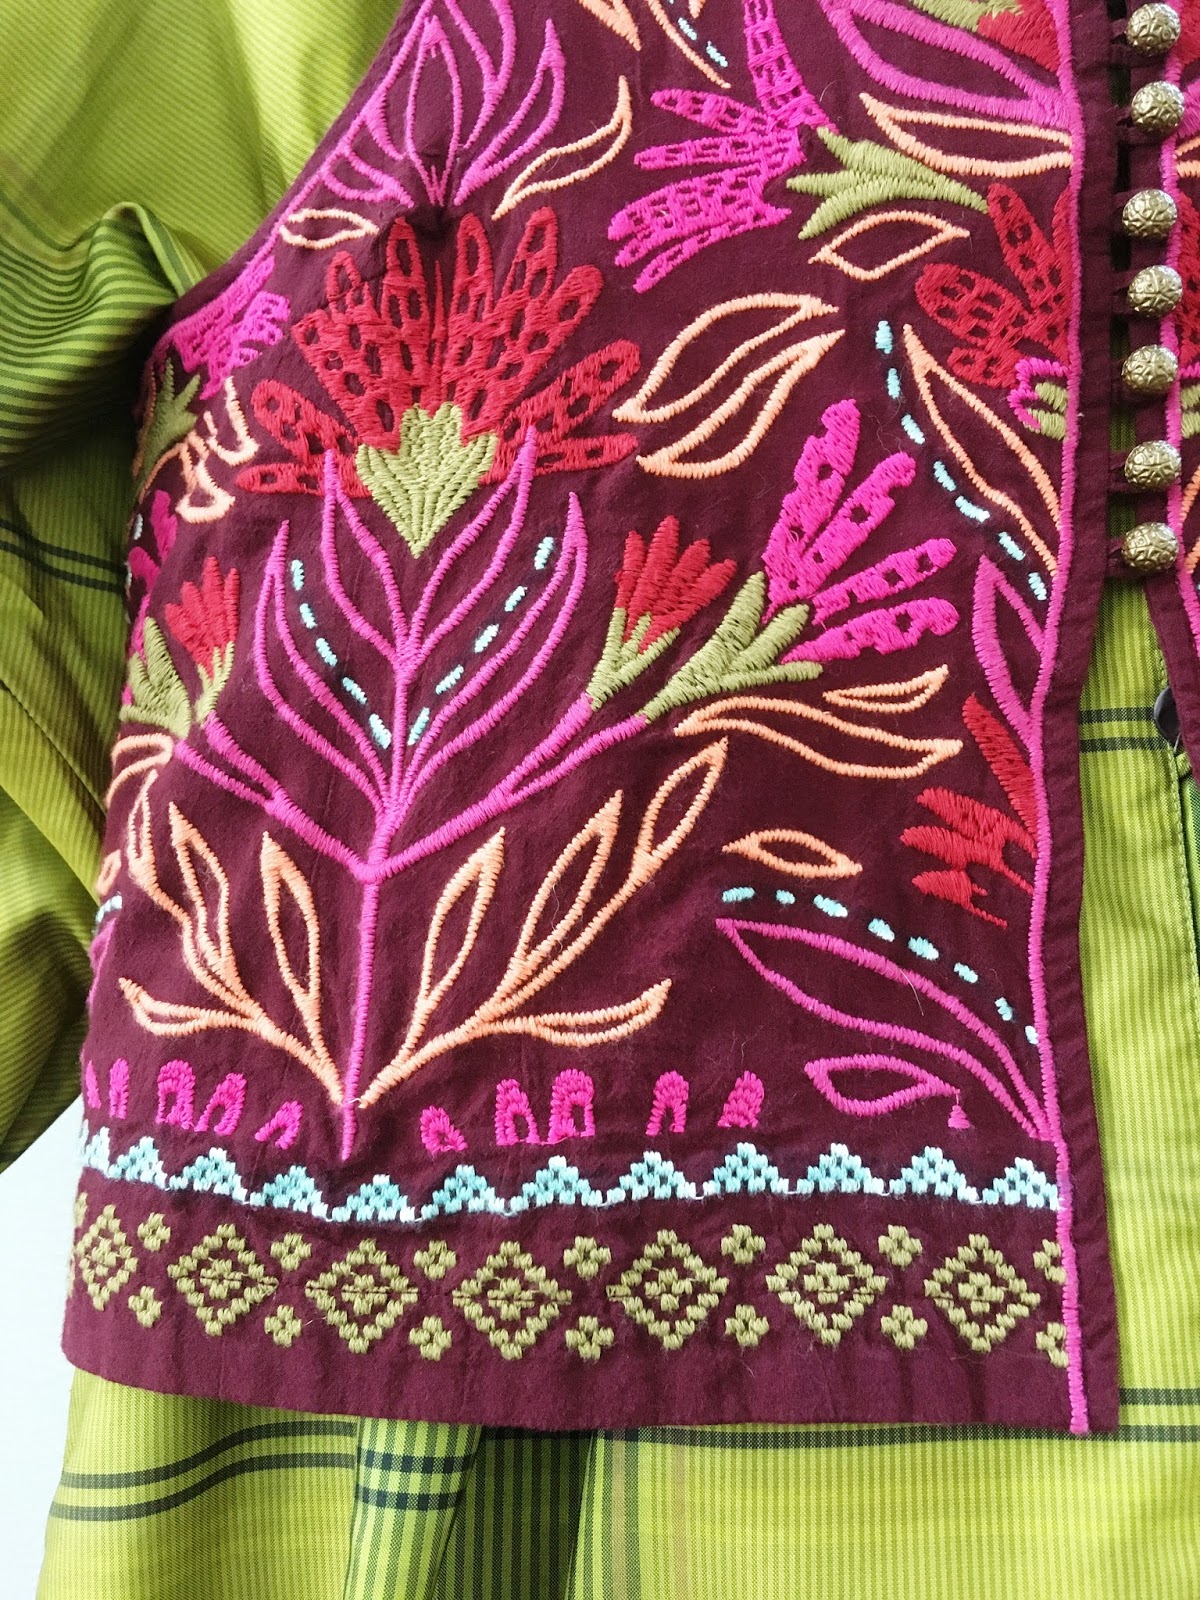
The kantha embroidery on the upper textile and the textile without below, used in the same ensemble


Some embroidery examples from many places. Unidentified individually.

catalog cover collage

Close up on the 1980 cover, as that dress was a big revival piece that year. We were just coming off the whole Folkwear/Gunne Sax/ peasant dress style movement here in the US at that time. I can still see making a jumper/pinafore of this in striped ticking with rivets. Industrial adorable.

All of this is online at the exhibition website

Four outfits from different decades, with embroidery hoops for signs.

I'm not going into a lot of detail on this show. The show didn't, so I don't know how to.
 The clothes were not captioned or labeled, so if they were from different collections, I have no idea (and I'm kind of a fan from the beginning: I went to the Berkeley shop soon after they opened, and I live in Seattle so it's not like I drove around the corner for it).
(for more on the GS brand and fans in the USA
https://www.latimes.com/archives/la-xpm-1994-09-02-ls-34083-story.html)

It wasn't a museum exhibit giving you a third person view of the creator; it came as is from Sjoden's company.
 I didn't get the catalog of the show;
I felt a little let down by that point.
I do like the presentation. The paintbrush heads are cool

Lots of watercolors. They might be originals. 
There's no knowing that.

It felt like a pop up shop, with funky displays of clothes that look a lot like what is available for sale now (Sjoden's work is 'timeless', or very similar from season to season).
The gift shop is already out of the larger sizes (putting stuff on discount ahead of time ate into their stock).

I like her stuff. I get their emails. You get the emails if you have read this far. I like Tina Givens.
It's your lagenlook
with the same too-small sleeves and oversized body and cheerfully mismatched prints in coordinated color palettes.

I enjoyed seeing the clothes, but if you live near a shop, you're seeing the same things. I wanted to know more about her and the company, and I didn't get what I wanted. I often complain about reviews that just feature what the critic thought the program should have been, and I don't want to do that here, but it's apparently where I have landed.

It was a very pretty show.

I like this museum, I appreciate how it grew out of a community center and its struggle to be an international center of a part of the world's heritage.  It has that strivers' self congratulatory tone it's always had. At this point in time in America, I honestly feel a little weird listening to the recordings of Nordic people celebrating how wonderful they are, when all the people speaking are middle class white people.
Which is not the entire Nordic experience,
but it's the experience of the people who donated money here. Hard work, and Socialism Lite.
There's a tip of the hat to the Salmi, but they aren't in the videos.
I'm not knocking this place.
 This museum has done some nice work; 
recent example was a touring exhibition of the work of Jacob Riis.
https://en.wikipedia.org/wiki/How_the_Other_Half_Lives
No photos allowed, so don't tell anyone. 
In the other end of the same exhibit room, they had large scale photographs of 21st century immigrants to Denmark. Also no photos allowed, but you can see some of them here:
https://www.nordicmuseum.org/exhibition/legacy
photo from "Legacy" exhibit Danish photography

It was really well considered, and I give them major props for combining the past poverty in New York with present poverty in Denmark in one room. It's the sort of thing a good curator can put together in a public space, given the latitude and opportunity.
So the Sjoden pays the bills. That's cool.

Socially distanced northerner.....


Sunday, September 6, 2020

What I learned from Bragust and AlteritAugust: Link Party


I like theme month sewing challenges until I don't. I can follow and be impressed/inspired by the wide variety of responses, and then worn out by the repetition. 
These two do pique my interest, as two of my sewing failings are the bras in my life, and the stack of mending and altering that grows without any effort on my part. Both #braugust and #alteritaugust live on Instagram, but that does not mean you have to contain your interest to that platform.

I'm not sure how evident my alteration work is on this blog anymore. I still do a lot of it, it's just not as novel or photo-worthy (that Sjoden top being an exception), and it's done as soon as I think about taking a photo. And how interesting are photos of things in the machine in process? Not much to me. But alterations are most of my sewing, either for me or friends or money from friends.  My thinking on this has moved towards preservation rather than refashioning. The main point is I want to see sewing bring life back to stuff, while preserving the original intent if possible. At the end of the day, it's just stuff.


Sew North started #AlteritAugust a few years ago, to bring back to life things she'd made or worn and get them back into regular use. https://sewnorthco.com/alteritaugust-2020/  This is positivity talking. Any talk of alterations reminds me of this series on Ikat bag, which really gets to the nut of the issue: 

http://www.ikatbag.com/2011/12/alterations-making-choices.html


Altering an item involves respecting it's making and its purpose. Ikat has a series of posts on this topic, but this one discusses why you might not want to. The purpose of alterations is to create new value and use for the current owner. If you can, it's good to retain as much of the original in the seam allowances (see Mrs Mole https://fitforaqueen.wordpress.com if you want to see this in action). If that's not a concern, respect the process and do it right. Take your time. Measure twice, cut once and only after heavy consideration. And if you do bodge it, there are workarounds, or maybe you're just going to do what you can and put it in the donation pile. Or salvage the bits and use them later.


Sewcialists has #Braugust, and they are putting out some goodness 
https://thesewcialists.com/2020/07/28/all-chests-welcome-resources/ reminds me that Melissa Fehr has put a lot of time and attention into describing her techniques. The post https://blog.fehrtrade.com/inspiration/4723/elastic-edges-three-ways/ can be summed up with suggesting  "A walking foot for your sewing machine. I cannot stress enough how much of a difference this will make to your activewear sewing success!" 


 I cannot sew elastic to fabric without failure. I was hoping for some advice on sewing  elastic to lace somewhere in this month. Lacking that, I am falling back on Nancy Zieman

http://www.nancyzieman.com/blog/sewing-general/the-absolute-easiest-way-to-sew-elastic-to-a-waistline/


There are a lot of sewing advice gurus, but if I'm sorting through a pile of results from a search on a sewing issue, and a Nancy link comes up, I go to that one first. She wrote so much, recorded so many programs in so many places, and she wasn't afraid to try something new. Even if I disagree, I learn something.

Sophie Hines, from IG Stories, Lingerie Sewing Tips

https://www.instagram.com/sophie_hines/
https://www.instagram.com/stories/highlights/17947844347182034/

Sophie Hines has a tutorial set in her stories on Instagram: Lingerie Sewing Tips. I'm sorry that's the only location I can find for it, but they are there. She uses a jillion pins. And she sews over them! Ahhh! In this tutorial, she has some of the best action shots of construction and sewing I have seen. She makes very simple advice make sense.


A happy discovery has been the Ginger and George LBB bra, specifically the YouTube tutorial showing how to construct one. 
because.....
There's No Sewing Elastic To Knit Fabric.
Is Miracle!
(youtube link)


This lime green is from Em's scrap pile (the ultimate in repurposing: giving someone else your scrap bag of leftovers), I only made one layer to check the fit. It's remarkably close right out of the box, using a couple of hints from the tutorial. I highly recommend watching the YT tute. It's a simple, clever pattern with few moving pieces that is easily hacked and altered. There are a trillion cup sizes on the PDF, which is layered to reduce vision strain, and has a guide as to which pages you'd need to print. 
There's a free code in the video for this pattern, but I liked this so much I GAVE THEM MONEY FOR IT. 

As it turns out, from reading all of these: what I need to do is this: 1) reduce the pressure on the pressure foot, 2)put the most stable layer on top while sewing, 3)match elastic to the edge of the fabric and the seam allowance and trim excess fabric AFTER stitching. I need that extra bit in there to make a stable seam. Last but first: I'm going to need to make samples to test different stitch lengths and needle types (and sometimes thread) to determine which works best for what I'm doing, so samples will be necessary from the scrap from cutting out my project.


And sorting out that tension
http://dragonpoodle.blogspot.com/2020/05/necchi-bu-nova-and-tensioner.html
We all make the same mistakes with where we think the tension has gone wrong. Dragon Poodle is here (second half of their post) to set you (and me) straight.
And you know I'm leaving this here so I won't lose it
Honestly, if the only thing I did all day was point you to their website, I'd consider it a good day's work.

Thank you benevolent scrap bag.