Showing posts with label button audition. Show all posts

Sunday, July 22, 2018

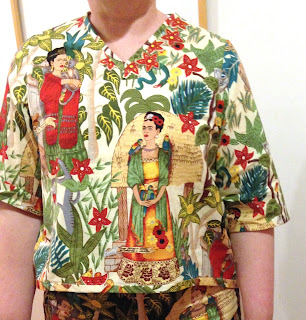
Going to call it what it is: the cutie


I don't know what else to call this dress.
sewn in 2002 or 2003. Not my first quilting cotton dress, but reaaaaaaaal close
It's cute.
I've made it over and over again. I've worn a couple of them to shreds.

I'm 5'2" (158cm) and cute was the default mode for many years. 
shakes head. I'm 59.5 in years, so that's less interesting to me than it used to be. 
I blew through making this one, so no photos. It's cute.

There's not much to say about this dress. It's drafted from my bodice block, and it has a front button cut-on facing, a 60-64" circumference tube skirt gathered at a slightly higher waist, no darts, short sleeves that have a pretty high armscye, and patch pockets.
For coffee 'go' mugs.

The pieces all run the same direction this way. Particularly if you turn this upside down. Or stand on your head.
The skirt needs to be about 60" plus wide, so it needs to be in two pieces. One seam is the center front, the other is sorta buried in the gathers. The whole dress only takes 1.75 yds of 40-44" quilting cotton. 

 I have been buying for this in 2 yard lengths to be able to match the fronts. This is needed more or less depending on the pattern repeat size. 

The Sewing Woes has a 23" inch repeat, which is a beast and eats up yardage. Luckily it's mostly on grain, so I'm not digging myself a deep hole for later. 
I cut one front, iron the facing over, and then match it up on the yardage.

 I use the front piece and match the center front line with the piece flipped, make sure it's got enough fabric for it's facing, and then cut that.
I clip a notch at where that front facing folds over on the top facing.

When in doubt, I leave as much space around pieces for wiggle room. I can always trim back the excess.
Directions: I sew the collar facings to stabilize that open collar curve ASAP.


Then it's endless fiddling with making the front opening match up properly.

Unfortunately, the printing is not consistant across the Woes yardage, so I had to choose what I needed to be perfect and what I could live with.

My acceptable error rate is ......uh, I'm no Peter Lappin. 

http://malepatternboldness.blogspot.com/2018/07/how-do-you-like-my-octopus.html

 The rest just follows: shoulder seams, sleeves, side seams, attach skirt.
I add the pockets last.


I didn't try to match the bodice to the skirt. Too many gathers for that to make sense

i did get to use the nifty selvage on the facing on this one.

Sadly, the buttonholes have become the problem child of the sewing room.
This is the automatic buttonhole when I follow the directions.


Lots of picking and redoing. 
It took me many years to realized I would be much happier unpicking and redoing, rather than shrugging and moving forward with the errors. I do thank Peter Lappin's blog for that; it is worth the effort. Until it's not.

I did hit the button stash hard for these. 

These magenta kids don't all match each other. This is probably the only thing I will ever sew that they will go with, so I went with them. The yellow will audition again, I know.
I do love pawing through the buttons. 
I might have a lot of them. This is only one jar. (the 'cheezy plastic button' collection)

The Dickies is for scale, until I realize the square they are on is one inch, thus scaled. The three holes have been collecting in this one jar, from all the other bags and bags of buttons from every thrift store and estate sale I've ever been to. Okay, maybe I have too many buttons.
Maybe I have just enough.
Sewing Woes is done and ready for duty. 

Sunday, April 2, 2017

Pullover woven shirt gets one last detail or two

The pullover shirt continues. 

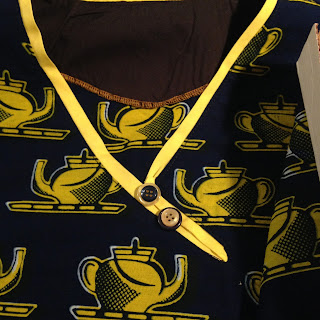
In playing around with the basic shirt, I did change the neckline.
 I needed more opening to accommodate the bad right shoulder/ get the shirt on and off over my head. 


It splits to the side.


The whole neckline is finished with bias trim, down that split opening and around.
It overlaps enough for modesty's sake. 

Did you know there are five different yellows in bias tape right now?

Opens enough to give me the stretchable space to pull this off over my head with little struggle.

The lengths I will go to in avoiding buttonholes...

 The process is a little easier to see in the second fabric version
I staystitched around the neck and down to where I'm cutting (also securing the facing, love a 2fer)

Clippin'

Bias binding around the collar and the placket


I sew over pins. I work on costumes for youth groups. I live on the edge, baby!
And I wear glasses, so eye protection!

I forced that bulge at the corner; a slight wearability fudge for gap prevention. One I did not need to do with this version.

The difference between the first blue edition and this gold dot edition is the staystiching I did around the collar. Because I had some stretching and distortion the first go-round, I made sure that I faced and stay-stitched the collar opening as soon as possible, while the work was still flat on the table. 
Yes, I have been sewing for about fifty years, but I have been a sloppy one for about forty of those. And most of the fabrics I have used have let me get away without such niceties.

Not the upholstery fabric jeans.

You see that bulge below the yoke on the left side? That is a result of the crotch seam stretching out on that piece almost two inches from being handled and not staystitched. I cut the seam back and the interior stretched out fabric had to go somewhere. 

That bulge didn't show up until I put the pants on and took this photo.

I cried.

So staystitch already!

On reflection, I think I want a facing behind the opening (sewn to the upper flap from behind) because I really am about as modest as you can imagine)


I could have hand stitched it, but I'll be honest: I am an uneven hand stitcher. I would rather have the tiny errors with a machine than the overall uneven effects of my handwork.


I made a covered button and a tiny bias tube for a loop.

I did make enough bias trim to hem the whole gold version; it's a reversible woven dot shirting I got at District Fabrics. Where all the good things come from!

Okay so this one goes the other way


The print asked me for two tone button stacks. This is where the big jars of buttons come in handy.

Many auditioned, few were chosen.
The bias tape is pretty stiff and unforgiving on that corner turn. Needs work with a screaming hot iron. Or just cover it with the button.
This was the first version, back off!

And no, I'm not modeling it for you until I remove that unfortunate bias trim that slices me in two in a really unfortunate spot.


The other thing I did relates to the widening I did towards the bottom of the 3/4ths sleeve.
This is the version with a contrast bias hem. My hand is not that color. Really.

It made it easier to take on/off, but felt too open at the hem
So I folded it over a little and stitched it


It hits just below the elbow and looks pretty good. And allows me to use the selvage at the sleeve hem (from the nifty wax print I got two yards of at Seattle Art Museum's gift shop).

Finally, some successful sewing! Now let's go make more horrible mistakes!
With a raincoat!