Showing posts with label burrito facing. Show all posts

Wednesday, March 9, 2022

Second Shirt, with variations

 Doug did buy fabric for two shirts when he was at Mood.

https://erniekdesigns.blogspot.com/2021/12/new-shirts-new-fabrics-not-for-me.html

I traced this off last winter, and made the long sleeve that I knew I would need for this version, with long sleeves and cuffs.

I barely took photos cutting this out. Here's the box. 

I was busy watching Devil Doll on Svengoolie. A very creepy film.


During the spare time waiting for my awful exam results, I did some sewing together of things

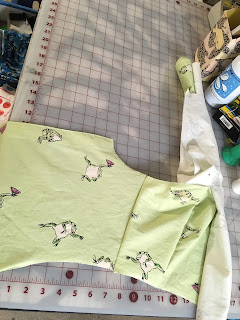
the burrito method is magic
one version here 
https://erniekdesigns.blogspot.com/2015/06/burrito-roll-facing-trick.html

You just have to roll the entire shirt into the gap inside the yoke. Do this before you add the pocket or the interfacings or anything bulky.

It's just so nice looking when it comes out.


and this is where we are for the  moment, as Accounting 120 is KILLING ME.

There never have been enough hours in the day but this is getting ridiculous.

And while this is on the table,

I am in discussions with Doug's eldest child, who is planning an August wedding

"Ultimately I just want to be really comfortable while still feeling like a pretty pretty princess."

Well, YEAH. I think we can have it all here.

So it begins (each and every one a etsy/ebay purchase)
There will be more on this topic as things transpire.


Thursday, December 30, 2021

New Shirts, New Fabrics, Not For Me

 Doug wants a new shirt

Doug went to New York with the bride and they went to Mood

Doug brought home fabrics and buttons.

Took new measurements, they aren't much different than three years ago

and traced off new pattern (because I just can't find the old one) from Simplicity 7030, mixing Small Medium and Large pieces

His wrists are smaller than mine, and he's a foot taller. Go figure.

The other shirt will have the long sleeves and cuffs (roll-up able)

Checking length - I traced the entire pattern this time, for future reference.
 Checking seams on the floor (also walking the armsceye)

Sewing action shots: 
the obligatory sewing the yoke/burrito facing roll

And a partial unfurl

Buttons. I like these better on this shirt, but I'm not the boss here

These are the buttons for the other shirt, but the same size. SO I trimmed one of the buttons down for the collar, just to see if it would work.

I need to reshape the sleeve. It should not tent out like that.

Needs a little more in the back. 


And he seems pretty happy with it.
The black buttons look fine. I will figure out how to work on that sleeve tenting out like that.

If you work with me and were wondering what the entire box of cookies I got for this work had in it:


Because the ex ate half of them overnight before I could bring them all in.


Sunday, July 28, 2019

Seamwork on YouTube

https://youtu.be/mkA4cX9vdx4

I am pretty sure this was the OH YASS, fist-pump moment.

I give Seamwork/Collette Patterns endless crap, but this is a great video. It's clear (they used two very different fabrics to illustrate) and concise. You do this in two passes, one for each armhole.

Bring your own popcorn.

And then I kept watching their channel.
We have a less than clear video on bias layouts
I can stop you right here and say: hey, go read this post next week:
(the one that isn't there yet but it will be)

https://erniekdesigns.blogspot.com/2019/07/bias-theory-would-look-better-with.html

However, let's say hello to the instigator of the next several blog posts


The problem starts here:
https://youtu.be/cjqqxM0H0iA?t=199

Each fabric has two biases.
She does not explain this.
But it's true. If you don't match the seams properly, the item will twist as it hangs out/gets worn
this is wrong

this is also wrong

It's important to get this right when you're laying out your pattern pieces.
And we are finally going to get to that next week.
I've been working on that post for about a year.

On the other hand, if you are up for a different approach to the subject, 
Paukshte Fashion Workshop is worth a look.
https://youtu.be/MuTCjRyDHpQ


I have to admit that I love this woman's slash pattern altering, as well as how she cuts out the pattern piece by folding the fabric. It's probably distorted, she didn't line up the selvage and the cut edge evenly,   she's using that fabric so inefficiently,  but DAMN she just gets to it. She eyeballs it and goes for it.

It's kind of the action film version of sewing. 
Gawd I'm looking forward to this movie

But the thing is: because it's on the bias, those little squiggles and snips will hang right out. It's an amazingly forgiving construction.
If it only stayed still.


And then I remembered I was going to watch the Charles Kleibacker videos.

But let's go to the tape with Charles Kleibacker


The next several blog posts continue this thinking. 
Stay tuned.


Monday, May 9, 2016

The Burrito Facing Trick Gets A Threads Video


In the recent Threads 185, they have a fine article explaining how to draft an all in one facing for a sleeveless top.

And now they have a video demonstrating how to install both kinds.

You may recall previous blog post


This is much nicer by far!
Both versions! (the first is appropriate for turning a vest and lining, as well)

I do love a well-shot video.


Wednesday, June 3, 2015

Burrito Roll Facing Trick

I am all about making shells to wear when it gets hot. And I weary of cutting and sewing facings. I like an all - in - one facing, and I like it cleanly done.
I also love a sewing trick.


I did not invent this, but I did want to illustrate it with more distinction between the inside/outside, facing/fashion fabric sides. 


I used a black fabric and a red fabric; it seems clearer which face is which, as if they were four distinct prints.

I've used it on a couple of things, but the fabrics have no real photographical right and wrong sides. The photos made no sense.

So I made a little model version.

This is photo heavy, and I repeat the technique on the second side, in case the first was not clear enough.

  You would first sew the front and the back pieces to each other at the shoulder seams, and then press them open. I skipped the shoulder seam part.  And any interfacing. Sorry.


Right sides together, sew the neck seam.


Grade and clip that seam.

This is where you'd understitch the neckline seam to the lining.
If you do that sort of thing.  I'd topstitch later.

Turn right side out

Roll up one side of the item towards the opposite armsceye

Rollin'

Flip one side of the shoulder piece....?  over your rolled part

Roll the other over, to make a tube

I flipped it over, matching up the seam edge

Make sure when you pin that seam that you aren't catching any of the rolled up part


Pin for the win!

Okay, my side seam on the left looks odd. It will match up later. Really. The point is to get the armsceye seam edge to match up right now.

Stitched down

Grade and clip the seam

And here is the act of faith: open it up at one end and pull it through.

The clips show where I'd put my pullin' fingers if I weren't taking this photo right now

Looks weird....

And it works. Dang!

Halfway there; we continue with the other side

Roll up

Flip rolled part to center

Fold over and line up, stitch, grade and clip the curves!

Open up an end

Commence pulling

Don't rip it

Just work it out

I left the clips where they started, to give you an idea of how confusing this could be. There used to be a section of the ACTs that used to test this mental skill. 


Now what I SHOULD have done was make the facing part a 1/8" smaller, so that when it was all lined up and turned out, the front fabric would be favored over the facing. This is something I never remember to do ahead of time, so I fake it with the ironing.

Sewing up the side seams; open up the armsceye seam so it's flattened to sew across, front to back in one seam.


Iron the side seam open

From here it's up to you. Topstitching or not.  I didn't make one part the facing and one part the front fabric (a bit of stunt sewing on my part), but clearly that works.

This wouldwork with a heavier fabric and a light lining.  It would not work with something stiff, or with a really narrow shoulder.  It is similar to the vest lining technique I used back in Plaidness, and the Yoke Burrito technique, as demonstrated by the lovely Peter Lappin on his blog Male Pattern Boldness. If you can turn a tube inside out, you can understand and do this, too.