Showing posts with label tracing paper. Show all posts

Monday, December 11, 2017

Mystery Long Sleeve Shirt Fail, Success, ?? We'll call it a draw

This is what I thought the pattern was.


This is the setting I use for knit stitching.


Tell tale shoulder seam is not a vertical seam feature
This is what I ended up with.

Kids, get a good night's rest. Sewing is not a race! Don't make jokes about the Kessel run on Instagram and then sew tired!

Don't be ME.

So we go back to the shirt that works.


Turn it inside out.


No, it's not the right one. This is the pattern for teen boy.


It's 1/4 inch too small at all the seams.


So we trace another pattern off the one that works.


There's paper and pencils and a straight edge


I'm only going to trace half the sleeve


So I'm going to mark the center line extra nicely.


And to trace the seam edge on the top of the sleeve, I'm using a tip from KD King's playbook and use a wheel and tracing paper..


Place the waxy tracing paper between the item and the paper.


Use the wheel to trace the seam


And lookit! That nice red line is the seam.


Add a seam allowance and fold over and trace the other half.
It may not be perfect but it's symmetrically not perfect.


And label the pattern pieces properly so you can find them again.


The less I say about my knit Mystery Food experience the better. 
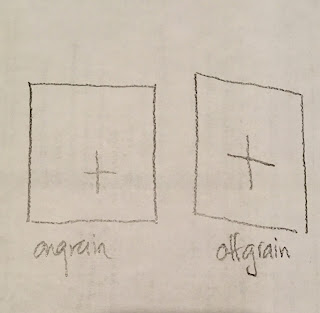
Both pieces were printed on offgrain fabric and I wasted a couple of hours trying to grain them up. I ended up cutting out the pieces on a single layer to get them as close as I could. 


I tried the 'fold and hang'. Nope.


This is truth.


I have a million photos just like this one.
The story of my life thus far


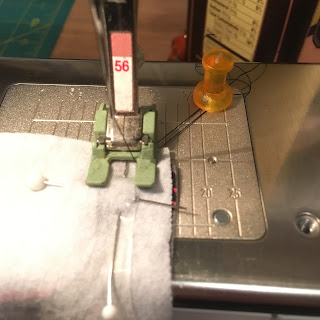
Used the 'put the magnet on the threads' trick to get it started. Yes, I'm using clear elastic in this shoulder seam. It's tricky to get started but it's worth it in the long run. And yes, I am about to zigzag over a pin and across another.

 Sewing over pins is my danger zone, baby!


Sadly, the fabric breaks white. Dark printing on white knits will do that where it's stretched.


This the back collar join. White fabric shows on the stretched fold. Le sigh.

It fits. The collar is twisty, but that's operator error. I wanted to get it done in time to wear on Thanksgiving. Which I did.


With a slight alterations of the armsceye to be able to raise my arms, I cut a second version from my Precioussssssss Liberty knit


I did use the art clips/bulldog clips to grain it up. It works.

But when you wash it, this is what happens if ifs not ongrain. And the folded hem is only off a very slight amount.
IF you click on this, it becomes a monster sized photo of epic panoramic fail. One of my better panorama pix, though.


And I did make one more, from the Art Gallery lemon knit.
Which turned out well enough, but it washes me out.
I may pick the collar out and add a contrast bit in there, but we'll let it be for now.
I would add a photo to show this, but I am experiencing technical difficulties and can't upload photos until I get another hub. Twentyfirst century first world problems; the big pc has shorted out and the only reason why I still have any files is that I backed it all up and kept it on backup.
I had to copy this from Instagram to load it here. Until I get back to the 21st century, I won't be posting a lot. Luckily I have a lot of sewing for presents to do.

Tuesday, December 1, 2015

Dignified Pullover Garment: Japanese Nested Patterns

No, I still don't remember where I heard about this book


I am glad that I did order it.


This is the stuff I need


This is the shirt I am going to make.
If you have ever traced off a pattern from a nested page, you know how frustrating it can be. It had better be interesting enough to make the work worthwhile.


The diagram of nested pieces is on pattern page 3, and their relative locations on that page (relative to each other that is). 


The piece shapes are good to know, as it makes it a lot easier to figure out if you traced all of it. Or too much of it.


I do not know what the numbers on the tech drawing refer to. They do not refer to the instructions, which are very very brief.

I don't want to draw on the pattern page, as I will reuse this page and may eventually sell or trade this book. So I want to find a way to indicate where the lines are before I start tracing, so I can see the whole piece beforehand.

After some pondering of household items, my gaze fell on a penny.
I do have a lot of them. They are small, flat, and they stay put.


The pieces are indicated by their pattern letter (L in this case) and a little line to the line you're looking for.


See the rectangle, nested in with the other pieces? I fingertraced and left pennies until I got all the way around.

The letter codes go all the way around the page. So I went around the page clockwise, tracing them one by one. Even the ones I was pretty sure I wasn't going to use.


That's a rectangle, with a rule on one edge ready to go


Some were a little less specific which line. I had to go back to this one to find the piece I was missing at the end.


That's a sleeve


That's a tailor's mark. It's very easy to miss those with that much going on, but I got the ones I needed.


When I was tracing, I used a rule as often as possible, and rolled the paper over the pennies, flicking them out of the way through the paper once I had found the line.


At this point, I would urge anyone who is interested in nested sewing patterns to do a dry fit of the pieces you have traced. They may look like the pieces in the diagram, but this is where I always get 'bit'. The large square piece ended up being two inches too wide to fit. And the whole thing would be a dress in length on me, so I left off cutting out the bands at the bottom.

Most importantly, the sizes do run notoriously small. I cut a large (from previous hard won experience) and my 38" chest just fits comfortably.  I read no japanese to speak of, so the measurement table made no sense to me (largest number was first, then middle, then smallest last. I guessed the largest would probably be the hip. It may have been.)

This is really a lot of work for a pattern. If it's just another shift or a tshirt, I wouldn't bother tracing it out, I'd steal the style features and adapt them to an existing pattern I already have worked up.

The actual sew is very quick, maybe an hour. It's just big pieces that don't have to be lined up precisely, and the interior finishes can all be serged.


left off the bands and the cuffs. I'm short

Next post is the construction and breakdown.