Sunday, April 29, 2018

Mamma Mia Super Trooper

 So one of your most dear pals ever asks if you think it's possible to make some costumes in two weeks.....you say yes.
Even if you have never seen Mamma Mia.

Yes, I pulled this off the internet from my Pinterest page. No, I don't know the actual source. I am really really sorry, but this is the best trio shot I can find.
  
There is a lot of shiny spandex here.
We need to do some research.
That Melissa knows her stretch stuff.

I lost a lot of photos for this about fifteen minutes ago, so lucky for you we're keeping this closer to the points I want to make.
The toughest part is getting reality and hope in the same room. 
I put my grown up voice on, 
I measured people and made them choose what they wanted, which features and which persona.
And for once in my life, I made a croquis to make notes on. Yay Organized Me!
And a rough outline of where the shiny bits can go. 

I wanted them to look unified.  Let's be honest: shiny spandex is 24$ and up a yard. And we're talking about a lot of yardage.
12 yards of lots.
This is a one night costume party set of things. The goal is: look sharp, don't fall apart, don't cost a billion dollars.
The original costumes are on display
https://www.pinterest.com/erniekdesigns/mamma-mia-costume-board/ 
has a bunch of links.

My point for all of you about this: a budget is a great inspirational tool. If all you can afford are your old socks for the ant puppets, you work with those socks and make them the best and cleanest socks you can find. And many some pipe cleaners from the craft store.
The client's happiness is your goal. Making them happy, staying in the budget, getting the most for your buck, and getting them to talk you up to their pals.
So. 
Fabric. 
Local options are limited.
No Joanns had a color they wanted, that I could afford that was in that quantity
So Harts Fabric  was called in. Bless that flash sale! As ever, they rocked it. They responded within a few minutes to an email series about weight and stretch.
And shipping.
Thanks kids!
12 yards is a lot to manage, so I rolled it up on a tube.
So those blue handled scissors are from the 'five in a bundle' pack at Joanns. And they power through everything. Better than any other scissors I have in the arsenal, even the 'fresh out of the package' Fiskars Titanium. No, I didn't try the Kai's on this, are you NUTS? They are at the bottom of the rack display, in the lower corner. Two years of heavy costume abuse and they Do Not Quit. I badgered a guy into buying them today, and as he checked out in front of me, the clerk pointed at them and whispered "these are the good ones". I know, I made her buy them a year ago.
This Joanns Glitterbug sequin fabric was $10 a yard, and friends, I did not leave any for you. I went back twice for more. The third time, they were out. 

Drafted and altered three people tops and leggings.

Originally zip tops and pants, turned into fitted t-shirts and leggings.

I know, you didn't focus on the big armor collar on "Space Commander"
Mocked it up out of paper, cut a pattern of cardboard. Not heavy enough.
This gets cut out of unused EVA foam and covered with the sequin fabric.

It has a tab on the bottom to pin it to the shirt, so it won't smack her in the face

White glue that didn't get smoothed out enough. No one is getting close enough to see this.
No photos of poncho. I did a flat collar band of the purple to keep it from poking her.
Actually tried on the sleeve pattern to check for drape depth.
Did I mention that I made muslins of junk knit fabric for them to try on?
I did! Yay Organized Me!

I did not find enough of this to make full leg cuffs/boot covers of rainbow stuff, so I put cuffs on shiny netting, also from Joanns.
I would like to thank the Joanns employees on Aurora in Seattle for helping me dig into the remnant piles to search for more. No dice, but thanks kids. 
This was the secret hotel room preview. Lookit them shiny babes! I have LOST the video of this dance routine. Nooooooooooooooo
On my way to deliver, I heard that ABBA was back in the studio.
Coincidence? NO.

I did buy a little for me. Cause a pink sequin hat is going to come in handy sometime.


Monday, April 23, 2018

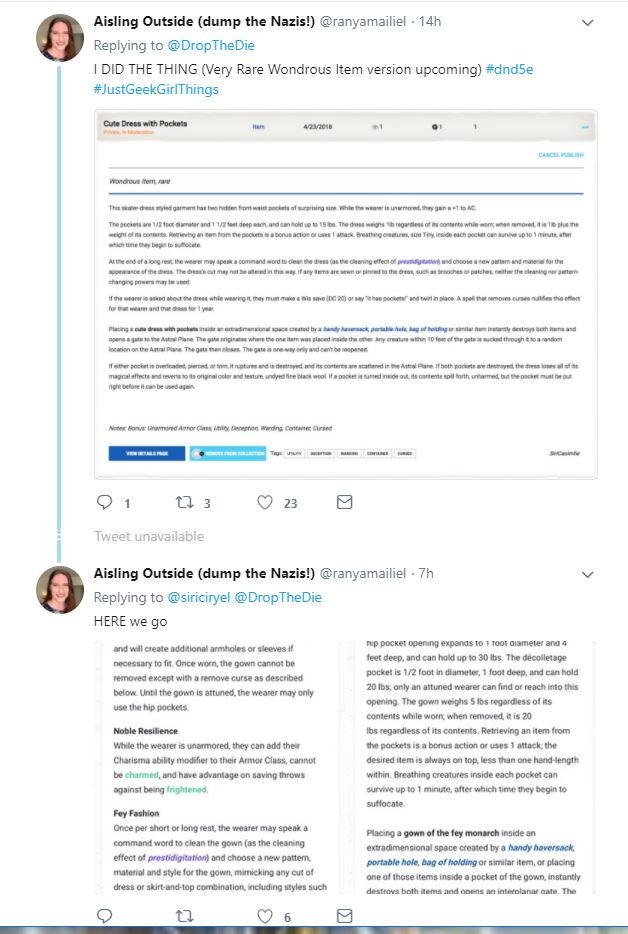
Magical Pockets on Twitter

https://twitter.com/DropTheDie/status/988410296426516480

The greatest Twitter conversation ever!

(click on stuff to make it larger if you care to read more)


I particularily like that the dress weighs five pounds regardless of the contents while worn. I wish I had this dress.


Sunday, April 22, 2018

ATATAC Pod Jacket Resizing potential post four

I get a better idea of the actual construction from the faux 3D image


The measurements for this pattern printed at 100% are these:

back width 16.5"
front width with plackets: 
sleeve at bicep 14"
neckline to back hem 29"
neckline 
A lanky man's jacket.

I could widen the front piece by extending the top and the bottom right flaps. By extending the bottom one, it makes it taller, and the upper flap gets shorter (leaving the same front flap height altogether).

The whole body gets wider if you slash the piece from the neckhole to the back hem, and just redraw the neckhole over the final piece.
The whole piece can be slashed and widened at that green line to make the arms wider.
You would have to carve more armsceye out for that extra circumference, but when you take this all into your brain, that would be the easy part.
widen front flap

widen back and front flap

And of course, if you need it to be longer, you can just drop the hem. Or drop the cuff for longer sleeves.
The only hitch in this is keeping the seam around the sleeve at the elbow. That sucker is going to hurt in the wrong place. And making the whole jacket shorter may involve just scaling down the whole jacket (printing at a smaller percentage than 100%) and going back to widen parts.

Such as: how? Huh? 
Okay. The back length is 29, I only need it to be 21.
21 / by 21 = .724
73%

No. I've done this before and it really does not work; remember that spiral jacket? It's dimensions are fixed because geometry. And my puffy lady arms are just not ....never mind. I have other things going.
Speaking of upper arm bicep adjustments......

At this point, I gotta be honest. I have a costume job I'm working on, it's a hoot and a half and full of sequins, I want to write about it, my phone is full of photos about it. It will be done and ready next weekend. 
And I still haven't finished my raincoat.
I really don't want to work on this. 
You don't want to read about it anymore.
I don't need a jacket right now.
Bring on the glitterbug fabrics!

YESSSSSSSSSSSSSSSSSSSS

Thursday, April 19, 2018

ATATAC Paper Doll Preview. post three

if ya click on the photos, they get bigger. Or you can slide on by.
Continued.

I have made the spiral shirt from CFPD, so I think I know how this is going to work.
https://www.centerforpatterndesign.com/patterns-1/cb-spiral-blouse

Because of all this, the sleeves make a certain level of sense to me out of the box.
And look at this striped version. The stripes run vertically. They are horizontal on the sleeve, and you can see a curved seam on the bicep, left of the pocket.


This is the time for the tiny paper model.
Copy

Print

Cut out

Add grain lines

Start goofing around.
Where is the neckline? Make that look like a neckline

And use the marked pockets as guideposts

Folding

The seam goes around forming the armscye

Which will keep winding to make a sleeve tube

With a really high armhole. Which is good for mobility (remember those flamenco sleeves?)
Your flexibility is going to come with your fabric choice I believe

And it works

Paper is not very flexible

One side folded, one side flat
Marked up the match points
and put them on the copy in the computer.

I love Paint. Don't take it from me, Microsoft!

So it will work. The front placket area looks to be a little less than the model shows (it barely touches). So I will do a little more goofing around with paper. And then a slightly larger fabric model. I'd really rather fiddle around with dinky seams and tape than scale up too early and curse the time I'd wasted.
And then there's that 'can I size it up?' issue.

But that's another day.
Further!


Tuesday, April 17, 2018

ATATAC Now that I have pattern pieces, what am I supposed to do with this thing? post two

I have a lot of pattern pieces. And free time.


Guess I have a book to read
http://atacac.com/book/index.php#index

Click on the internal links: this 'digital' book is a treasure trove of information.

http://atacac.com/book/chapter2-5.php
If you go through the entire chapter, you will have pretty much name checked every flat pattern designer who doesn't work for SimMcVogerick (will work out a good name for the Big One sooner or later). 

And to quote verbatim: 
"A common denominator between these cutters is that they emphasize the pattern, itself, as a tool for creation. By experimentation and transformation of patterns, either through block patterns or other shapes, they find new shapes and ways of designing for the body. As Roberts (2008) notes, one problem that may arise is that the garments may end up as walking patterns that have little to do with the body wearing it." 
(chapter two, page five, bottom of the page)

The Demented Fairy can vouch for that one
https://thedementedfairy.wordpress.com/2018/02/26/a-subtraction-addition-but-not-yet/

How to wear, how not to wear?
So will I get something I can assemble, and even more fabulous thinking: alter to fit me?


Sunday, April 15, 2018

Atatac Pod Racer Jacket PDF Friday Night PARTY post one

L'Etoffe Fabrics put this link on their spring email.
https://shop.atacac.com/collections/sharewear
And as always, clicking on the photos makes 'em bigger.

And so I clicked and there goes housekeeping this week.
And now I'm sharing. 

Interesting shop and design company.
http://atacac.com/company/

Trying to make wearable digital design, with some visual wit and maybe toss some TR flavor on the mix. 
Even if you have no interest in their product or the rabbit hole you KNOW i'm wandering into, that description of their business and their model is worth five minutes of your time.

Where they are doing with this technology
https://www.clo3d.com/

There are no instructions. 

There are some clues, and a digital book of inspiration
http://atacac.com/book/


It's free. I have some free time. I love an adventure! Let's jam!

The pattern sheet is one big picture. I will need to print it out in tiles/pieces 

Eighty pages. 
Next time, I'd do a screen capture of this small gridded image for reference.
Eighty pages can go wrong so fast....

Don't judge me on my printer. It still gets the job done.
You want the cut marks. If the paper misfeeds (and it will), you'll need the marks to line stuff up.


Eighty pages. 
And I have to stand there and catch them, because the catching box is AWOL.
Who recycled my box?

I use paper from work and home that was just printed on one side. Most of it is dead stuff from the fax machine, some of it is stuff that my boss just is too thrifty to recycle. I used to get this from a pal in a real estate office. Nothing sensitive. Lots of boilerplate. And I thank them all from the bottom of my PDF printing heart.

I did a print of the whole pattern layout for reference.

and then I marked it up when I went through the printed pages, to give myself a sense of how pages will relate to each other.
That previous screen capture shot would have been a good idea......

I taped this in strips, starting with the bottom row and working up.
Those cutmarks are tiny but clear.


overlapping action shots


and laid them out on the floor
while watching superhero tv.

Okay, back to the floor show.

You don't want to tape them down tightly - you will have to wiggle them to fit to each other. And a ten page strip has room for a lot of error.

This is only half of the pages.
The floor is disappearing. I will have to cut this up into sections.
The big piece in the middle needs to stay together, but everything above that are smaller and can be assembled on the table. and my back is killing me.

Cat in upper right for scale 

Ant for scale. That was the rest of the day. 

That's the big piece. If I try to fold it up, it will rip.
I get these big upholstery tubes at Pacific Fabrics by crying.


After the big piece was assembled, the smaller bits can be cut out and taped together individually.

Doesn't it look like it fell apart on the floor below?
Now I need to know more about what and how this goes together
https://shop.atacac.com/collections/outerwear/products/pod-driver-jacket-1
the 3D viewer is at the bottom of the page and rotates
Clicking makes this readable. European Tuc tuc drivers?

The pockets are on the side that is not under the safety belt. There's a safety belt in a tuc tuc?
DAMN. I like this thinking!

But what are all these parts I've been cutting out? How many welts does a pocket need? Couldn't they be one piece, repeated?

After staring at the 3D model in rotation, and looking at the way the lines on the body reveal the grainline, I think I have it. And I will have to put it on the form to see how those sleeves work. 

And those u-shapes? They are the bellows for the cargo pockets. 
We have to stop here. Yes, this is a series. Yes, it will continue this week.