Showing posts with label pocket. Show all posts

Sunday, March 15, 2026

Slip Stitch Patch Pockets


I have been poking at this post since November 2025; work and life have been in waves of upheaval.

And the illustration disappeared and I had to redo it.

Sandra Betzina is a guiding light in construction techniques, in addition to the other talents she possesses. 

https://youtu.be/Zzu6uW8RkYw?si=zdPuOveVkToSOv0-

The subscription website no longer exists, 

There is a DVD with this technique out there in some library systems, but it is out of print. 

The preview is:

https://www.youtube.com/watch?v=T-QDfg6J9AU&t=135s

I have watched it, and this tutorial is based on that video. I would link you to the video if I could. I am being a little vague here on purpose.

The key is making a cardboard template. To trace around, to iron the edges over onto. Cardstock, cereal boxes, corrugated is too thick.

Click on this image to make it too damn big and legible.


I cut out my pieces the same size and trimmed and eyeballed them to a pleasing proportion of 'how much fold over of the outside fabric I could spare'. 
I didn't have much to spare. These pockets are a little small for my purposes, but they will hold a cell phone until I am forced into a larger phone.
(pocket sizing is another post for another day)

I  am tracing the sewing lines onto the lining fabric.


I have machine stitched the lining part to the garment and am ironing the seam allowance in to the inside.

Using the cardboard template

I held the slipstitching edge like a sandwich in my left hand and slipstitched with my right.
Yes, there were hand cramps and I took breaks. 


What the stitching looks like on the inside of the garment

What it looks like on the outside. I do not have enough of this fabric to match the print, but you could.


All hail the genius of Sandra Betzina. I claim no invention, I am just executing her well considered instructions. 


Saturday, January 23, 2021

Pattern work: Pants Regraining

Those legs are off grain. And I thought I fixed that. Needs fixing more.
These are the one piece pants, the ones previous to the red ones, which I am giving up on. Look at those lower legs; the inside seam comes back towards the center. And these are better than previous ones. That inseam is curving in.

Pencil is the old grain line. Was I on drugs? No, but when I turned the one piece pants back into two piece pants for the red pants, I didn't correct the grain lines. And here I am, correcting.
 
I pinned the pieces to the folded over board to keep them lined up when I redid them.

I love love love my folding cutting board. It's not entirely accurate in measuring length (the fold sucks up some distance) but I can pin pieces to it with pushpins, I can use clothespins to secure the fabric to the edges to grain stuff up....and when one dies, it becomes very useful cardboard for projects and at least one kid's trifold project display.

And here they are

Black is still hard to photograph, but those ankles are straighter. Such a flattering photo!

You want to see a great pocket adjustment on pants?
https://www.sewinglikemad.com/2019/08/bob-woven-pants-by-style-arc-pocket.html
Mmmm hmmmm!

Meanwhile, I am pounding accounting into my head

More next week. I have notes to take.
And 'journalizing' is not a word. "Posting to the journal" will do.


Sunday, February 11, 2018

Double Welt Pockets and Coats

When you put an exterior pocket in a raincoat, you make a rectangular hole in the part that keeps you dry.
This is a double welt pocket. Peeking!
Helly Hansen rubber raincoat double welt pocket outside. 
The extra outside flap covers the normally directional inside flap, 
making a double door for your hand to go through, preventing water from pouring in.
Also keeps stuff from falling out.

And now that Seattle has downpours more than it has drizzle, staying dry is a key element to consider.

I love that red Helly Hansen jacket. I wore the first one out.

In making a new coat, I stole the pocket idea from the old.
The disembodied hand in a phantom pocket. Or, it's going in and down.
I measured my hand for size of welt. Six inches is not big enough for model hand.
The pocket bag is very big. It got smaller but if I needed to shoplift a couple of goats to go with the cow, I'd need all the pocketry I can get.
Now, it is important to mention that like handbags, the increased size of the container means you will try to carry more stuff. People hand you stuff.
I don't want a bottomless pit. I want to make sure I can touch the bottom of the pocket without leaning into it.
Essentially, I pinned the pattern to me, and put my hand where I expected the pocket to open and how long my arm reached. And that's where I marked the pocket location and it's depth.

G is for green material. Or go. And this is not a double welt pattern. 
Miyake patterns have a billion self welt pockets, it's how I learned to make them.
Since this was going to be a double, I needed to make a paper one to play with
Seven and a half inches opening width. BIG model hand with a wallet in it's grasp. We forget about that aspect, the holding and insertion and removal. 
The red X is the opening. The folds are TWICE the width of the opening (that purple rectangle is the width measurement), plus a touch more for turn of cloth. You can always fudge it back, but it's hard to make the folds cover each other if they aren't wide enough.
Those skinny little grey lines in the flaps represent where the interfacing should have gone. They are grey for failure.

Nevertheless, the great thing about tracing paper is you can see previous lines and trace over them or ignore them, as you need or not need. Grammar much? Anyway, I made a model on the lines I drew on the front pattern piece, goofed around with it,  drew it out and trued it up on the grid board.

Yes, the pocket bag is huge. And it needed an extension to the welt facing to attach the other side of the pocket, thus that longish rectangle with the letters on the side. 
Sewed it down on the long edges of the opening. Not the ends. That happens shortly.

Cut it open

Cut the long triangles
Flipped it inside out and poked those triangles through and folded it up.
This is where the extra flap direction needed attention and a good night's sleep.
It is sewing a car.

Sewed those triangles to the facing to keep the whole little welt accordion together
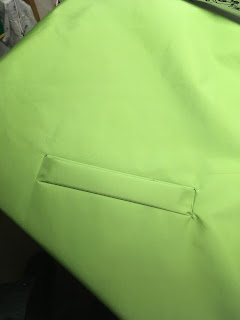
The welt will stay puffy. I didn't want to punch more holes in it by topstitching, and I did not (IDIOT !) put two sided tape in the folds to keep it. The fabric will not hold a press. This was a mistake, don't do that, put interfacing and doublesided tape in your pocket welts in your raincoats. These are mushy welts. They should be crispy.
And perfect is the enemy of wearing this coat in the season it was intended for.
Now this is where things get fun. This enormous interior pocket is only attached at the welt, and it is going to get heavy stuff put in it. My hands for a couple, probably a phone a wallet whatever junk someone hands me to carry.....
it needs support.
I cut an athletic non stretch mesh piece for each front piece, sewed the top of the pocket to it and attached it at the top seam on the shoulder and the collar. The shoulder will do the heavy lifting as usual.
Yes, that's a chunk of teal colored plastic bendable cutting board from the kitchen. Yes Threads paid me $25 for that hint a few years ago. I can say they are very very useful for working between layers. Irons melt them.
Don't iron them.

And hung inside out on M'damn, there it is.

Winter came back this week. I would like to report that in addition to it's great capacity for cow lifting, I can wear an entire down parka under this coat and have room to spare. And it is very waterproof (so much so that rain drips down and hits the backs of my legs. Hint to self: make the coat hem lean out, not curve in). 

Sunday, May 21, 2017

Raincoat Is Mostly Done (mug shot edition)

It's not going to rain for awhile.
I just look sooooo excited, don't I? Flattering angle, great lighting, happy face...

Which is good, because I need to put this aside for awhile. It needs more than I can give it right now. It's sucked the fun out of me.

I do think this raincoat has a lot of promise. 

It fits. It fits over my enormous sweatshirt and the big sleeved Miyake shirts. It covers my backside. The sleeves are long enough and I can raise my arm. I put in useful pockets at just the right points.
It will take a very rainy day. It has reflective bits and a visible print. The hood will stay up but the jacket isn't hanging from my head.

It just took so long to get here. Every step has taken a day of thinking and rethinking; I'm running out of time before I'm working full time and have 'pace around and change my mind' time.

And I need that 'pace around' time for the big projects.

I did not cut these pieces out. I redrafted them. Twice. But I did start with that McCall's jacket (ended up raising the sleeve angle so it was more straight across)

See, the shoulder seam has less of a slope to it now

When I got it on the table, it was offgrain, but what isn't these days?

Fabric Fusion won the seam sealing contest

The nylon can be ironed.  And if it had a weight on it overnight, it would stay pressed. Mostly.

Mostly.

I put a little horsehair braid in the seam at the front of the hood. That hood needs more overhang at the forehead.

Things did not line up perfectly, but I didn't expect them to. Four foot rule.


Numerous zippers: side hem seam. Put that curved line down at the bottom and the side rather than the top center of the coat. At least I don't have to look at it all the time.

Outside welt pocket. Got most of the puckers out.

Inside pockets with zippers pointing the right way for easy access. This is one point where I learned from the mistakes on other coats. Also learned from the black coat: I put mesh in the sleeves and shoulders; it's a nice slippery one that won't get hung up on shirts, and isn't sticky or clammy on bare shoulders and arms.


I wrote out directions, I made construction notes. I  worked stuff out ahead of time. There were a lot of layers to think about.
I even added a thin mesh layer in the body, to give it a little more substance. Which will make it more wearable in the long run.

I drafted a pattern from patterns, I made the pieces fit, I tested it numerous times, I'm pleased with the IDEA of the coat, and I will wear it. 

I wear that black raincoat, for example. It has its charms.

I do have to add the front zipper and the placket flap, and the hood is going to need a visor. I can pull it over to cover my forehead, but it won't stay.  So kids, that Oregon hood needs an extension on the front center.

But the seams are puckery. I undid a lot of them and redid them, but there's still a incompatible materials tension/stretch issue there. The Bernina badly needs a tune up, which does not help the matter.

The curved hem on the upper sleeve piece needs a facing for it. And I just got...tired and used bias tape. I can go back and redo that properly....but not today.
Once you see the rippled hem, you will never unsee the rippled hem

There are about eleventy billion things I can identify on this that don't work very well. The fabric is charming but it's not raincoat material; it would make a helluva set of tote bags. 

But it is one thing I like: it's not anything for a funeral.

Although the expression on my face implies that I am going somewhere unpleasant, I am not

I will finish it and wear it and refine the pattern further.

Because I did cut a winter lining for one. Because I am really tired of that damn purple coat. Wearing a school color in a university town is tiring. And I graduated from there. So did the spouse. And the boss. And all the friends. Because UW Daily RAWKS. 
But I live a mile from it.
When I am old, I won't wear purple.

I do not look upset with this

And I quilted it.

So this will continue. I just need a break for now.
I have novelty print pants to sew. 
Lucky for you, I can't find the photos right now.