Sunday, September 30, 2018

I love mending and amending. But mostly mending.

I love mending. I have a closet of clothes I made over decades, and I delight in the whole cycle of life they have. Mends begin as little proactive reinforcements to retain that perfect first wear look. They turn into visible mends to keep beloved items in the rotation but at a different level of wear (house vs office for example). At the end of their lives, they result in taking the item apart to be made into other things. Sometimes those are patches for other items, or pocket bags for new pants, or simply rags for around the house. I get a lot of action out of worn out jeans, for one example. I am a thrift shopper, and an upcycler, but mostly I will sew anything. --
-- from anything, onto anything.

size 12/14 boys Hanes, to be precise. They outgrow them before they outwear them.

--This was posted in the comments on Mending on the Seamwork blog. I think I do some of my best thinking responding to other people's stuff. 

People don't seem to love mending as much as they love making. Upcycling is a thing. It was formerly known as altering, and alterations don't rate really high. Over at the Refashioners, the 2018 theme is wide open
https://makery.co.uk/2018/08/the-refashioners-2018-inspired-by/
This is good.
The Refashioners is a ton of fun. I've certainly enjoyed it.
2017 AND 2015 in one go
(I could have worn the 2016 denim hat to make it a hat trick....I swear I just walked into that one)
But this post is about mending.
Visible and invisible.
adding an interior yoke to a fragile shirt beloved by my sister

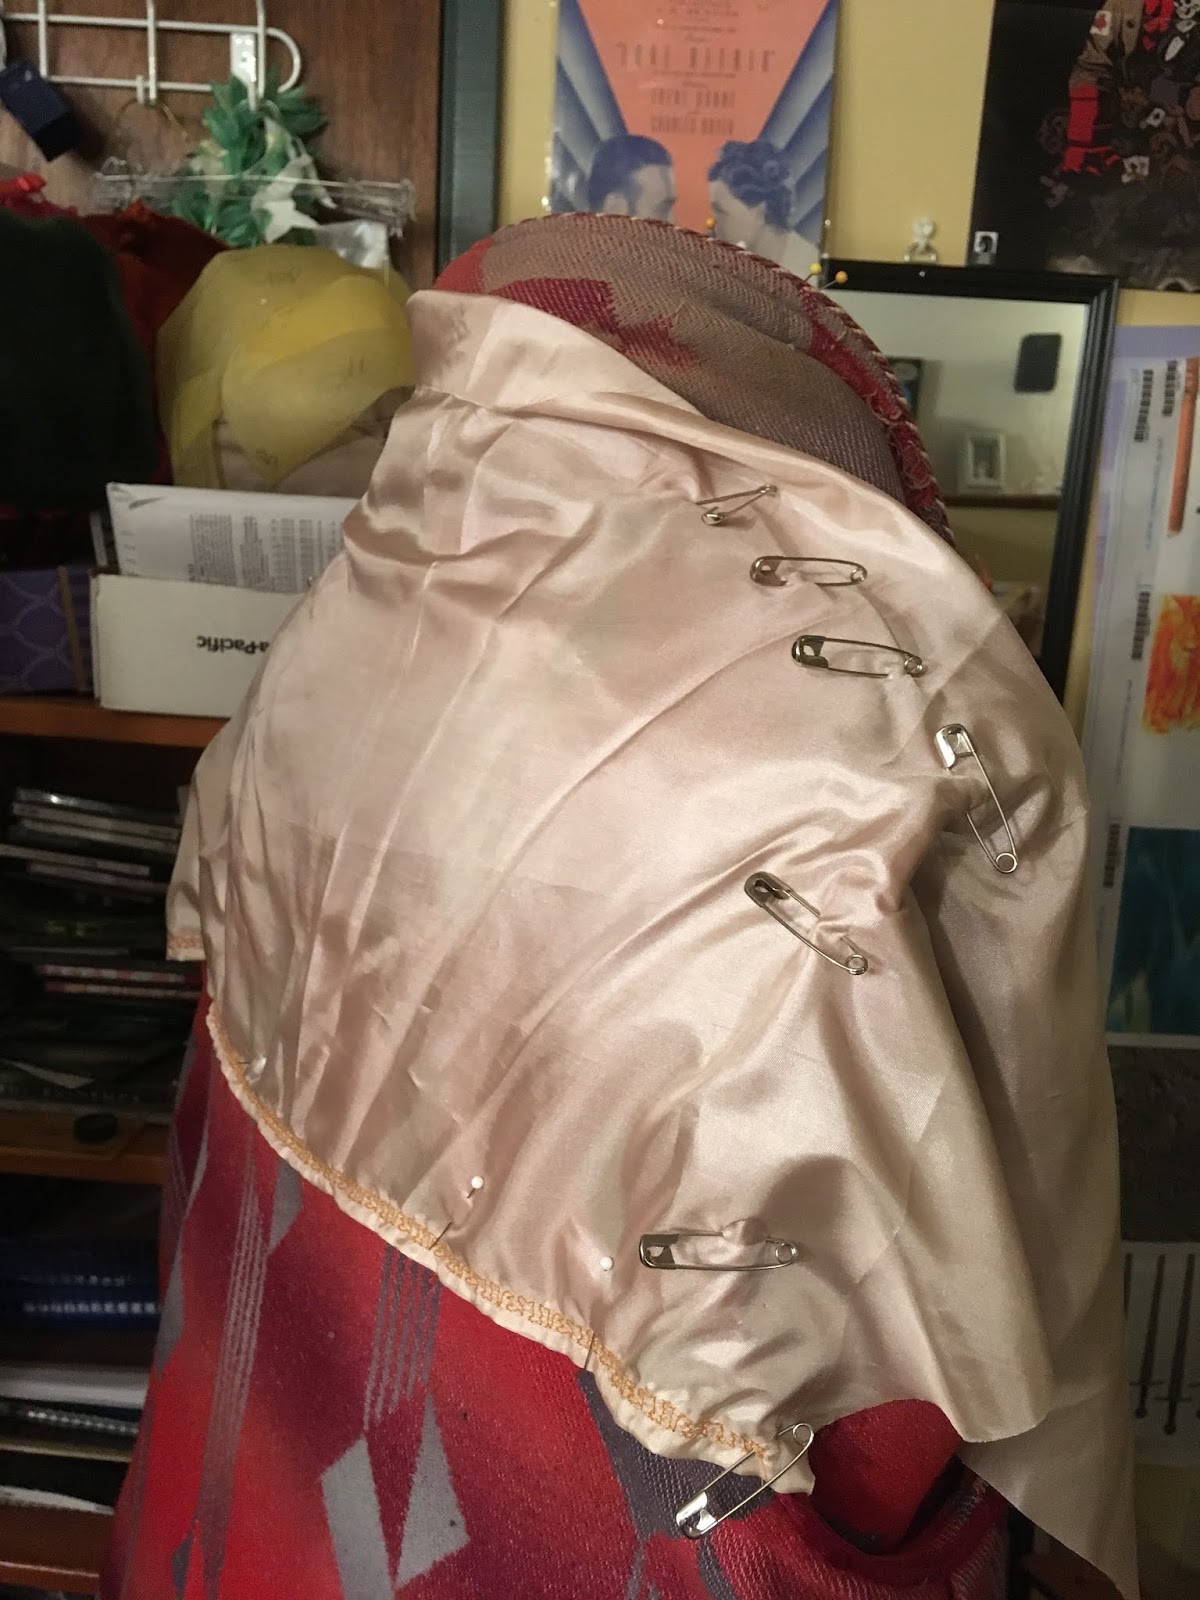
and the same interior treatment for the beloved Beacon bathrobe (quite shredded by the cats over the years) Safety pinning it out to fit it on, handsewn in place.

repairing the McCall's commemorative umbrella with a naked 'cover your own button' cover

The black jeans pocket mend.
BTW, the iron on fabric mend does not last; the glue gives out and the patch flaps about. It needs stitching down all around. But it beats sewing over a thousand pins, and it's a quick stabilizer.

Doing a very visible mend on the ripped back pocket.

And the 'make holes in the jeans and backfill them' treatment.
Also note the extended front pocket bags. And the teeny fly with dinky zipper

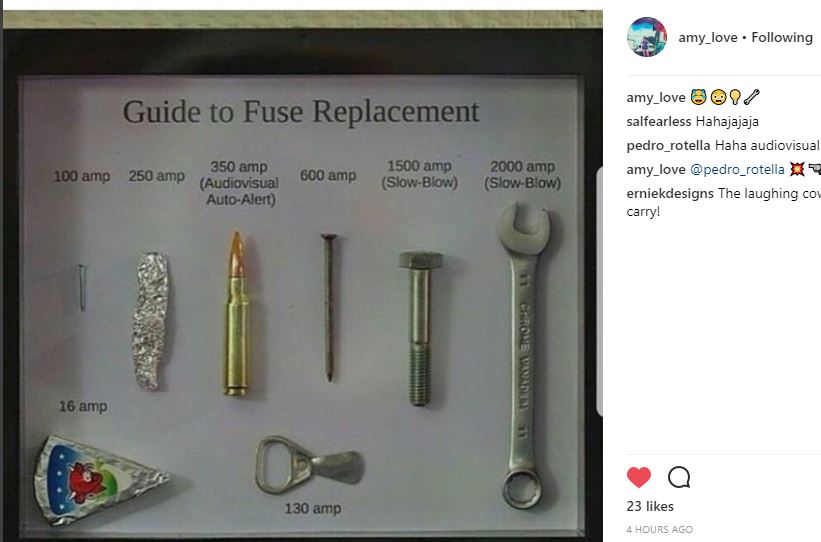
'look, I'm full of circuitry!'
I am working on a muscle tissue print for Spoonflower. It started as a Attack on Titan cosplay print, and turned into a 'look, I'm full of raw muscles' print for mends like this.
This is soooo on the back burner. It's a long weekend away from done. I enjoy it more as a really weird ogee thing frankly. I love taking photographs, slicing them, and then building repeat prints from them. I will go blind doing this I am quite sure.
Or frozen into my chair like the Navigator from Alien
HR Giger illustration of Navigator for Ridley Scott's Alien

But it's not exactly mending. Amending.
Which is kinda the point. I can make something look like it's new
(taking off the shirt collar and flipping it so the worn edges are on the wrong side)
or I can make something wearable. I enjoy both.
---
The choir dates have a start date, fittings start October 9th.
The sewing room is making progress of a spendy sort.

After staring into the three way switch box of doom, I hired the professional.
Before. And it doesn't look like this inside anymore.
After! It's all I can do not to post a video of me snapping this switch on and off. It SNAPS. Also new lighting on walls in progress.

the panorama was worse than this collage


The couch is still here, and the carpet is crap, but I did get rid of a lot of the donation piles in the middle. The couch leaves, and then I build the new table top, and we'll be in business.
Until then, I'll be mending, sorting things, throwing things out, endlessly measuring. I have a few things ready to be sewn, but I have to get this room ready for work.

Tuesday, September 25, 2018

Refashioners 2018 Reminder

I stole this from Elizalex and her blog and her flerkin brilliant curtains dress

https://byhandlondon.com/blogs/by-hand-london/the-refashioners-2018-inspiredby

And speaking of Flerkin

https://dccomics.blogcrib.com/2018/09/20/nomadevanscaptain-marvel-2019-insp/


Sunday, September 23, 2018

We Interrupt Your Regularly Scheduled Mending Program


This is the closeup of the sewing room. Yes, it's a mess. But it's where I sew.

This is the longer view of the room. I only use half the room. And those wall lights are the only ones in the room that have fixtures.
Why yes, that IS an eight foot couch. That's a bunch of pillows and curtains and stuff that's leaving the room. I'm standing in the door, to my left is the wall.


I am going to have more sewing and I'm going to need the room. Seems easy enough.
I need a bigger table, I will need more hanging racks for the choir job. The couch is trying to find a home: it's been too long for everyone who's wanted it. 
Imagine: a couch too big for a frat house! They even found a truck for it.
 I've cleared a path for it out of the basement. At this rate, I'll just build a table over it.

 And this stuff needs to go in there (including that stuff under the table)
That table will get an extendable cover.


This stuff can stay in the cupboard for now.

I also need real lighting.
Yes, I am tired of the endless extension cords.

I started with replacing the dimmer switch
This suspiciously warm but functioning dimmer switch

Came out of this box.
A box that is not entirely secured to the wall.
Neither is the electrical cable coming into the box.


Neither are the light fixture receptacle boxes. When I've tried to wire up a new fixture, the box wiggles away on one side.

Old wiring. It doesn't look entirely right, and I don't have the talent to figure this out.
I pulled things out, shut off that circuit.
All the electricity-full wire ends are covered with twisty lock covers. No electricity is escaping into the air. Nothing is touching that cardboard (it's there so I don't reach for the switch when I walk in the room)

So I don't have a sewing room with electricity for now. 

So if you wanted your pants hemmed before the electrician gets here, you are out of luck.
On the plus side, I dug out all the ivy and put in the coneflowers and the hydrangea. 

I found and replanted the Minnow daffs.


Saturday, September 15, 2018

Reproducing Past Patterns Butterick #2307


 http://www.pastpatterns.com/2307.html

Does this look at all familiar?
No. Slight resemblance on the style lines, but... no.

I've had the Butterick for years. And pulled it out thinking it was older and wouldn't it be nice to wear a repro of a Great War dress for a lecture on said subject , regarding the 100th anniversary?
Well, no. It's 20s.
The 1916/1919 dates on the pattern are for the trademarks and patents for the company.
https://www.vintagestitching.com/pages/dating-vintage-patterns 
if you want to read a little on the madness of this subject.

Past patterns says this is from 1923.24, and while I think it's older than that, I have no proof and defer to Ms Altman's knowledge base and collection.
Mostly, I want to know what sorts of fabrics this would have been made from , and get some comparative images to work from. The drawings are lovely, but I want mooooore.


I traced some of it, I cut a lot of it.


Quite rightly, I let this sit for a week. And then I cut out a toile from fabric I don't give a damn about
The center piece is the lapel and the curved flange (that would cover the welted pocket opening in the dress body. A dress with pockets is a win!).


SEAMS!!! 
As with the patterns of the time, the instructions are pretty light on the ground. Handlettered to boot. This is one company where there's definitely a house style and one draftsperson's hand present.

Considering how 'vaguely precise' some of the instructions are, I feel that I am giving nothing away by reproducing them here. While we learn a lot about the sleeves and making tailor's tacks, there's still so much missing in how to address that long long open seam allowance around the neck and center. Not to mention any lining for that vest front that would finish the outside seam that runs around the cut-on collar (it's got to flex as the undercollar, and be visible at the flange). Still some mysteries.


I love that you "arrange dress on lining". It's just a bodice lining, which has a smaller profile than the dress. By attaching the sack vest outside to the fitted bodice, you could bring in and anchor the larger pieces by their seam allowances without apparent seaming. Which would be covered up by that narrow added belt (that belt is hot stuff in 1918, believe me)
And aren't the handdrawn numbers lovely?

From the excellent ""Witness2fashion.wordpress" webpage: fashions for July 1918.
Second Battle of the Marne that summer. People say the war is practically won with the arrival of the Americans, but it's not over yet.
https://witness2fashion.wordpress.com/2016/08/10/summer-dresses-from-butterick-july-1918-part-1/
This vest front Butterick 9992 strikes me as similar enough to give me a good idea as to materials.
And how do I close that front up?
http://www.extantgowns.com/2011/12/edwardian-jumper-dress.html
I know it's not the same style, but it's roughly the same era, so techniques would be similar. 
See that dark grey line up the back facing? It's all small hooks to close it up
I added two inches to the armscye and the sleeve. I have two extra inches of sleeve in that armscye. I could not take photos of me in it as it's just too tight in the shoulders to move. It is super fitted, after adding inches and inches and inches. And I already have a moulage that fits like a glove (The term literally means “molding” or “casting”)

But I am going to cut this short: I had a major fitting fail and a lack of love has set in.
The armscye was too small, now it's just not in the right spot because the back was too narrow and the neckline too high. A 1918 38" chest is not a 2018 38" chest.
Which makes me grateful I made this out of stuff I do not give a damn about; I won't try to cobble it into something wearable. 

Basically, I am better off if I transfer style ideas and details to an existing similar sloper that fits me. A tube that already fits me. I can chase this armscye  location around for a week, or I can draft this vest front onto an existing pattern. Or I can take a break from this and work on something successful to break this downer I'm on.


The vest front that makes the dress.

I trimmed the super wide part a bit, and shortened it by an inch between the collar and the lower flange

So I am going to mark the pieces as to what needs to happen, add the toile as it is to the package, and set it aside in the UFO pile for later.

I learned the word 'enbiggening' from G Willow Wilson's Ms Marvel.
You learn stuff from comics.

Because I need a win here. The lecture isn't until October.

And Hammer Pants are calling from 1991.
Which would be cooler if they were 1988, but....

Sunday, September 9, 2018

Pattern Review is Still My Girlfriend

8813. In plaid. Theoretically strong.  Needed more definition.

I pulled this section out from the other posts, because it's so far offtopic it should have a set of bus routes, a water district and a library.

The problem comes from reading the directions. Because for once, I'm gonna read them.
See the space between the end of the piece and the top of the next piece you're sewing to?

In this illustration, you can see there's a distance from the seam join to the top of the pattern piece.

It's right there


In illustration #3, you can see there's a distance from the seam join to the top of the pattern piece.
In real life (yes, I shortened on the alteration line. I am short), there's about 3-4 inches distance.

But in this illustration (#5), it's just a seam allowance distance.

And this illusion continues to the next illustration (#6)
As it turns out, the discrepancy in the illustration is not a problem. It's just a drawing error. That transition at that corner did trip me up, and I had to unpick and topstitch it.

However, sometimes it's a problem.
https://sewing.patternreview.com/
 PR, here i come.

Now, as readers of this blog will note, I have ISSUES with PR. I linger every year over the 'do I give them my money and for what?' at renewal time. And I renew, I just renewed, because I do get something out of it, and I do want to encourage more of this peer review of patterns. The knowledge bank is deep, and full of Ann Smith's work on Miyake Vogue patterns (which is half how I got to this).

Generally speaking, I read the lowest scoring reviews first. I want to know if there's some ghastly rotting corpse in the instructions or the pattern pieces. Even Vogue has some horribly done patterns still in rotation. 
https://voguepatterns.mccall.com/v7464
You will make friends online over this one. You will have to.
This 40s vintage hat pattern that is missing half its instructions is still for sale, and is  still missing the second half of the instructions (and I took a hat making class and still cannot chalk that one up to 'you need additional millinery skills for this'. No.) 

On a wider view of the pattern world, there are plenty of patterns that make no sense TO ME* and have loopy instructions where you wave your hands over the pieces and they must assemble like Autobots or Avengers, all on their own. I like my match points to match. Miyake's blouse 2056 may be a mess of match marks that has defeated me SO FAR, but I know in my heart this does work.
There is no real proof of this shirt working yet. If you have succeeded, please comment and explain.
However, there's 
 https://erniekdesigns.blogspot.com/2013/04/miyake-dress-1309.html
which DOES work


A dress that STILL fits me, twenty pounds later. Don't overlook this feature.
But clearly I have digressed:
Pattern Review, Vogue 8813 is a busy page.

25 reviews (23, two people reviewed it twice) and all of them made major alterations to the pattern. Even the ones that indicated they did not in the summary, made alterations of significance: added waistbands, buttons, sewed up the v-neck, major FBA, armsceye 'creation' (adding a dart to the bottom of the sleeve to create a fitted curve - a reverse gusset).  One relegated it to the Halloween dress up pile. People who rated it five stars and would recommend to a friend would not make another one. That's not a recommendation. 

 I do want to remind you that sometimes, it's really not you, it's the instructions or lack of instructions. More often than not, pattern pieces weren't reassembled to verify they fit together. Some patterns have a lot of moving parts that are hard to keep track of. Even professionals screw up. Stuff happens.

Remember how to make a peanut butter sandwich?

https://erniekdesigns.blogspot.com/2017/10/instructions-are-hardest-part.html

The pattern I did for SewBaby turned out okay, but it only turned out because we spent a billion years on the instructions. A BILLION. It's day is over, it wasn't the greatest coat for toddlers (though a very good bathrobe....it has the 'sew miles of bias tape around the edges' problem. Snoresville.)
Look, my patttern is in the bin at Value Village! Uncut...oh that's not a good sign.

There are different levels of instructional engagement. Some people need to know where to sew A to B. Some people want to wing it. But I insist that there are patterns that are just unsewable because they were drafted off an object that the drafter did not understand. Go look at that hat again. I'VE BEEN THAT DRAFTER. I've made that mistake.

This pattern broke me.
I think that a pattern is a promise that if you read it and follow it's directions with care, you will have a result that will look like the photo or the drawing. If you have basic skills and are willing to do some learning on the job of new ones, you can produce results that are consistent with the image you've purchased. If you are a beginner and you try a 1950s vintage ballgown, you will have plenty of challenges, but you can do it. 

Or if you're 18 yr old me and you're ruining some Harris Tweed  - the only Harris Tweed you will ever touch - to make an ill-fitted suit for a friend.
It did look like the drawing. It did not fit her. I followed the directions. I had to look some of the procedures up in a book in the library (this was 1977) but there were directions to follow and I followed them. Except for the one to make a toile to check the fit. I learned a lot. I also lost a friend.

Remember Rue.
https://www.colettepatterns.com/catalog/rue
https://ciaraxyerra.com/2016/10/04/we-need-to-talk-about-the-rue-dress-some-more/

*this is my blog. I am entitled to change my mind. Or not.