Showing posts with label muslin. Show all posts

Sunday, November 8, 2020

The Pekka Jacket, versions 1 through 4

 I didn't like this jacket at first

And I'm kinda shocked I haven't written about it yet.

I started the first one in July. I was sewing this summer, I really was.


I worked on the first version, using a heavy rayon twill that frays when you think about it. I assumed it was going to be a problematic toile. I adjusted the length and cut down the pockets, but left the original seaming. Which took forEVER to finish. About ten hours of misery.

I finished the seams before I assembled parts because the edges were disintegrating as I handled them. I worked as flat on the table as I could manage.
this was a video that blogger isn't interested in loading today

And I hated it. And my sister didn't want it, so I hung it up in my dining room to stare at. 

And a few weeks later, I wore it to go back to work.

And it works; it's the perfect office jacket. And now it's a TNT.
version two

version three

version four, in wool

Endless seam finishing; hand sewing is not my strong game
Plus adding a neck saving piece (Fun fact: I'm allergic to most wools. Except for mohair)


Most of the construction of this jacket involves interior seam finishes. If you use a fabric that doesn't need much finishing (besides hemming the body, the sleeves and the interior of the pocket) (or let's say you bag a lining for it, which might be quicker), you could be done in an afternoon.
This took all of Frankenstein Meets The Wolfman, Star Trek and two podcasts on Dune.

It's a oversized jacket with cut-on sleeves and a lot of seams, and it's a jacket that I made in fabrics that either ravel or are stiff enough that those seams need hand finishing. Either tacking seams open or wrapping them with bias tape.

https://blanchexblanche.com/en/shop/woman-patterns/jackets-coats-en-2/ready-to-sew-veste-pekka/


Obligatory hair touching pose

So much seam finishing


Version two, made of a quilted grey knit from District Fabric (back when they were still in Seattle) left off the vertical seam that encloses the pocket seam, and gained a armscye and an added sleeve so I can wear a winter coat over it.

The pocket is still deep, and will hold an army of cats and a to-go coffee 'mug'. 

The third version is from similar knit/quilted material that started pilling the moment I pulled the fabric out of the bag. By this point, I'm cavalier about seam finishing. And photos.

Version Four was planned to be the warm work layer, a stylish slanket. I bought double layer wool/rayon sweater fabric from Emma One Sock, and planned ahead to finish seams by trimming them out and basting them over.

It's easier to see the construction details in the wool.

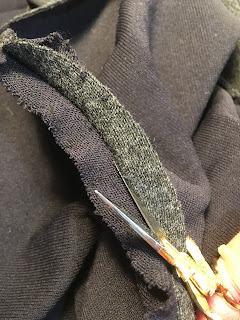
 I had to trim the layers apart in the seam allowances to make the seams flatten out better.
And I bound all the seams with homemade rayon scrap pieced bias tape

This spool is perfect for this job.

I attached the pocket on the outside seam, folded it over, tacked it down, and then you add the back and sew on the collar

Photos that are overexposed are to show details. But you knew that.


The rayon edges shed little blue curls EVERYWHERE. Still cleaning them up.

The seam finishes were pretty much all done on the dining room table, to keep the weight out of my lap and off my wrists, and on Saturday nights watching Svengoolie monster movies on the big television.

Hand sewing is not my forte, and I am trying to improve my skills by stitching as often as I can.

Next time, I want David Sedaris' jacket


What a great riff on blue line kitchen embroidery!

Sunday, April 7, 2013

Miyake Dress 1309

I love Issey Miyake's Vogue patterns, mostly the ones from the 80's, I think I've made them all. 


1309 seemed a classic, so I bought it and pondered. Going into the Pattern Stash contest, I knew I wouldn't be able to crank it out like I normally can (damn left thumb) but it was a good excuse to make things I've been thinking about.


I knew that I wouldn't fit the tunic as is, so I wanted to make a muslin to check fit points and potential alterations. I also knew I wanted to get rid of the exposed back zipper, and previous Miyake patterns have convinced me that there is always a chance you can lose the zipper.

Above all, it is a legendarily tricky construction, being just three pieces turned this way and that, so a failed tablecloth (loves me that Ikea curtain material!) stepped in for the trial run.

 And yes, it wasn't wide enough, and the armholes are too long. So more muslin piecing, adding about 4" to a size 14 gave me enough to get around the backside of 41".


 It's one big piece, sliced up the middle and crossed, with a short right side panel and a long left side panel.


So, armed with knowledge and a sense of "oh, what the hell", I dug out three yards of this cotton hand-painted stuff that just hasn't suited anything up until now. I had to wash it again, because it was so dusty from being moved several times from house to house. I've probably had it longer than I've been married. Which clocks it at 30 years old.
Oi.

I inherited a serger from family, so for this version, I cut out the big pieces and serged the edges. 
Three pieces, serged and ready for marking
I decided to widen the big piece (2" each side) to add the necessary width. I felt the proportions would be better. 

The red line is the alteration in the pattern to shorten it.

I kept the center line pinned to make putting the tape markers on  an easier task
I used masking tape (should have used the blue stuff, easier to remove) to mark the join marks. This way I could really see which were circles or squares, and clearly identify them by their letter codes.

I don't have photos of the part where I cut the center slash and then serged it. Examining the muslin, I didn't think I needed to go the whole bias tape route. I did have to move the tags off the center line, and then there's the part where I forgot to raise the serger bar and ....had to rethread the serger from zero. The actual sewing time for this was under 30 minutes. The total amount of time was probably several hours (there are a lot of marks to transfer to the pieces) (I am really bad at threading the serger. Now I'm very good at it.)

I zigzagged the edges together and pressed them out for the shoulder join


Now the armhole is a good height.
 Only problem is: in widening the big piece, the shoulder pieces are waaaay too wide. They got rolled in and sewn.
The only place you can see the serged center (where I didn't do the bias edging) is on the back of the right side armhole

It even looks better on me! A Miracle!

Taking in excess shoulder width by folding it in and overcasting on the serged  edge

Tacking down center so I don't flash anyone. Also a good cheat as to which side is the front...

Because I will forget which is the right and which is the left...
This works out great, as it is a perfect summer weight dress for overheated me. Camouflaged enough to disguise a lack of undergarments when it turns hot. 

To celebrate, I bought another "new to me" Miyake this week on Ebay!