

I pulled this section out from the other posts, because it's so far offtopic it should have a set of bus routes, a water district and a library.
The problem comes from reading the directions. Because for once, I'm gonna read them.

See the space between the end of the piece and the top of the next piece you're sewing to?

It's right there

In illustration #3, you can see there's a distance from the seam join to the top of the pattern piece.
In real life (yes, I shortened on the alteration line. I am short), there's about 3-4 inches distance.

But in this illustration (#5), it's just a seam allowance distance.
And this illusion continues to the next illustration (#6)


As it turns out, the discrepancy in the illustration is not a problem. It's just a drawing error. That transition at that corner did trip me up, and I had to unpick and topstitch it.
However, sometimes it's a problem.
https://sewing.patternreview.com/
PR, here i come.
Now, as readers of this blog will note, I have ISSUES with PR. I linger every year over the 'do I give them my money and for what?' at renewal time. And I renew, I just renewed, because I do get something out of it, and I do want to encourage more of this peer review of patterns. The knowledge bank is deep, and full of Ann Smith's work on Miyake Vogue patterns (which is half how I got to this).
Generally speaking, I read the lowest scoring reviews first. I want to know if there's some ghastly rotting corpse in the instructions or the pattern pieces. Even Vogue has some horribly done patterns still in rotation.
https://voguepatterns.mccall.com/v7464
 |
| You will make friends online over this one. You will have to. |
This 40s vintage hat pattern that is missing half its instructions is still for sale, and is still missing the second half of the instructions (and I took a hat making class and still cannot chalk that one up to 'you need additional millinery skills for this'. No.)
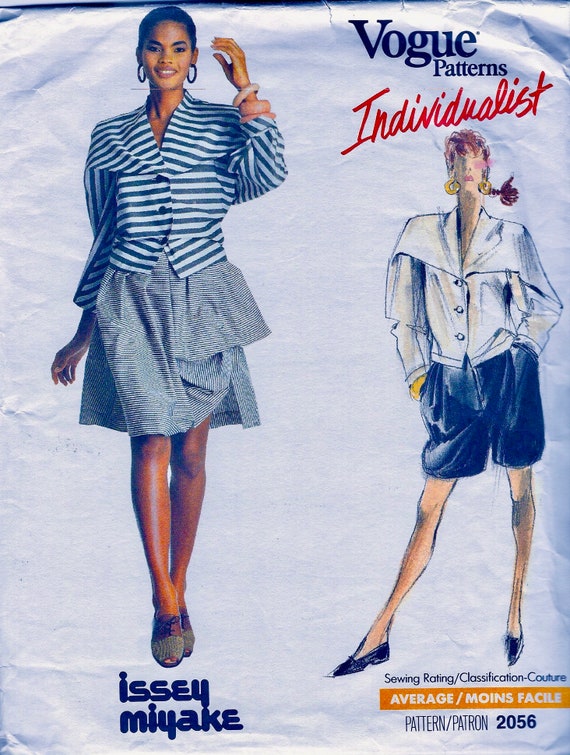
On a wider view of the pattern world, there are plenty of patterns that make no sense TO ME* and have loopy instructions where you wave your hands over the pieces and they must assemble like Autobots or Avengers, all on their own. I like my match points to match. Miyake's blouse 2056 may be a mess of match marks that has defeated me SO FAR, but I know in my heart this does work.
 |
| There is no real proof of this shirt working yet. If you have succeeded, please comment and explain. |
However, there's
https://erniekdesigns.blogspot.com/2013/04/miyake-dress-1309.html
which DOES work

But clearly I have digressed:
Pattern Review, Vogue 8813 is a busy page.
https://erniekdesigns.blogspot.com/2013/04/miyake-dress-1309.html
which DOES work

 |
| A dress that STILL fits me, twenty pounds later. Don't overlook this feature. |
Pattern Review, Vogue 8813 is a busy page.
25 reviews (23, two people reviewed it twice) and all of them made major alterations to the pattern. Even the ones that indicated they did not in the summary, made alterations of significance: added waistbands, buttons, sewed up the v-neck, major FBA, armsceye 'creation' (adding a dart to the bottom of the sleeve to create a fitted curve - a reverse gusset). One relegated it to the Halloween dress up pile. People who rated it five stars and would recommend to a friend would not make another one. That's not a recommendation.
I do want to remind you that sometimes, it's really not you, it's the instructions or lack of instructions. More often than not, pattern pieces weren't reassembled to verify they fit together. Some patterns have a lot of moving parts that are hard to keep track of. Even professionals screw up. Stuff happens.
Remember how to make a peanut butter sandwich?
https://erniekdesigns.blogspot.com/2017/10/instructions-are-hardest-part.html
The pattern I did for SewBaby turned out okay, but it only turned out because we spent a billion years on the instructions. A BILLION. It's day is over, it wasn't the greatest coat for toddlers (though a very good bathrobe....it has the 'sew miles of bias tape around the edges' problem. Snoresville.)
 Look, my patttern is in the bin at Value Village! Uncut...oh that's not a good sign.
There are different levels of instructional engagement. Some people need to know where to sew A to B. Some people want to wing it. But I insist that there are patterns that are just unsewable because they were drafted off an object that the drafter did not understand. Go look at that hat again. I'VE BEEN THAT DRAFTER. I've made that mistake.
I think that a pattern is a promise that if you read it and follow it's directions with care, you will have a result that will look like the photo or the drawing. If you have basic skills and are willing to do some learning on the job of new ones, you can produce results that are consistent with the image you've purchased. If you are a beginner and you try a 1950s vintage ballgown, you will have plenty of challenges, but you can do it.
Or if you're 18 yr old me and you're ruining some Harris Tweed - the only Harris Tweed you will ever touch - to make an ill-fitted suit for a friend.
It did look like the drawing. It did not fit her. I followed the directions. I had to look some of the procedures up in a book in the library (this was 1977) but there were directions to follow and I followed them. Except for the one to make a toile to check the fit. I learned a lot. I also lost a friend.
Remember Rue.
https://www.colettepatterns.com/catalog/rue
https://ciaraxyerra.com/2016/10/04/we-need-to-talk-about-the-rue-dress-some-more/
*this is my blog. I am entitled to change my mind. Or not.
I do want to remind you that sometimes, it's really not you, it's the instructions or lack of instructions. More often than not, pattern pieces weren't reassembled to verify they fit together. Some patterns have a lot of moving parts that are hard to keep track of. Even professionals screw up. Stuff happens.
Remember how to make a peanut butter sandwich?
https://erniekdesigns.blogspot.com/2017/10/instructions-are-hardest-part.html
The pattern I did for SewBaby turned out okay, but it only turned out because we spent a billion years on the instructions. A BILLION. It's day is over, it wasn't the greatest coat for toddlers (though a very good bathrobe....it has the 'sew miles of bias tape around the edges' problem. Snoresville.)

There are different levels of instructional engagement. Some people need to know where to sew A to B. Some people want to wing it. But I insist that there are patterns that are just unsewable because they were drafted off an object that the drafter did not understand. Go look at that hat again. I'VE BEEN THAT DRAFTER. I've made that mistake.
 |
| This pattern broke me. |
Or if you're 18 yr old me and you're ruining some Harris Tweed - the only Harris Tweed you will ever touch - to make an ill-fitted suit for a friend.
It did look like the drawing. It did not fit her. I followed the directions. I had to look some of the procedures up in a book in the library (this was 1977) but there were directions to follow and I followed them. Except for the one to make a toile to check the fit. I learned a lot. I also lost a friend.
Remember Rue.
https://www.colettepatterns.com/catalog/rue
https://ciaraxyerra.com/2016/10/04/we-need-to-talk-about-the-rue-dress-some-more/
*this is my blog. I am entitled to change my mind. Or not.


