Monday, December 29, 2014

Refashion Handbook , Little Fixes reviews


I love the Seattle Public Library. They buy books for me and keep them until I need them.


I have been meaning to read this book, as it sounds like my sort of book: take stuff apart and make new stuff out of it.

Beth Huntington blogs at https://chicenvelopements.wordpress.com/tutorials/. She was not the first Renegade Seamstress (love the stuff here). It's hard to give yourself a nickname and make it stick in the blogoverse. 

She is very successful at it, and her book has a lot going for it. She's like a cheerleader who wants you to see the good in the cast offs. Unlike a lot of refashioners, she's a thrift shopper first, looking for good material and potential. 

She is the first to admit that her methods are probably not seamstress level. She doesn't finish many interior seams except with Fray Check, there's no concerns about mixing your DCO and your machine wash items in one outfit, and she plays fast and loose with marking and measuring. Her knits frighten me (the Wild Life Skirt elastic waistline measurements confused me; did she just cut this too narrow to go over your hips? Maybe she has skinny hips. Ah, shaddup picky brain!).

The inside back cover of the book has a list of other publications, and one should be the companion volume:


Do not be fooled by the adorable children. There are some amazing projects in this one for dealing with knits, and some great finishing techniques.

I can't believe I haven't written about this book; I stumbled on it this summer. I would like to pretend I invented a lot of tech for t's, but I'm just doing what any good mom would do: saving stuff. And Little Fixes is just a really good compendium of how-to's and why not's. If you're going to start cutting up tshirts, this is the how to book to end up with something that looks good and will stand up to some washings.

I made this big so you could kinda read it. "Be sure the design is facing outward".


I do have to give Ms Huntington some major props for finding the good in the less than interesting. Her taste isn't mine, but she is brave and did some righteous saves.  And her suggestion to put a padlock on the good scissors is going into action tomorrow morning.


More book reviews in following weeks! If you've read a good one lately (sewing that is), pile on here. 

Wednesday, December 24, 2014

New Vintage Make and Mend 2014 Loungewear Edition: Fail Department


If ya didn't know already, I loves New Vintage Lady, and I am a make and mender from way back.

And yes, it is December 23rd. Actually, the 24th. And I have been sewing pajama bottoms  and fleecy hats for holidays all weekend long.

Sadly, I never did get these to work out for me.

Decades of Style Kitchenette pajamas, with the thrift shop Ikea duvet I used. 

I prefer to make jams and pajamas from thrifted and home used sheets: already very soft from washings and washings.


The inset on the front sewed up in this order, from that corner. I could have gone from the center to the sides as well.

Ohmygerd, sewing over pins!

What little pucker there was ironed right out. I topstitched to hold.


Top left: front looks fine. Top right: Back looks horrible - the belt won't pull it closed without pulling it all out of line.
Bottom left: Back tie is too far to side, Bottom right: moved to edge of flap


This way, the belt should close the back and secure the edges so they will stop falling off me. Then they can wrap around and give me the waist I have earned.

But no. This doesn't work to keep that long, curved back edge from flapping open and pulling this off my shoulders.

So, I opened up the ends of the seam, and pulled clear elastic into the seam to snug it up/gather it up gently. 

It fits well enough now, but it's just been more fiddling than I want to photograph anymore. This is one of those projects where 98% of it gets done right away and the last 2% just drags on and on.

And frankly, I am not a loungewear girl. Step-in playsuits do not suit me, as lovely as this pattern seems and as soft as this fabric is.  

Sadly, I will hack this for the potential pajama pants. And we have no photos of that, thank you.

Thursday, December 4, 2014

Booty Power to the People

photo Sew2Pro,


If you have any curiosity about how to move a dart on a pattern piece, this is a fine demonstration of that.

I am working on pants and their darts related matters this month, and hopefully will have some stuff to share on that front (or back, see what I did there) soon.

photo ErnieK


photo Rosie Wednesday

And go read this, too: Rosie Wednesday's red-wool-pants 

Monday, December 1, 2014

T Shirt Rebuilds

I've been rebuilding/remodeling a lot of t-shirts; I almost never sew knits from scratch. 

I cut them down, I rearrange the parts, I cut out the stuff I like and sew it onto something that fits. And sometimes, I take it apart again.


This is the second shirt for this dragon and there will be a third

I do these shirts in batches. Which means that I've been sitting on a couple of these for awhile.

                       This is the standard remodel. The order of work is important.

 Shorten the shirt (fold up, pin, sew, THEN trim excess)

Fold up hem to taste

Stitch with wide overlocking sort of stitch

Trim off excess (try to keep excess in a loop)
 Bottom excess will be the new neck band (sew new collar line, stay tape the back neckline, THEN trim old collar off. Unless you like a reaaaaaallllly wide collar)(then fold over and stitch in the ditch from the front) (then trim it)
The bits so far

keep old seam tape (unpick its stitching)

old fabric from bottom is sewn around old collar for new collar

super narrow zig zag  stitch for stretch

1/4"/ 1 cm seam allowance

Join ends and sew together, then stitch over for continuous loop o neckfacing

NOW you can cut off the old collar
If you like a wide neckline for your shirt, you can cut off the old collar first. Believe me, it will grow very wide once you start cutting into that knit.

I kept the old seam tape out of the new seam...

and then it's sewn onto the back collar with a straight stitch
You can leave the seam tape out of it, but the new collar is going to be much wider than the old one. Which may be what you want.

Fold over and sew over seam allowance for new collar

Tiny zig zag in the ditch

NOW you can cut off the extra on the new collar


Sleeves are too long and too narrow at hem. No, I'm not retaking this photo. I look better blurry.

New Hem point

Match the hem distance marks sleeve to sleeve

Folded up and overlocked stitch

Second hem! Matching at top of shoulder seam

Better. I am out of focus all the time.
 If it's too broad or sagging off the shoulders, fold up on sleeve seam and sew a new seam at the cap. 
Bringing the sleeve cap up a 1/4/1cm - ish

The seam starts halfway up the sleeve, tapers out and tapers back on the other side, same distance down

And I am not taking any more photos of my blurry self today.
I mean, this bookstore is now closed.


Monday, November 24, 2014

Hanging from the crotch seam

It's kinda hard to find a title for a post about staring at crotch seam variations, but there we are. To sum up a rather long post: your trousers hang from your crotch, your jeans hug.

Before we fall down the rabbit hole, sewing has a lot of conventional wisdom. Your coat fastens this way or that, your pants fly opens this way or that. There are a lot of do's and don'ts and everyone has an opinion but mostly we go by convention.

And most of these conventions are apparent, obvious, and overdiscussed. So to find one that hasn't been is weird.

This post is for the overdiscussers. Which I guess includes me.
~~~~~~~~~~~~~~~~~~~~~~~~~~~~~~~

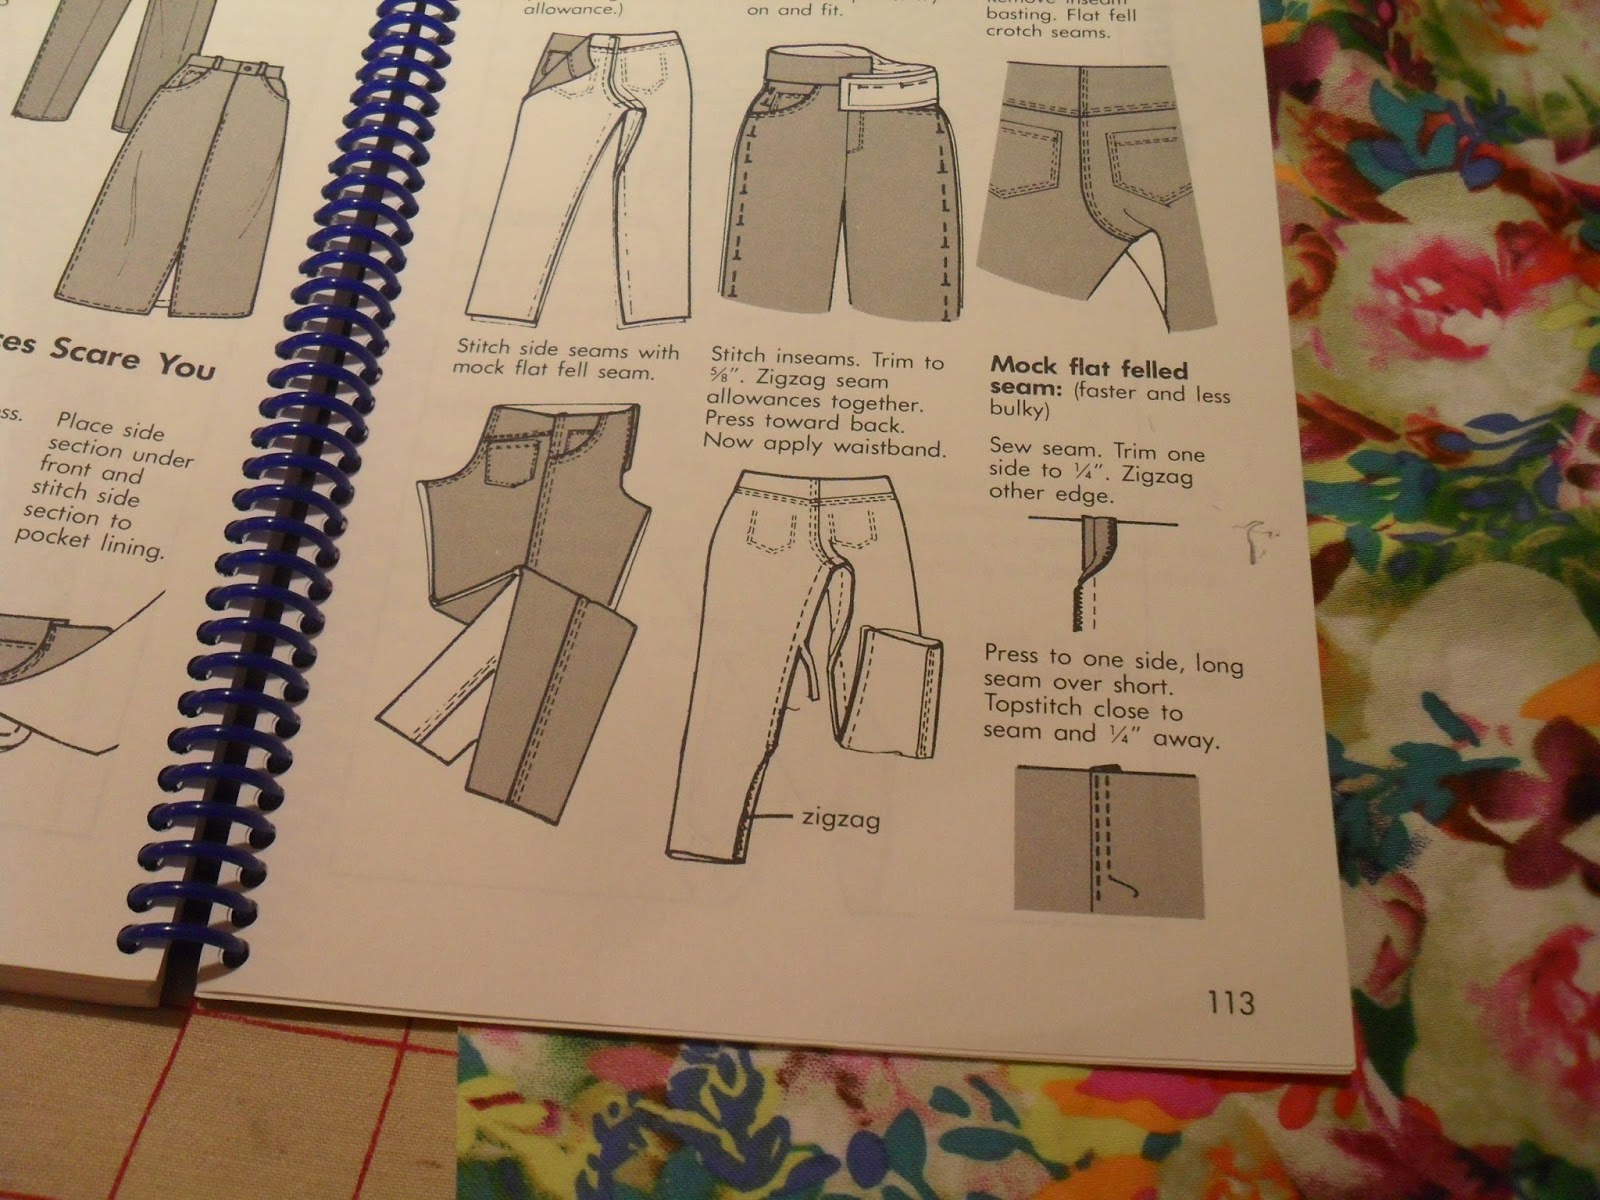
Over on Closet Case Files, HLou is running though the Ginger sewalong. And her dominant seam for the intersection of the front and back pieces runs from side to side. Which looked really weird to me, as the instructions I always think of are these:

from Pati Palmer and Susan Pletsch's  "Pants for any body" , 2000, my copy *


Youre leaving that bit at the crotch point open so you can sew the legs together like below


Except when you're making jeans

Sewing order: front for fly and pockets, back for yoke and pockets, sew up outside seams. Final seam is side to side.


This is a pair of men's jeans, with the fly open at the front. The final, dominant seam runs from side to side


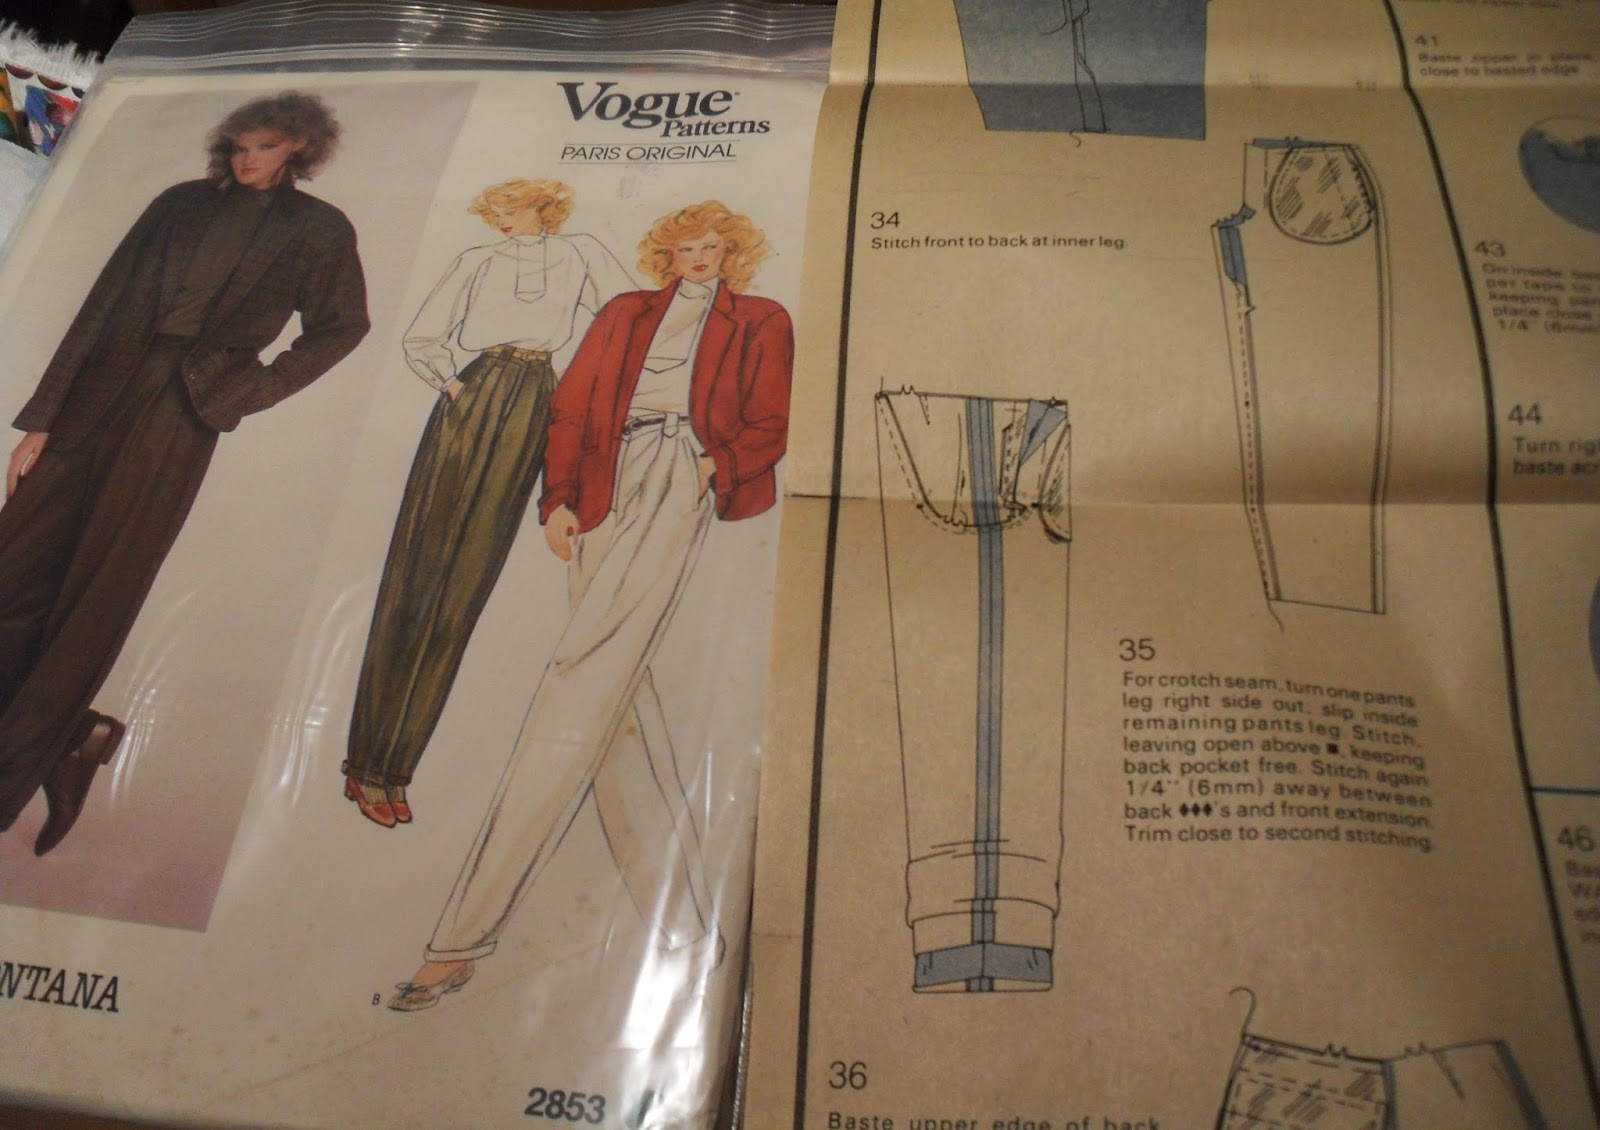
A pair of men's trousers, where the seam runs from front to back

typical Vogue pants construction information (where you stuff the one leg inside the other and sew the final seam) BTW: reading these instructions, don't trim that seam to the second stitching. You'll weaken the seam more than you will adjust the fit.

After inspecting every pair of pants in this house that were purchased, I've pondered the whys of this.  I have gone to a lot of effort over the years, and for what?

Taking that step to leave open the seam after you make up the fly is a pain; the only real reason why you'd go to that trouble is so that the fabrics for trousers can hang better. They are designed to drape your legs, and you'd want that seam to act as a hanging line.
 Jeans hold themselves to you, even if you're using a lighter weight fabric. 

And camel toe is so unpleasant. Which is why there are no model shots of these jeans in progress.

I keep changing weight and moving seams around, so this is version 5 of the Jeanius jeans. And once again, the sides are too high and the back and front are too low (yes, bigger in the back AND the front. Damn you cookies!)

I can't do much about the front: the fly is finished, the zipper trimmed, and such.

I can shove a wedge in the back at the center to bring up the waistband as I bring it in

Yes, my backside is that round. 
Or I can do what I did, which was add a side to side gusset at the crotch.
Faint pencil line at center to help match up front and back seams......taking the dominant seam to a side to side  and then some
Don't add a side to side gusset at the crotch.

This does bring up the front and the back. It also gives me too much fabric in the inside legs, which creates a cavernous camel toe effect. Which is interesting, but not quite what I was going for. And I am just not interested in that photo for sharing. 

So another pair of 'eh' trousers; not sure if I leave in the gusset OR just drop the side seams at the top for a lowriderish effect.
Given the way I remodel my clothes, I will probably live with it and THEN remodel it. 

And that's why we save the leftover bits.

I am finishing this up and going to alter the pattern again, which will bring us to version 6.
~~~~~~~~~~~~~~~~~~~~~~~~~~~~~~~~~~~~~~~~~~~~~~~~

*Hey, I don't make $$ from links. I make money from sewing and selling patterns on Craftsy. The Spoonflower thing makes me money I spend on Spoonflower making more samples for more prints. Etsy has never made me any money. I don't recommend buying on Amazon, for a long set of reasons we don't need to bore ourselves with here. They do control the used book market; go look on Abebooks site for more.  But they did pay me a lot of money for toy reviews in the 00's. Ah, those were the days!