Friday, May 27, 2016

Handbag From Leftovers


A quick bag for the weekend.

What I'm actually doing  NOW is fixing the fit on a pair of pants I've made for the Pattern Review contest AND
hemming the mothership of prom dresses.
That will be an entertaining post if I ever finish it.

But this is a quick bag. Mostly made, it's a foldover piece of fabric, about 8" by 26" (10, 10, 6? I'm guessing), joined by zippers, hunks of scrap for lining and finished on the outside edges with 2" ribbon that becomes the loops for the strap hardware.


There's a hook for my keys on the left and a pen sleeve on the right, both in the side seams.

Clearance contrast zipper makes a back pocket. 


A rough sketch of the pattern. The grey is the interior divider pocket
Because pockets.

We're here for the 

Ohio Travel Bag 1 1/8" Nickel Plate Tuck Lock Clasp

I got this on Amazon, but you can find them around. 

What I foolishly did not take a photo of was that I wedged in a hunk of felt in the layers to anchor the base of the clasp.
The base was installed first, and then I line up the flap of the bag and the tuck part to the base. 

I could mark the tuck on the bag flap with it engaged in the base, but not the other way around.
And I'm lazy.

Hole poking. You have hole pokers. A nail or a screw would do the job.

Pliers! One decent pair will solve a ton of troubles. These are pretty cheap and they've done the job for 25 years (oh gosh, I am that old) 

Lovely! Functional!

Sides sewn up


I bought the strap material at Sew Expo for $12, which is about twice the cost of all the other materials here. The rings are keyring split rings, which always come in handy.
The clasps are big jewelry lobster clasps, and the D rings are....from Daiso. 12 for $1.50.

They don't all match, but I needed a little bag, and I have another plan for a strap, just not the time.


Tuesday, May 17, 2016

This is a tank dress


This is a terribly drawn set of illustrations, but I am so .....beside myself with irritation that I am just going to express it through 'art'.

You will need a sloper/bodice block. And some paper. And a pencil. Or a crayon.

This is not rocket science . If you have ever sewn anything, you already have the materials on hand.


Free slopers keep slipping off the internet, but you probably have a simple bodice pattern that looks a lot like this. No, I do not need a bust dart that big. I need a wider block.

The purple lines are the ones you're going to draw on your paper, around your bodice. The green line is the lower front neck. You can draw the one you like the best.
You will make some allowances for wearing ease (I mean, we're making a dress length tank top here, there's no real art to it) and you want to be able to pull it over your head, so add a couple of inches around your bust line/chest for width. Expand the neck opening, you probably have a pullover top that has a neckline you love. Use that for this part. 

Extend those lines down to the skirt length you are looking for. 
If you are bootylicious, add more. 
If you are not, do what you will.

This is my rough layout on two pieces of folded yardage, and those diagonal lines show where you're going to cut your bias facing strips for the armholes and neckline. 

You could also cut an all in one facing, as recently demo'd on Threads' website.

 I even gave you a pocket for the side seam. Add it where your hand wants to go (reach for pocket, measure how far that is from your armpit, mark on side seam).

And you're welcome. 

*author's message

Neat little awkwardly placed seam line, at no extra charge!

Thursday, May 12, 2016

Sprout Grows An Appleton

I've been a skeptical customer/designer on Spoonflower for a few years now, and a beta tester on the 'cut and sew' project that turned into the Sprout Pattern company. 

(for the new: where a pattern is printed onto the fabric for your 'cut it out and sew it up' use)

Hey, a tshirt from the first betas!

They've made tshirts (I've made the tshirt) and some simple clothes, but nothing that really took advantage of the capacity of Spoonflower to add sizes and pattern shapes.

Now we're talking about living up to your potential here.

Wider range of sizes AND cup sizes


Frankly, I'm an A cup, but you get the idea


And there is no size price penalty
$99 for all.

(insert your favorite happy yell here)

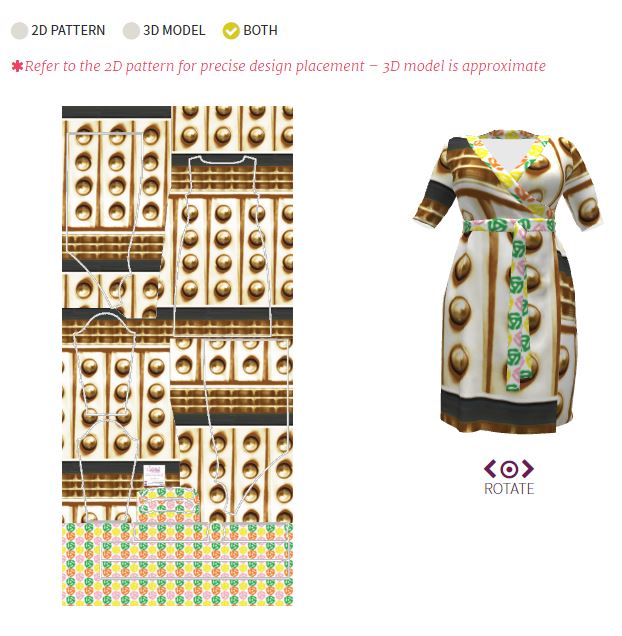
You can select two prints
and move them around to place the print as you'd like it on the fabric
Sadly, the two front wrap panels do not line up with each other across the torso at this point, so a big motif is not going to match.  Yet. Bet they fix that soon. And I picked these prints to show that; I'm not that overcaffeinated with the print choices. But the day is early....

Before you all go off to play with this new toy,

A stern warning from the management of Ernie K Labs:


The flat model on the left is what will get printed, NOT the 3D on the right.
So even though it all looks okay enough on the right, you're getting a 'headlight' on the left wrap panel (red circle on 2D). 

No, this is not cheap. Modern Jersey is $26.50 a yard, 56" wide. It's a little on the light side for my tastes for weight, but appropriate for the dress design. And the Appleton Pattern is $14 for the PDF (included in this package). This does get you the main print choice as well as a second choice for the trim, which would be an additional yard (Spoonflower doesn't do half yards, just fat quarters and swatches).

It's not cheap. But it's pretty damn cool. A good step forward for Sprout/Spoonflower, and a great collaboration with Cashmerette.


Monday, May 9, 2016

The Burrito Facing Trick Gets A Threads Video


In the recent Threads 185, they have a fine article explaining how to draft an all in one facing for a sleeveless top.

And now they have a video demonstrating how to install both kinds.

You may recall previous blog post


This is much nicer by far!
Both versions! (the first is appropriate for turning a vest and lining, as well)

I do love a well-shot video.