Showing posts with label quick project. Show all posts

Friday, December 4, 2020

Ear bud bag

The old ear buds had a tragic accident and sparked me when I used them, so they had a more tragic end.
Replacing them, I decided I should give them a safer form of transport than wadding them up in my coat pocket.
Of course I traced it. I'm making a pattern for it.
My goal is to keep the bundle from tying itself up. If I put a snap or a button in the middle of that wound-up cord, I should be in good shape to keep it from tangling.


Paper pattern made, pinned out

Making a square hole is easier to trim to the edge to turn it.
Sewed that square, cut it, turned it.

Turned it


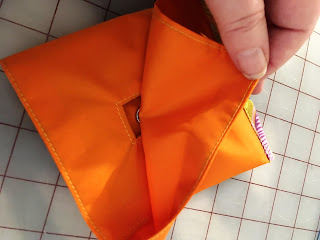
This is the ugly half burrito. Yes, I had to turn it first, and then flip it back to stitch the sides and top seam. I know, I used a fabric without a visible right/wrong side, but this light nylon is what I had on hand to make this out of.

And after a quick light press (with a pressing cloth cause SINGE)

It worked.


I went back and snuck a piece of interfacing in the center section. Should have added piece of interfacing on center spot for other side of snap. Could have done this for the hole, but didn't need to as yet.
This is a test model, we'll see how this works out long term.

Snap one (centers in hole)
Snap Two, needs interfacing under it.

it gets some bias trim at the seam to cover and finish it.

Roll it up and stick it in.

Snap it shut


It's in there. As long as I put it in with the ear buds at the bottom of the pocket, I think it will be okay. It may not need to be a three fold, it might just as well be an open top pocket. Or maybe a zipper? 
I'm testing this out. I don't think I will need another one, and my fam are all wireless ear bud people.

Ya never know.

It's been working pretty well so far

Friday, May 27, 2016

Handbag From Leftovers


A quick bag for the weekend.

What I'm actually doing  NOW is fixing the fit on a pair of pants I've made for the Pattern Review contest AND
hemming the mothership of prom dresses.
That will be an entertaining post if I ever finish it.

But this is a quick bag. Mostly made, it's a foldover piece of fabric, about 8" by 26" (10, 10, 6? I'm guessing), joined by zippers, hunks of scrap for lining and finished on the outside edges with 2" ribbon that becomes the loops for the strap hardware.


There's a hook for my keys on the left and a pen sleeve on the right, both in the side seams.

Clearance contrast zipper makes a back pocket. 


A rough sketch of the pattern. The grey is the interior divider pocket
Because pockets.

We're here for the 

Ohio Travel Bag 1 1/8" Nickel Plate Tuck Lock Clasp

I got this on Amazon, but you can find them around. 

What I foolishly did not take a photo of was that I wedged in a hunk of felt in the layers to anchor the base of the clasp.
The base was installed first, and then I line up the flap of the bag and the tuck part to the base. 

I could mark the tuck on the bag flap with it engaged in the base, but not the other way around.
And I'm lazy.

Hole poking. You have hole pokers. A nail or a screw would do the job.

Pliers! One decent pair will solve a ton of troubles. These are pretty cheap and they've done the job for 25 years (oh gosh, I am that old) 

Lovely! Functional!

Sides sewn up


I bought the strap material at Sew Expo for $12, which is about twice the cost of all the other materials here. The rings are keyring split rings, which always come in handy.
The clasps are big jewelry lobster clasps, and the D rings are....from Daiso. 12 for $1.50.

They don't all match, but I needed a little bag, and I have another plan for a strap, just not the time.