Showing posts with label hacks. Show all posts

Monday, September 7, 2015

The Refashioners part two

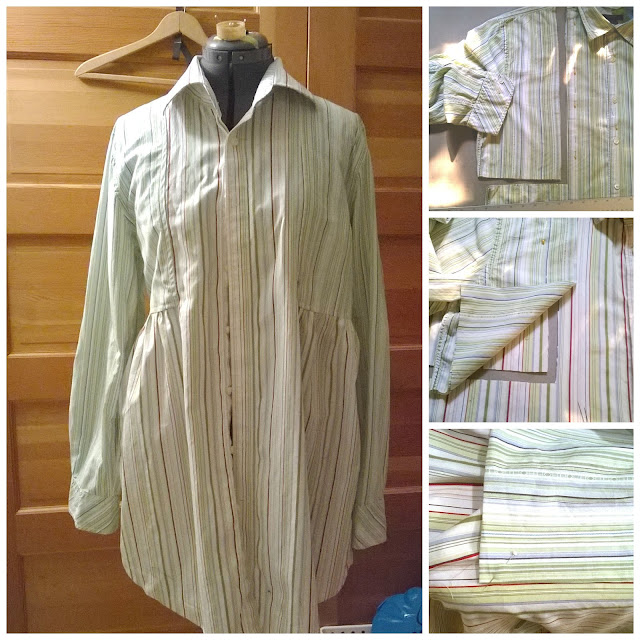
Ah, the multiple collar effect


It can be done


I dunno

The collar is overwhelming. And unstable. It needs a facing for structural support (those collar stands make one heavy heavy lump). And the shirt is too big, and I'm tired of shirts by now.

I am sure I will return to this. But not soon.
A noble experiment. Nothing ventured, nothing gained.

(So, yes, I do post the fails.)

Sunday, August 30, 2015

The Refashioners 2015, part one

or  #therefashioners2015

The idea being that a selected group of sewists will remake a man's shirt into something else and post about it on Instagram.

But I do this stuff all the time.

I had just finished this bomber style jacket from a linen shirt. 

I had a whole set of make photos THAT I ERASED after I loaded this to Instagram.


I had a beautiful shirt I was rebuilding for my son, until I ...unpicked the collar from the shirt.

Which only works if you haven't make a buttonhole in one end and you want to recut the collar. Or the collar isn't ridiculously long cause you're working an XXL into a M. 
Which doesn't really work. The armseye on an XXL is really long, and unless you are dropping to a S, the armseye is not going to work in your favor, the front will be too narrow. Unless you take the front off the collar stand and the yoke and move it up.

Which gives you this result.

I really hope my son isn't looking at this. He's going to have a fit that this is headed towards Wadderville.

It would work if you could keep the collar/placket together, and the shoulder/armseye in one piece.

If you did this.


I'm 16" across upper bust, shoulders


I cut a generous overlap (1 3/4") to allow for the usual mistakes

This is the most accurate color representation of the set. Two similar toned striped shirts.

Notched at the top to match up the seam. I sewed the vertical seams first


To get the horizontal seam  to line up, I pinned the end of the vertical seam on the outside

Then I flipped inside and started pinning the horizontal seam

 I gathered the horizontal seam. A little Alder, a little One Hour Dress

I did not machine sew to the corners, I can finish that with topstitching


Now both sides are gathered. 
Cuffs still need thinking, and it's almost dress length which is too long for what it needs to do. And it needs interior seam finishes. And ironing.

It does NOT need buttonholes or buttons, though. WIN!

And I have one other over the top shirt idea and not quite enough time. 

This can be done. I have the technology. And the shirts.


Wednesday, January 21, 2015

Pen Holder Hack(s)

Okay, I am working on a few other things that are shiny and distracting and have piping and waterproof zippers. SewExpo in Puyallup is coming up; so is Emerald City Comic Con. What to wear to either? Both? Making a Surf to Summit Fehr Trade rashie for the Pattern Review workout wear contest.

That and I had a birthday. And the teen had a 18 year old birthday. And the Seahawks won. 
Okay, it's busy town like always.

I am always pondering tool storage and bag hacks. And I loooove Jet Pens; I go to their emails almost faster than to Idle Hands (and I love Idle Hands). 

But this seems a bit overpriced for something you can make with duct tape.


Take a piece of heavy tape (gaffers tape if you want to upscale) that's three times as long as the 'wrap' distance around your fave pen/pencil. Goo side up, place another piece of tape a little longer than that 'wrap' in the middle. Apply to back cover of chosen notebook so that none of the goo is going to touch your pen/pencil. 

This works better with a pen with a clip, but you can put a piece of thin fleece or scuba fabric or something squishy in the place of the 'wrap' tape, and that cushion will help hold a pencil.

This will last as long as the notebook will.
Seahawks make front page of NYT. Left coast WIN.
This is the quick and dirty version with wide elastic, glue and duct tape (I was running out the door to a conference).

Your results will be prettier.

And speaking of pretties:


There are a lot of patterns out there for this pen case. The trick is the zipper; either get a long one and do the endless zipper installation, or use a regular zipper and tack the tail into the center fold at the top.

Of course I am making a pattern for something far tricksier. When I'm not doing that other stuff. 

Yes, boss! Back to work!


Monday, May 27, 2013

Going back to the jobsite


The cat is not pleased that Plastic Slinky has been requisitioned back into mail sorter mode for the summer as the seasonal phone job returns.

Sewing will be slower, but I've got a pattern I'm tinkering with that I plan to put up for sale on Craftsy.  Meanwhile....


Mail sorter: drill holes in paint stirrer or cheap wood about a foot long.
Attach with them plastic covered wire ties you saved from the kids' toys 'cause you're cheap.


Works remarkably well for business envelopes. Not for bigger stuff that will flop over, but that's not what I'm swimming in on my tiny desk.

See ya later!


Thursday, January 24, 2013

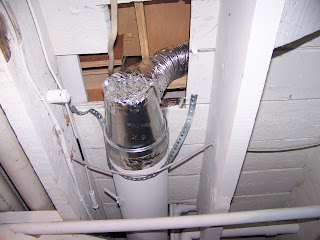
Handcrafted Duct Work


Well, the holidays are always busy with making things for family and friends, minding kids and making foods.
As well, sometimes the holidays are about making it warmer.
And what could be more heart and soul warming than central heating, properly distributed throughout the domicile?
Previous remodeling of kitchen (not shown, but located above this photo) sent this duct to the interior of the new kitchen island. So for some time, we've had very warm pots and pans.
And now, the heat is vented to the actual room. Lots of metal cutting, shoving, not as much profanity as I had expected, and the retrofit is done.
I should mention, for the concerned, that the reduction in duct size works with the reduction in air traveling through the smaller ducting (lever on left side cuts down on air flow).

Unfortunately, now my son's room on the top floor is overheated. Gotta work on that one.

In conclusion, sometimes alterations include tin snips and hand drills. As much as I enjoy mixing it up between the tool shop and the sewing table, this puts new meaning into the word 'retrofit'.

Monday, June 4, 2012

Mail sorter kluge

When I'm not making stuff at home, I am data mining. And sometimes data needs sorting. Pretty much it's a paint stick and a plastic 'slinky' I drilled holes and tied it with floral wire (first thing to hand) One double hole to anchor the middle. Yes, the annoying toy has been subdued. Yes, they can have it back when this season of work is done. Maybe.

Monday, December 12, 2011

The Hardy Boys get Kindle-fied

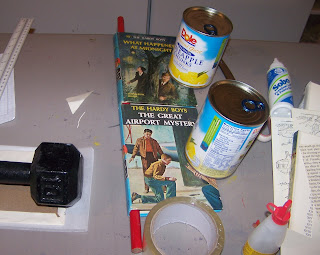
Now before you get all pure on my keester, I need to say that these editions are in no way special or precious. They are hardcover, and they do have the endpapers with the adventurous tykes getting into all sorts of scrapes.


Those ten pound weights have been very handy around the house. I wrapped the boards in wax paper to keep them from gluing themselves to the surfaces; peels off nicely and can be coaxed off with a little moisture if they get glued good and proper.


I have made back pieces out of chipboard and covered them with the table of contents and related images. I can wrap and glue elastics, or I can do the velcro/mounting tape attachments as necessary. Though the Kindle Fire would mount better without elastics (hope recipient is not looking at this page!)

All in all, going to be handsome.

BTW, great directions for this project on www.instructables (see linkbar)


Kindle cover project

In another case of "if you can't beat 'em, join 'em", I've been working on covers for the family of e readers and the e readers themselves.

First, find a book at the thrift store that sums up your feelings:


Then carve it up and put the thing in it. The marbled paper was a stash piece from a million years ago, and the perfect thing for the gift cover. Elastic straps hold it on, but you could use adhesive-backed velcro (I find the velcro is stronger than the glue that holds it on) or those removable adhesive tabs for hanging stuff on walls. Don't know about residue on surfaces, but I do know it's better than the velcro glue.


Try variations on a theme, this one in neoprene. I didn't need to cut slits on the sides for the page tabs, but I will mark for them in the future (push down on the fabric and the buttons work fine).


I have put a cord pocket on the back.


Of course, this is the one I use. Kitchen safe and I can always stuff some spare neoprene in the back for padding (gravity works better in my house). Or bubble wrap for that real DIY look


My next ebook is all about making bags from vinyl. So this meme will continue, I am sure.