Monday, May 30, 2022

More pocket - inadequte lady pocket adjustment

This coat has stupid lady pockets 

the pocket I have my fingers in is TOO DAMN SMALL
I think it would have fit the tiny iPod. Too short for a pen. Maybe a chapstick?
So I unpicked the seam along the zipper (blue line in drawing) to open the lining up and pull the pocket out (purple line in drawing) to add more fabric (red line) to it, without taking apart the zipper entrance and facing on the pocket. So I can put in my tiny iPhone. Or a pen.

So none of these photos really illustrate this . Sorry. You pull the lining guts out and it's all a big fabric salad

Here's our front


The seam ripper is pointing at the seam I undid to pull the pocket out to add to the far edge.


So here is most of it pulled to the outside, through the zipper seam


The grey is the original pocket. The blue is the addition. It's attached to a big flap of fabric with a little red fabric connector bit to the lining, so the pocket stays put when you pull something out of it. I disconnected that and reconnected it when the surgery was done.

BIG FABRIC SALAD

and then I sewed the seam by the zipper back up


The after photos...
It will fit a Stacia Burrington divination card  which is standing in for my phone, but I can't take a picture of the phone in the pocket without the phone cause it's the only camera I have now.

The pocket is actually an inch or so longer than this card.

Bonus photo of stitching elastic for more pajama bottoms. More soft sheets, more soft pajams!
I am working on actual clothing, but work is getting nuts and the mending pile is easier to deal with than a new thing from scratch.


Monday, May 23, 2022

Bob and Variations


I can never make just one.


I have been wearing memade pants exclusively for (checks blog)
a jillion years. (2014) (and I did take the Craftsy Jeanius course and it changed my life)
https://www.craftsy.com/class/jean-ius-reverse-engineer-your-favorite-fit/

https://erniekdesigns.blogspot.com/2014/03/jeans-x3-sources.html
specifically: I just don't want to bother with the other pants anymore.

I have some things I want in pants and I got tired of buying pants and altering them. I got tired of pants not fitting, having stupid pockets, being uncomfortable.

I am not sure why I originally wanted one piece pants (I am prone to stunt sewing), but I did and I hammered on that pattern a lot. And the final iteration had the side seam towards the front, and an inseam pocket in it. And I was very happy with them, and was only lured to the Bob side by Instagram people.
(@theladywholunches, specifically)

The Bob uses less fabric and fits just right.
It does bear a strong resemblance to V8499 and V8561, both Marcy Tilton patterns
(please see http://communingwithfabric.blogspot.com/2010/03/vogue-8499-marcy-tilton-pants.html for her take on them)

Even Google thinks so; my search results for marcy tilton pants patterns shows the Bob pants and the Ethel:


So more Bobs happened.


Two yards, crossgrain layout: squeezed fronts backs waistband and facing for pockets (not entire pockets)


These took two yards of Ankara and used all but a couple of 8" x 5" triangular pieces.


A nice thing about ankara is that you can use it crossgrain to show off the print, and if the hem of the pants pieces is right on the selvage, the print lines up all around the pants.  and the front piece looks off grain. Except it's not if you look at the marking on the piece.
Well, we'll get to that
You should always mark the grainline on your pattern pieces; this is sewing 101. I've messed up so many pants by not paying attention to that, and the inevitable twist in the legs as they get washed and worn is just my pants telling me what a hack I am for not paying attention.
HACK! LOSER!
And looking at this diagram for the pattern pieces, there's an interesting set of grain choices.
The hems match the grain lines, but the grainlines don't entirely match the front and back seams. The front piece actually gives you a 1" by 8" wedge more fabric at the front seam (the gray wedge indicated below), starting with 1" at the waist and tapering to the crotch. I have more tum than I used to, and this is...not a bad idea. All three fabrics I used are so busy you can't notice the widening.
the yellow rectangles are square with the pattern's grainlines


Yes, it's weird, but I don't think it's wrong. the grain is consistent between the front and back, and the fit works for me, so I'm calling it hooray for the extra gray wedgy bit. I have added that and more into pajama bottoms to allow for cake consumption; why not start with it?

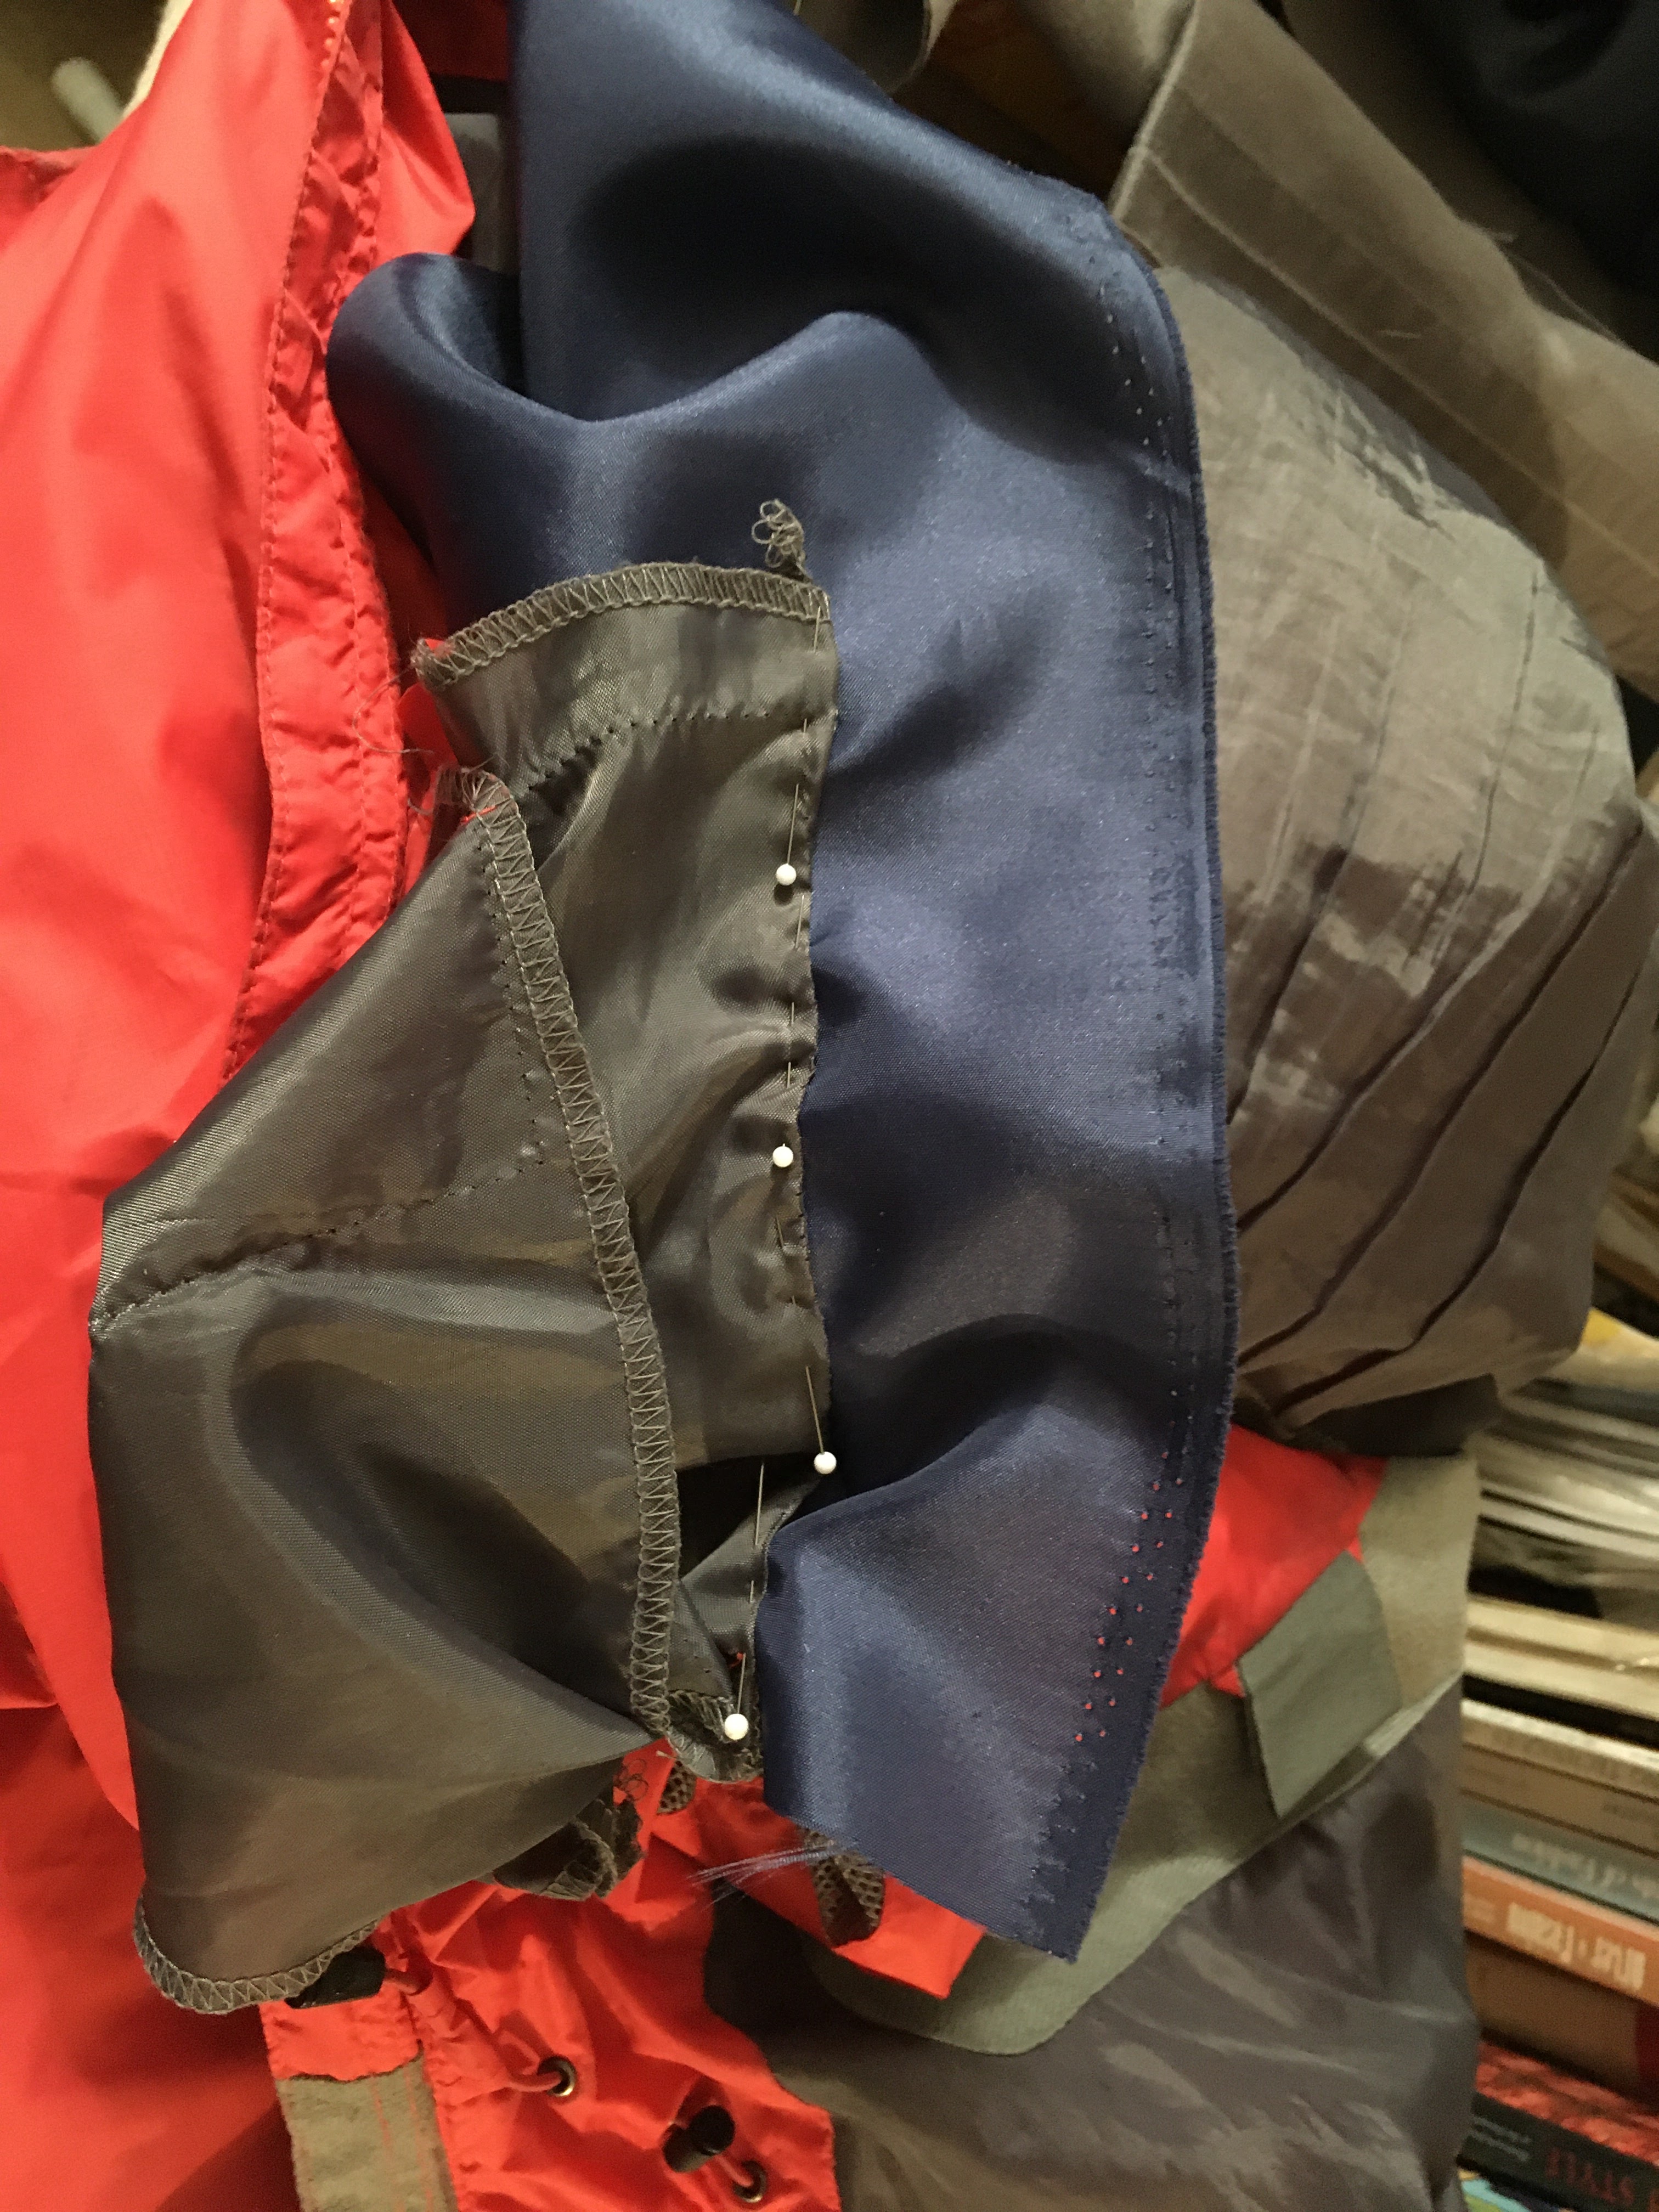
I ditch their pocket bag for one where the top seam gets sewn into the waist band so the weight of the bag is carried by the waist band, not the side seam (which the side gets sewn into). And my bag is bigger. bigger on the inside.
Inside out Bob pants, showing larger grey pocket bags (made from separate material), extending into the waistband and staystitched to the side seams


So here are the Bobs
Another Ankara, from House of MamiWata
and Tiger
from Alexander Henry, courtesy of Stonemountain and Daughter Fabrics
(I don't get paid or compensated by them, they have both done a great job by making it easy for me to give them money for fabric)
You can see where the pattern does not match up on the side (moved more to the front because extra pocket contents room under my tum) seam, and this needs to be a feature, not a bug. In another kind of print, I could turn the front panels sideways from the back, to make a contrast (I have done that with  stripes on another pattern, and it looks really cool)
This is a great pattern for ankara, as the body in most of those fabrics is really a great match for this style. The novelty cotton is a little too soft for it, but these will be fine once summer comes in August.

I suspect there's a couple more coming down the road....

Sunday, May 15, 2022

Style Arc Bob Pants: Peer Pressure Pants

 Now here's something I don't say very often 
"I made these because everyone else made a pair and they looked great on them"

Style Arc Bob pants

and even more of a surprise:

"And they turned out pretty great!"


Pretty much straight size 18, with the usual adjustments: moved the side seams towards the front by an inch (you can see that on the grid board photo above, and on this inside out flatlay photo.


changed the pockets to hang from the waistband, and faced the visible edge.
used the selvedge edge as a trim on the inside waistband and visible on the hem


And I have two more cut out right now, ready to sew!

Wednesday, May 4, 2022

Signal boosting: Silk Designer, Spitalsfields Life Of Course

 Peeps these beautiful fabric designs, from the 1700's, courtesy of the Gentle Author and the V&A's research library

https://spitalfieldslife.com/2022/05/04/james-leman-silk-designer-o/


There's a LOT of them. Go check it out!


Sunday, May 1, 2022

(not at all) Magic Bag of Tricks part three

 Just imagine every other word is a profanity. Pick whichever ones you like.

I tried to start on one side, and work my way around.
I like a profanity with a bilabial fricative, myself.

Blue tape worked better than clips (which slid) and is easily removed and reapplied.
Endlessly.

Because this keeps not wanting to sit in the frame.
"HOLY MOTHER OF PEARL" is the most family friendly one I used here.

It keeps popping out.

SO MANY BAD WORDS RIGHT HERE

Tacky Glue will dry. It will get tacky in less than a year, and it does dry reasonably clear. I can also trim off the excess, if I give a damn about that by the end of this
(and eventually I will)

It is supposed to fit. The pattern and the frame go together. The toile worked.
This ..... is not working.

The toile was in a woven fabric. You cannot overestimate how much squish/stretch/flex you get with a woven, even an upholstery weight. This one will just NOT.

This is a reverse angle trying to use the camera to see if the corner is sitting in the frame or not.
It's... mostly in there? I don't dare pick it up to turn it over to see (working from the lining inside).


I'm going to put glue on string to fill out the gap between the fabric and the frame, and secure the bond (so the bag doesn't drop off the frame)

I know, the glue should go in, and then the string. And on this part, that's what I did.
Remember, every other word is a bad word.
This was a naughty project.

At this point, glue is everywhere (some of those spots are polka dots, some are NOT) and I have ceased to care. I just want to finish it so it's done and I can stop pretending to finish it.

So much profanity.
So Much Glue


I got glue on all my fingers.


Getting a store bought handle. don't even ask about the one I made for it.
this is just so not my jam....well, I had to add hardware and rivets (which is ME), but still so not my jam.

Should not have trimmed the end (you can see the wadding if you look in). didn't trim the other.

Getting rings to go on rings is easier with a pair of narrow needlenose plyers. They don't have to be great, but they do need small noses.


This is it's senior year book photo. Color adjusted. Vignette. 

And now I am so done with this. I will clean up the glue on the other side some other time. But now I am FREE and I do feel much better about it.
If I only carried a purse, this would be it.