Showing posts with label coat. Show all posts

Monday, December 18, 2023

Winter Coat wrap up: Can be seen from space

 Finishing the coat took a long time. I just didn't have any extended period of time to sit with it and get it all done, so sewing in five minute chunks would have to do

the quilting was too big for the exterior, so I trimmed it down

I open up the pins and hang them on the edge. As this went on, I hung them with the heavier bits on the inside of the bowl.

Yes, it's huge, even without hood or cuffs or hem. It's all held together with safety pins

This is the time when the coat is just dragging itself off the table and trying to break free.
I need to set up on the big work table when I do this stuff, and I just.... don't. 
I like the checkered flag tape. 

My zipper is weird: at the bottom, the insert pin is on the right (my left) and the retaining box is on the left (my right). I am used to inserting the pin with my right hand, and this is backwards and I can see a day where I rip this zipper out because of it. My brain is not happy with this.
https://www.ykkfastening.com/products/zipper/s_zipper.html  What a zipper is supposed to be


I made cuffs for the previous version remodel out of socks and it worked really well. I'm only using the part above the heel, folded in on itself, and not using the cuff.

This part, where I sew the sock ribbing to the end of the sleeve, took a ridiculous number of tries to get it right. And I unpicked it all every time I redid it. Picking black thread out of a black sock is really hard on the eyes, but really good for the profanity.

Added the end piece of fabric (also a lot of undoing and redoing)

Flipped up

It's over stretched but it keeps out the wind well enough

It sinks way in there

I had to pull it over a 2 by 6 piece of wood to get the basting properly done

I also had to remove the hood and redo it so that the collar is wider - it's still more snug than I would like, and I need to put something on the inside of the top of the placket to keep it from poking me in the neck.

Oh, you can see me coming alright


Homemade bias trim from rayon lining to cover neck seam

Cuffs need a something: this will wear out the fastest but is easily replaced

It wants to be free; the rest of the coat is crawling away

I wore it out today; the prequilted lining is really stiff and this is noisy and I am mammoth in it. 

The zips in the outside pockets are annoying, so I will unpick the single welt and either add a wider flap or just remove the zippers.

Clearly I am not staying on top of my blogging, but I am going to continue. I do post on instagram when they aren't blocking me from posting (there's a couple other faux Ernie accounts and I could put a stop to it if I paid for my account and got a blue star).

Also, fyi: this coat is not THAT fluorescent in person. I did get some OH MY comments from strangers today, but there are so many construction workers in Seattle I kinda fit in.

I will add a photo of me standing on my front steps (the fluorescent green ones) to complete my  story.

Tuesday, November 14, 2023

More Mistakes: Winter Coat 2023 Gets New Fabric and Rally Stripes


The recent darkness has reminded me that it's better to be seen than to be fashionable
Old version on left, new traffic flag version on the right

The old ultrex green coat got dirty and it can't be scrubbed, 
but the water print just disappears into the shadows and so will I. 
Meanwhile, an orange with racing stripes will not.
I can get a little dirty over the years, as long as I continue to have the opportunity to do so.

The 2ply ultrex in orange and 2.5" reflective tape are from Seattle Fabrics, which is still not open to the public. There was a snafu with the reflective tape, but I covered up the 'clashing orange' (had ordered black) with poly grosgrain and reflective grosgrain from the stash, also from Seattle Fabs) so I'm more rally stripes than single stripe. I feel like I should put on a racing number in a circle on the opposite side.


the hood has been sewn and seams glued. The stitching on the stripes has been glued as well. The front pockets will be next, with welts and zippers.

Finished rally stripes. This is the one down the back.
It won't get done when I wanted it to be done.
I will look enormous and orange.
And stay alive crossing the street.


Sunday, November 5, 2023

New Winter Coat: Mistakes Are Being Made

So much work today. 

All for naught.

The front exterior pockets of the coat have been double welts in one previous edition, and zippers in another, and zippers functioned better. Keep stuff in better.


I did enjoy making these zippers

The trick is always: don't sew into the teeth, but right up to them, and either put a stop or glue across the teeth at the ends. Stop works better but glue will work here.

Love these process photos.

The zippers look good.

Sewed them in place, using the plastic cutting board strip between the layers.

You will not see the print of the flannel interlining in the finished coat. You won't see the inside of the pockets.

And when I hung up the one front piece on the mannequin, it looked awful with the white zipper.
Ew. 
Going to pick it out and try a different color from Joann's.


Thursday, October 28, 2021

Folkwear Cocoon SewAlong

It's a sew along and a sale! (through Oct 31, 2021)

 https://www.folkwear.com/blogs/news/making-the-folkwear-503-poiret-cocoon-coat-sew-along-day-one

Hooray! cause I keep smacking at this and not getting the results I want!

Not that I didn't have some inspiration.

Piakdy's Overflowing Stash Gigli Cocoon
http://overflowingstash.com/2011/08/20/taking-the-scenic-route-with-gigli-wannabe-coat/

https://www.pinterest.com/erniekdesigns/cocoon/

Tiny Scale model version

Plus the pattern is onsale until October 31st.

Bigger split back/collar version in double gauze

Adjusting for full busted

I have made a couple of samples and few of them have worked out. the pattern has a lot of ease, but no bust adjustments for the large chested. 

Not quite what she was hoping for


So many samples over the years. These are only a few of the ones I could find photos of.

Looks great from the back

And from the front, NOPE

I'd still make one in silver velvet in a heartbeat

Anyway, sale runs through Oct 31st 2021


Sunday, February 18, 2018

Coat assembly instructions


Sewing a coat is like sewing a car. It has a lot of parts and an order to assemble them in.
Every time I've sewn one, I've made a list of the tasks, the parts, and used my time to arrange them in the order I need them to get done in.
I am parking this list here for my future benefit.
There is one highlighted activity in the middle that came up this week. 
Oh, you'll see it right away.


The raincoat has a sleeve and upper body overlay as well as the main body piece, pockets that were internal and outside welt pockets. And it's fully lined. This made it complicated in ways that the winter coat is not.
Nevertheless, much of the same process applies.
So, for your entertainment, and an explication of how you can take a complicated task and break it down into a long list of five minute activities
(or: what I learned I could do during a child's nap time, when I had napping children), here's the list. 


Raincoat 2017 assembly instructions
Materials:
  Things that need sealing:
  Upper front shoulder seams
  Hood seams
  Collar seams
  Welt pocket seam
  There is so much fabric at the placket and overlays, I don’t think that needs sealing
Order and name of Layers:
  Outer: upper body overlay, main body
  lining: main body
  mesh for upper body overlay
Zippers
  One long center zip with placket/flap to cover/underlie (zip flap opens to right hand)
  Two shorter coil zippers on lower side seams to close in windy weather

  Two Interior pocket zippers

  Anorak snaps for placket
Seam tape for inner zipper finish, collar, side zips. Grosgrain, whatevers….
ASSEMBLY
Assemble fronts
Stay stitch neck seams all pieces
  Baste front/back linings together at shoulder seam and mark for pocket locations, adjust fit. Remove basting stitches.
  Sew Welt pocket through outer fabric (outer) to oversize lining pocket rectangle (both sides). Seam seal, let dry.
  Sew inside pocket to lining at chest height (both sides) and add zippers to tops to close.
     --finish ends of zippers so they don't uncoil and snag clothes
I'm not showing you the snagged sweater, but there were some tears. I'm adding some ribbon over the ends. The coil wants to uncoil. It wants to be free.
Nice little fishhook it is.

Happened on both sides of both pockets

  Finish outer pocket, wondertape to outer fabric to secure.
  Sew outer front to back at shoulders,check pieces to line up at center – ZIPPER BASTE?
  finish shoulder seams = ‘body’
  Sew front to back mesh at shoulders, finish seam
  Attach mesh to lining, finish seam
Assemble upper fronts
  Stitch upper fronts together at shoulder seam, sew outer hood,
 seal both and let dry
  Hem 1” leave side seam ends open. Do not finish cuffs. Be careful about matching hem position at center seam
  Baste upper fronts/outer hood at collar seam. Adjust for fit. Stitch, seam seal, let dry
Hood assembly

  Sew hood lining, stitch seams open.
  Baste stiffening material at center brim section (horsehair trim?)

Final body assembly
Sew all side seams, checking upper hems to match
Sew Short zipper to outer fabric (with end join at side seam), fold under lining to cover zip tape on inside
Baste outer fronts and backs to lining Check and stitch
Sew lining  hood to lining. Check with outer hood assembly to match. Flatten collar seam.

Sew hood and lining to outer hood at front hood edge. Turn and topstitch
Cuffs? Turn later? Check for length and turn later?
Secure layers together at center seam. Leave it open to add zipper?
Big outer pocket will need tacking to lining for support.

Zipper placket
Placket will get a couple snaps to close quickly (two at hood part)
Mark zipper both sides with thread at hood collar seam intersection
Baste zipper and unfolded flap to front finished upper/front/lining .
Order is front, then flap wrong face to right face of front, then zipper on top: stitch together, leave a lot of zipper tape open.
Yes, I made myself a diagram because I knew I would forget. And no, I haven't put the zipper in the raincoat yet. Fall Raincoat season blew by in a week. Now it's winter. Don't worry: there will be a Spring raincoat season. A long one.

  Fold flap  and zipper out, fingerpress and stitch to secure front
  Fold flap over zipper to cover, then back and  turn under to seam.

Finish cuffs with fold and topstitching

Trim flaps to match sides

And this is what I think about when I go to sleep at night. It's boring enough to put me to sleep, thinking I've done my duty and can sleep well.
And since I've put it here on the blog, I will be able to find it again.

Sunday, February 11, 2018

Double Welt Pockets and Coats

When you put an exterior pocket in a raincoat, you make a rectangular hole in the part that keeps you dry.
This is a double welt pocket. Peeking!
Helly Hansen rubber raincoat double welt pocket outside. 
The extra outside flap covers the normally directional inside flap, 
making a double door for your hand to go through, preventing water from pouring in.
Also keeps stuff from falling out.

And now that Seattle has downpours more than it has drizzle, staying dry is a key element to consider.

I love that red Helly Hansen jacket. I wore the first one out.

In making a new coat, I stole the pocket idea from the old.
The disembodied hand in a phantom pocket. Or, it's going in and down.
I measured my hand for size of welt. Six inches is not big enough for model hand.
The pocket bag is very big. It got smaller but if I needed to shoplift a couple of goats to go with the cow, I'd need all the pocketry I can get.
Now, it is important to mention that like handbags, the increased size of the container means you will try to carry more stuff. People hand you stuff.
I don't want a bottomless pit. I want to make sure I can touch the bottom of the pocket without leaning into it.
Essentially, I pinned the pattern to me, and put my hand where I expected the pocket to open and how long my arm reached. And that's where I marked the pocket location and it's depth.

G is for green material. Or go. And this is not a double welt pattern. 
Miyake patterns have a billion self welt pockets, it's how I learned to make them.
Since this was going to be a double, I needed to make a paper one to play with
Seven and a half inches opening width. BIG model hand with a wallet in it's grasp. We forget about that aspect, the holding and insertion and removal. 
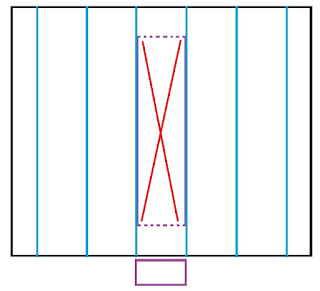
The red X is the opening. The folds are TWICE the width of the opening (that purple rectangle is the width measurement), plus a touch more for turn of cloth. You can always fudge it back, but it's hard to make the folds cover each other if they aren't wide enough.
Those skinny little grey lines in the flaps represent where the interfacing should have gone. They are grey for failure.

Nevertheless, the great thing about tracing paper is you can see previous lines and trace over them or ignore them, as you need or not need. Grammar much? Anyway, I made a model on the lines I drew on the front pattern piece, goofed around with it,  drew it out and trued it up on the grid board.

Yes, the pocket bag is huge. And it needed an extension to the welt facing to attach the other side of the pocket, thus that longish rectangle with the letters on the side. 
Sewed it down on the long edges of the opening. Not the ends. That happens shortly.

Cut it open

Cut the long triangles
Flipped it inside out and poked those triangles through and folded it up.
This is where the extra flap direction needed attention and a good night's sleep.
It is sewing a car.

Sewed those triangles to the facing to keep the whole little welt accordion together
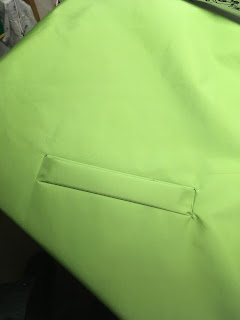
The welt will stay puffy. I didn't want to punch more holes in it by topstitching, and I did not (IDIOT !) put two sided tape in the folds to keep it. The fabric will not hold a press. This was a mistake, don't do that, put interfacing and doublesided tape in your pocket welts in your raincoats. These are mushy welts. They should be crispy.
And perfect is the enemy of wearing this coat in the season it was intended for.
Now this is where things get fun. This enormous interior pocket is only attached at the welt, and it is going to get heavy stuff put in it. My hands for a couple, probably a phone a wallet whatever junk someone hands me to carry.....
it needs support.
I cut an athletic non stretch mesh piece for each front piece, sewed the top of the pocket to it and attached it at the top seam on the shoulder and the collar. The shoulder will do the heavy lifting as usual.
Yes, that's a chunk of teal colored plastic bendable cutting board from the kitchen. Yes Threads paid me $25 for that hint a few years ago. I can say they are very very useful for working between layers. Irons melt them.
Don't iron them.

And hung inside out on M'damn, there it is.

Winter came back this week. I would like to report that in addition to it's great capacity for cow lifting, I can wear an entire down parka under this coat and have room to spare. And it is very waterproof (so much so that rain drips down and hits the backs of my legs. Hint to self: make the coat hem lean out, not curve in).