Showing posts with label vintage pattern pledge. Show all posts

Saturday, September 15, 2018

Reproducing Past Patterns Butterick #2307


 http://www.pastpatterns.com/2307.html

Does this look at all familiar?
No. Slight resemblance on the style lines, but... no.

I've had the Butterick for years. And pulled it out thinking it was older and wouldn't it be nice to wear a repro of a Great War dress for a lecture on said subject , regarding the 100th anniversary?
Well, no. It's 20s.
The 1916/1919 dates on the pattern are for the trademarks and patents for the company.
https://www.vintagestitching.com/pages/dating-vintage-patterns 
if you want to read a little on the madness of this subject.

Past patterns says this is from 1923.24, and while I think it's older than that, I have no proof and defer to Ms Altman's knowledge base and collection.
Mostly, I want to know what sorts of fabrics this would have been made from , and get some comparative images to work from. The drawings are lovely, but I want mooooore.


I traced some of it, I cut a lot of it.


Quite rightly, I let this sit for a week. And then I cut out a toile from fabric I don't give a damn about
The center piece is the lapel and the curved flange (that would cover the welted pocket opening in the dress body. A dress with pockets is a win!).


SEAMS!!! 
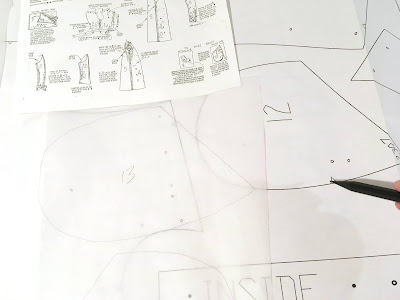
As with the patterns of the time, the instructions are pretty light on the ground. Handlettered to boot. This is one company where there's definitely a house style and one draftsperson's hand present.

Considering how 'vaguely precise' some of the instructions are, I feel that I am giving nothing away by reproducing them here. While we learn a lot about the sleeves and making tailor's tacks, there's still so much missing in how to address that long long open seam allowance around the neck and center. Not to mention any lining for that vest front that would finish the outside seam that runs around the cut-on collar (it's got to flex as the undercollar, and be visible at the flange). Still some mysteries.


I love that you "arrange dress on lining". It's just a bodice lining, which has a smaller profile than the dress. By attaching the sack vest outside to the fitted bodice, you could bring in and anchor the larger pieces by their seam allowances without apparent seaming. Which would be covered up by that narrow added belt (that belt is hot stuff in 1918, believe me)
And aren't the handdrawn numbers lovely?

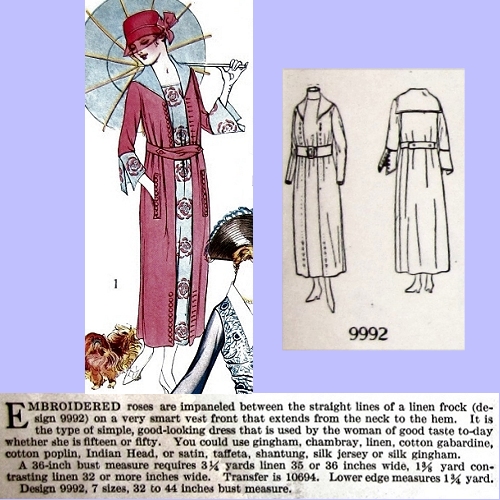
From the excellent ""Witness2fashion.wordpress" webpage: fashions for July 1918.
Second Battle of the Marne that summer. People say the war is practically won with the arrival of the Americans, but it's not over yet.
https://witness2fashion.wordpress.com/2016/08/10/summer-dresses-from-butterick-july-1918-part-1/
This vest front Butterick 9992 strikes me as similar enough to give me a good idea as to materials.
And how do I close that front up?
http://www.extantgowns.com/2011/12/edwardian-jumper-dress.html
I know it's not the same style, but it's roughly the same era, so techniques would be similar. 
See that dark grey line up the back facing? It's all small hooks to close it up
I added two inches to the armscye and the sleeve. I have two extra inches of sleeve in that armscye. I could not take photos of me in it as it's just too tight in the shoulders to move. It is super fitted, after adding inches and inches and inches. And I already have a moulage that fits like a glove (The term literally means “molding” or “casting”)

But I am going to cut this short: I had a major fitting fail and a lack of love has set in.
The armscye was too small, now it's just not in the right spot because the back was too narrow and the neckline too high. A 1918 38" chest is not a 2018 38" chest.
Which makes me grateful I made this out of stuff I do not give a damn about; I won't try to cobble it into something wearable. 

Basically, I am better off if I transfer style ideas and details to an existing similar sloper that fits me. A tube that already fits me. I can chase this armscye  location around for a week, or I can draft this vest front onto an existing pattern. Or I can take a break from this and work on something successful to break this downer I'm on.
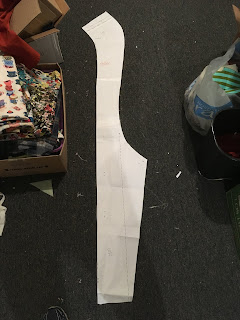


The vest front that makes the dress.

I trimmed the super wide part a bit, and shortened it by an inch between the collar and the lower flange

So I am going to mark the pieces as to what needs to happen, add the toile as it is to the package, and set it aside in the UFO pile for later.

I learned the word 'enbiggening' from G Willow Wilson's Ms Marvel.
You learn stuff from comics.

Because I need a win here. The lecture isn't until October.

And Hammer Pants are calling from 1991.
Which would be cooler if they were 1988, but....

Sunday, July 23, 2017

McCalls 8062 Vintage 50s Blouse

It's that time of year!

I put up a string of photos on Instagram of different vintage patterns that are pretty much the same pattern. Partly because I had bought all of them with the same intent of a low yardage blouse, and partly because I really would like to come up with a new blouse, and early 50s vintage is where my mind travels.

click on the photos to make them bigger.

It says novelty cotton right in that list! (it also says corduroy)
Have you ever had a corduroy blouse? 
I'm not saying it doesn't work, but it has to be a really nice corduroy.


for those who like a side zipper, this will squeak out under a yard with facings.

mail order blouse, no number. These instructions and the Japanese pattern books are going to get a post of their own soon


I don't have a waist anymore though. That will be apparent shortly.
April 2016

I traced the vintage McCalls features onto the newer McCall's to speed up the resizing process. I decided to go with the sleeveless version because I really liked the squared off armsceye shape.
It has no bust darts. Since I have no bust, this usually works for me. It seems to be that it should be cut on the bias to get away with that dart free effect, but it's not.

Square!

And of course, I decided to go plaid.


I did not write on the original: this is a copy of the cover.

One way to guarantee the plaid matches all the way around it to cut out the pattern as one piece from front edge to front edge, make long darts resembling the side seams and wherever you take darts. 
I went downstairs before work to take this photo, and while it lacks much information as a photo, I can assure you that the pattern piece lacks just as much. I cannot photograph pencil lines that are not there: I winged it. That it would be wrong to leave out this information as a full report of this make, that is certain. And that the visible back dart (right corner) is in a better place than the one I put in.

This technique allows me to use the selvage and these markings and tags from this Javanese sarong yardage (from Value Village - someone had dumped piles of these great plaids). This 'unbroken' section of plaid weave is a feature of many of these sarong; it's woven that way, not tucked or stitched. It just fits with open sections to spare before the shoulders. 
In my next life, I will get the plaid to match on the shoulder seams as well!


Getting to this took about a week.

And I did the 'fat thread in the bobbin' bottom up topstitching


and the facing folds over so it all matches all the way around


And this is where it stopped. I did the buttonholes and sewed the first button, and then, before I could get to the body fisheye darts, I stopped.

And this is how it hung on the rack since June 2016.
Sewed the first button and then hung the rest on a safety pin.
I had made the damn buttonholes!
I think I ran out of Vintage Pattern month and Summer.

So, in honor of July as Vintage Pattern Pledge Month, I put the darts in and here we are.
Uh oh. Clipped the dart before I tried it on.


Took all of two minutes.
Should have taken longer.

You know, I've posted less flattering photos of myself on this site. So the part where I'm pointing out how those darts in the back are too low and too deep and I cut INTO THEM so I'm stuck with the shirt pooching up on my backside?
Yeah, that.
We really do not have many neutral backgrounds in this house.

But still. I like it. The fabric is crisp and lightweight, but not transparent.
I like it as a plaid as well. I'll open up the darts and mend the slashes.  


Wonky topstitching a speciality!
I am getting bagging in the high chest/armpit. This may be a feature more than a bug, as the rest of it fits as well as a box shaped woman can expect. The armscye fit the chubsters just fine, and I don't want to open them up any deeper as exposure is not something I'm hoping for.

But check this out

I bought this solely for the instructions
Shoulder pleats! This might help deal with the bagging.

And I have a lot more plaid!
And one more week of the month!
And a night free without family obligations!
Words to live by