Showing posts with label pdf. Show all posts

Wednesday, April 21, 2021

A couple of Style Arc knit tops that aren't quite....there yet

Winnie and Freya by Style Arc are not doing much for me. I started these in January, and am just getting around to writing about them because I barely wore them.

It's not for lack of trying on my part. I assembled the PDFs and cut them out weeks ago. I sewed the Winnie up early February, and I thought I blogged about it then.

Apparently not. So here we are. On my usual PDF palaver. 

With a little planning, you don't have to print out all the pages.

You want to find the page layout page, which shows you how the pattern pieces are spread out over the paper pages. The pieces are numbered, but not according to their order in the combined PDF page count.


(The keen eyed will have noticed that in the custom page choice window above, I have an error in my page selections when I screenshot this page. I corrected that and printed out pages 6,7,11-20, 23-27 and 30-32.)

The ones I don't need (short arms, short torso) will be redrawn to the length I need without the extra pages being printed and are crossed off on the print layout. 
I do have to re-number the pages to print the correct ones (the pattern pages are numbered for laying them out, but because of the first non pattern pages, they aren't the same numbers that I need to choose for printing)

After that, it's the usual print/assemble/whine/tape procedure. Yes, it isn't instant gratification, but it's also not whining about patterns not being in stock at the store. There's no magic wand for any of it.


The tough part for the Winnie was that I had to do some piecing to make the sleeves fit the fabric (I didn't buy quite enough). I laid more over the bottom of the left sleeve, basted the extension on with Wonder Tape and stitched it on. This was the hardest part of the project. And again, it's Lady McElroy knit crepe, which is super fiddly to work with.
Somebody stop me from buying this again.

The pattern does not repeat the way you think it does, and I wasn't going to get a perfect match. And you can't see it on the finished sleeve. After I cut the second sleeve to size, the rest was just simple assembly.

I did not sew over that pin.


The print is really pretty. I love the colors.

Yes, it has a funnel collar

And in this fabric, this is the only way you're going to know that. The fabric has no body and just collapses on itself. I will try something stiffer, it's a nice collar assembly (it just folds in on itself without a neckline stitch, stitched on the side seams, leaving a raw interior edge. I'd show you on this shirt, but.....that's not possible with this fabric)

Folded over to the inside and stitched just to the collar side seam

So I assembled and cut out Freya the same night, and only finished stitching it up a month later, in a fit of "this WIP pile is not going to finish itself" fury.

The
The cowl neck is a separate piece on this model. I did not make the sleeves as shown (just did boring regular ones without pleats at the cuff)

Yes, I trace the pieces off. Cutting out a knit with printer paper is just too much, and tracing it off means I might use this pattern again.
You could make this one in a woven. It's not very fitted and the cowl is big enough.

Look familiar?

Mort is the one in the turtleneck that always covers his face.


I used a 'ponte' (what we used to call poly doubleknit in the olden days - aka the 70s) that I had purchased for something else that it didn't quite work for. As you can see in these photos, the cowl neck has a life of it's own in a heavier fabric. Perhaps I should have switched one for the other.
And speaking of the other fabric...
This is a sample of another print of that other fabric after it's been washed and worn a few times. It's so so so pilled all over. I washed it in a wash bag, inside out, laid flat to dry. Only ran it through the dryer ONCE as part of the prewash abuse cycle. I really can't wear this again; the pilling shows up really badly on the black. It's so sad. Lady McElroy knit is just a beautiful fail for me, and I swear I will never buy it again. It's been nothing but hard work and short lived results.

On the positive side of sewing with knits....

 Linda Lee's Sewing Workshop video series on YouTube this week is really sharp, and it's all about Tee Shirts (not their tops precisely, but they are mentioned). Also a quick 'how I got into selling patterns' bit as it's her 30th year in the business.

You don't have to buy any of her patterns to enjoy and appreciate the cook's tour of t's she presents. She has grown on me over the years, and this series has sealed the deal. It's casual, it's not edited, it's like a fun trunk show on YOUR time


You can watch it on YouTube :   https://youtu.be/E7jKipvs4WY

Tuesday, March 23, 2021

Roaring 20s And Swinging 60s And A One Hour Dress Challenge

 https://exhibitions.fitnyc.edu/roaring-20s-and-swinging-60s/pattern-project/

I will be sewing this one this spring. This is my catnip, even if I never finish it.
https://www.youtube.com/watch?v=2LFHtNMZxYg&t=8s
She makes a scale model of the pattern to show how it goes together. I do love a scale model

And of course, we can't not look at this

https://exhibitions.fitnyc.edu/roaring-20s-and-swinging-60s/hour-dress/


Who can actually sew the one hour dress in one hour?

Well, nobody, but certainly in an afternoon you could get most of it done. This video discusses the wisdom of that timetable, as well as a little history of the pattern, the woman who developed it and her story, and some general sewing pattern history. The One Hour really does want a few inches of ease to let that bodice drape (it's worked really well in rayon for me, and because it's almost all straight seams, you're less like to run into issues of stretching on the bias).

And the original pamphlet is available for free. Yes, I said FREE. So stop paying for this sweetie!

https://www.antiquepatternlibrary.org/html/warm/H-SW007.htm

\https://www.antiquepatternlibrary.org/pub/PDF/H-SW007.pdf

Don't forget to visit the online exhibition!

https://exhibitions.fitnyc.edu/roaring-20s-and-swinging-60s/exhibition/

Friday, November 13, 2020

Felix Grainline Revisited: The Fin

I'm shocked I didn't write about this dress when I made it in 2019. 
I think I just didn't want to dwell on another epic fail.

 I had enough fabric leftover to make a couple of masks to go with it this year, so it got a little more love around the house.

Matching mask and dress. There are many matches when your stash is 95% novelty cotton


I did wear it pretty frequently this summer. I do not like the pattern.
 I really hated it at the time when I finished it.
Useful clues:
I had never made a Grainline pattern before this, I was not familiar with the fit profile.
Not useful clues:
I did not line it, because it doesn't need it. The collar/facing finishes itself and the inseam pockets are close to the outside seam and not big enough to need the internal support.
The measurements had enough slack in them to just make out without a toile. 
It's a pullover dress for light woven fabrics.
HOW HARD CAN THIS BE?
Ernie Kovacs, from Giphy


I love this Alexander Henry print, I love how the black collar really pops (which is why it lived in heavy rotation) and sets this fabric off. I love what the dress should look like.

And looking at the photos again, I can see where it went wrong and why it irritates me.
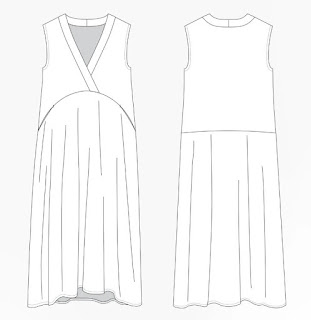
Grainline illustration from website
Several makes of this dress, including the designer, has the same problem:
it's got a fin in the front.

http://www.stonelakeroad.com/home/2019/5/13/two-felix-dresses
https://grainlinestudio.com/collections/dresses/products/felix-dress?variant=22533591040082
When more than one person has the same issue, it's not operator error.

To figure out where this went wrong, I had to reverse engineer it. To see the pattern, I had to figure out when I had purchased it, and where I had put the PDF on my computer (or had I deleted it entirely in disgust? No, but I did toss the printed pattern.)??

Grainline Patterns photo from website

I did find the photos, still unedited, in that month's folder.
I was really steamed about it, as the skirt stuck out in front like the photo below
(and this is the cut down version of this effect).
Hanging up in the website photo, the center is nice and flat, but there's a lot of skirt there. And the back of the skirt is coming forward to the front, just on the hanger. It's all pulling to the front.
My dress enters the room before I do

Selfies from work last summer. Not my pinball machine.
This is the problem
see that? I have a front fin and it hikes up in front. A lot. 

I could not figure out why I have so much fabric in the front in relation to the bodice: I had cut the same size for the skirt as the bodice, and if I slipped up by a size, I wouldn't have that much (and it's a LOT) fabric in the front.

Now I have cut that down (and cut it down again),  and it's manageable (mostly because I love the print/black contrast neckline). I tolerate it.
I have a lot of process photos, but this one of adding the neck facing is going here because I like it.

I wore it a lot; that long v neck with the facing collar is very flattering, it feels good to wear (not every dress wears well in quilting cotton) and it's different from the usual subjects in my closet. The pockets are a bit short (almost 7" deep, not quite enough for a phone and all the potential volume). 
I was going to trim down the front skirt, and continue that skirt gather to the back in a swoop

red line is new style line
Like this

But this is not going to solve it. 
Aubrey Plaza for drama


So what do I think is the problem with this pattern?
The neckline/shoulder seams pull the dress up in front: also, the front v neck should be longer, the skirt/bodice seam is unequally curved. Mainly, it's out of balance from front to back.

I got the idea from Dressmaking Debacles.

http://dressmakingdebacles.blogspot.com/2018/08/grainline-felix.html

"I'm thinking the neck/shoulder fit on Grainline just doesn't work for me. I believe it's meant for a more erect back; the shoulder seam is WAY back on me and I do not have forward shoulders."

And she has the same issue with the skirt in the front.
The neckline is pulling the dress up and to the back.
Look at the selfie profile photo again (it hurts me to look, you go ahead)
The quantity of fabric in front isn't helping.
Oh dear.
I do like the style lines.
So, my solution is simple.


I will be adding these style/seam lines to an existing TNT a-line sheath pattern.

The more I look at the seam line between the bodice and the front skirt on this page, the more I see how it adds to the problem in the front.  The top of the front skirt panel is too flat, relative to the width and curve of the bodice. It's not a lot, but just enough to create that front fin and skirt ride-up. 

I could correct the pieces to make this adjustment, but then there's the angle of the bodice vs my torso.  There's just too many moving parts to get them to fit. I'm really better off just tracing off a new TNT 'a line' dress pattern, drawing  the style lines on it to add the deep v collar (faking the overlap which has no practical purpose) and adding seam allowances as necessitated by adding separate pieces. 

I did add a tiny modesty panel at the base of the v neck, It's deep for me,  as I am actually a pretty modest dresser. My skirts have crept up from shrinkage over the years; I do have some deep seated issues about my knees it seems.

In reconsidering this pattern, it does offer an opportunity to salvage another dress that's been lurking in the WIP pile.
Maybe that long flat facing 'collar' is a solution to this

I love novelty prints, but they can be overwhelming, and it's nice to break them up with a solid trim, or just embrace the insanity and add another print to the mix.

Percy will approve


Sunday, April 22, 2018

ATATAC Pod Jacket Resizing potential post four

I get a better idea of the actual construction from the faux 3D image


The measurements for this pattern printed at 100% are these:

back width 16.5"
front width with plackets: 
sleeve at bicep 14"
neckline to back hem 29"
neckline 
A lanky man's jacket.

I could widen the front piece by extending the top and the bottom right flaps. By extending the bottom one, it makes it taller, and the upper flap gets shorter (leaving the same front flap height altogether).

The whole body gets wider if you slash the piece from the neckhole to the back hem, and just redraw the neckhole over the final piece.
The whole piece can be slashed and widened at that green line to make the arms wider.
You would have to carve more armsceye out for that extra circumference, but when you take this all into your brain, that would be the easy part.
widen front flap

widen back and front flap

And of course, if you need it to be longer, you can just drop the hem. Or drop the cuff for longer sleeves.
The only hitch in this is keeping the seam around the sleeve at the elbow. That sucker is going to hurt in the wrong place. And making the whole jacket shorter may involve just scaling down the whole jacket (printing at a smaller percentage than 100%) and going back to widen parts.

Such as: how? Huh? 
Okay. The back length is 29, I only need it to be 21.
21 / by 21 = .724
73%

No. I've done this before and it really does not work; remember that spiral jacket? It's dimensions are fixed because geometry. And my puffy lady arms are just not ....never mind. I have other things going.
Speaking of upper arm bicep adjustments......

At this point, I gotta be honest. I have a costume job I'm working on, it's a hoot and a half and full of sequins, I want to write about it, my phone is full of photos about it. It will be done and ready next weekend. 
And I still haven't finished my raincoat.
I really don't want to work on this. 
You don't want to read about it anymore.
I don't need a jacket right now.
Bring on the glitterbug fabrics!

YESSSSSSSSSSSSSSSSSSSS

Thursday, April 19, 2018

ATATAC Paper Doll Preview. post three

if ya click on the photos, they get bigger. Or you can slide on by.
Continued.

I have made the spiral shirt from CFPD, so I think I know how this is going to work.
https://www.centerforpatterndesign.com/patterns-1/cb-spiral-blouse

Because of all this, the sleeves make a certain level of sense to me out of the box.
And look at this striped version. The stripes run vertically. They are horizontal on the sleeve, and you can see a curved seam on the bicep, left of the pocket.


This is the time for the tiny paper model.
Copy

Print

Cut out

Add grain lines

Start goofing around.
Where is the neckline? Make that look like a neckline

And use the marked pockets as guideposts

Folding

The seam goes around forming the armscye

Which will keep winding to make a sleeve tube

With a really high armhole. Which is good for mobility (remember those flamenco sleeves?)
Your flexibility is going to come with your fabric choice I believe

And it works

Paper is not very flexible

One side folded, one side flat
Marked up the match points
and put them on the copy in the computer.

I love Paint. Don't take it from me, Microsoft!

So it will work. The front placket area looks to be a little less than the model shows (it barely touches). So I will do a little more goofing around with paper. And then a slightly larger fabric model. I'd really rather fiddle around with dinky seams and tape than scale up too early and curse the time I'd wasted.
And then there's that 'can I size it up?' issue.

But that's another day.
Further!