Showing posts with label patterntesting. Show all posts

Monday, February 26, 2018

Jasper gets a new collar


In my search to sew down the stash, I wanted to use as much from the hoard as possible.
The body was from thrifted yardage of very squishy, heavy cotton track suit velour, in a lovely navy blue.
The collar lining is an old pal.
Going to have to piece this together

but I have enough!

I'm down to the scraps of this brushed Joann's poly.

you can see that central fold line. Yes, I folded and THEN I traced the half piece. HA.
Most PDF patterns have folded pattern pieces to make the printing less onerous.
I traced them to make full pattern pieces and lay this out in a single layer for cutting. The big fold lumps (aka:turn of cloth)on a heavy fabric screw up seam matching.

The suggested fabric is sweatshirt or terry knit, and while velour is bulky, it's not very stiff.
The collar crosses over, and the intention is for it to stand up. 
You could make it do this, a layer of interfacing would do the trick nicely, but I elected not to pursue that issue.
The only tricksy part ended up in handling the collar.

In sewing the pieces together and top stitching, it stretched out along that seam, making the whole assembly curve out and down, rather than up slightly.

So I trimmed it up. Making the crossover part slightly smaller.


 My alterations were the usual: I shortened the body an inch, scaled the lower band to make it 1/2" (1" overall) narrower. Cause I'm 5'2" and Lisa's model is 5'7". 
Once I figured that out, it was smooth sailing.

Someday I will improve on my modeling skills. I'll get right on it.
Ah, the bathroom selfie. There is no good lighting in my house. And this is a dark light absorbing fabric.


overexposed to show....collar
Okay, I crossed the collar the wrong way....
I call it a win. It's pretty and cozy.
And, as ever, I don't get paid for this. I got paid in cozy!

Monday, April 17, 2017

Spring is officially here: Kalle shirt pattern coming out now

Here are the Pegasuses you were looking for. I know, they are upside down on the collar. Shhhhh! Don't tell anybody


Pattern testing gives me a chance to get out of my comfortable rut and make stuff I wouldn't make. Also geek out on technical matters. 

And frankly, Heather is a ton of fun to work with. Wouldn't miss it for the world.

It's been a long winter after the testing was done, waiting for it to come out. It wasn't going to sleeve, so it's not a winter thing.

sleeve: (v) to possess a longer arm covering without changing up the entire concept.

But now Winter Is Over.

Kalle is a pullover placket/button up shirt dress, with a faced yoke and faced hems and cuffed armsceye. And like all CCF patterns, it's instructions are faultless. 

My versions are of the pullover, and used the old version of the pattern. The  new version's placket is a little shorter.

Exciting tester photo. Yes, it's all about purple markers and photography.

Stripes are hem facing.

If you click on and enlarge this, you can see that I used the selvage for the collar and centered the name on the back. This does not follow exact grainlines, but I went with cute rather than perfect
Proof I made this way back when? The choir dress bags are visible in the back left corner on the rack.

I also made this out of Cotton and Steel cotton, which is about as heavy a fabric as you would want to make this out of. And as lovely as the yoke instructions are, I removed the inner layer to lighten up the shoulder line on the back seam.

I know,  buttons, but I needed to get this photo done and out. Placket is shorter now.


I dyed part of the rayon pegasi fabric for the placket and collar. See what a difference fabric choice makes?

I do love this pattern though. It's a classic shirtdress with solid state details and instructions, the placket and it's instructions/construction are worth using on other shirts because of that. It's a straightforward and rewarding sew. 
Because of the yoke (which extends out to the cuffs), I would recommend a soft fabric.  But I am going to make a couple more out of novelty fabric with a single yoke, because it's a great display for a great print.

Monday, November 16, 2015

Connect the dots to coat


It is not giving too much away to say that I've been pattern testing. And that involves PDF patterns.


Sometimes there are a lot of size lines all right next to each other, and it's hard for old eyeballs like mine to see which one I'm cutting on.


So I mark them and cut


And then they get too close together


So I spend a little extra time with a colored pencil to make a mark along the line I'm looking for, each time I can identify that line.


and then I just....


And then I will cut out the piece with my paper scissors NOT my fabric scissors.
Cause kids, I am using the used fax paper from work for these things.

I trust you all now know the name of the coat. Oh, did I say coat?


Sunday, November 8, 2015

Side Kick Sprout Patterns

So I ordered this.


And about a week later, this came.


The layout is exactly as it was shown on the webpage. Dayum! I could like this 21st century!


All the pieces are labeled, and the legend in the center advises cutting them out with the labels, and pinning the labels to the pieces as you continue. You will be happy you did that.

There are no notches to line up the pieces, but they are so square you don't really need that.


What I do need is an interior zipper pocket. This is more of a tote than a functioning handbag, and I have made this fella before in a workshop I ran. And I likes me some pockets!

So I added the zipper in the interior piece first.

There was some sewing. I followed the other directions. Imagine that. This is a very straightforward build, and the ecocanvas I used (imagine Sunbrella fabric that is softer and can take a print like a photograph....) doesn't need interfacing except at the snap. It does unravel like a demon if you work it too much.
Then I remembered I needed a place to hold my coffee upright inside the bag. Made one out of the endless brown nylon taffeta supply.

You know, when you have about ten yards of a tool fabric, like white cotton or sew in interfacing or the blanket stuff from a moving van. It goes in everything somehow. 

Cup holder sewn

Cup holder pinned into seam

Turning the whole thing from the inside out

That awkward midway bit. Kinda like childbirth.

oh yes, I did go there


All Pulled Through, will need to get the insides shoved in

There's lot of tacking stuff down at this point, but the part that I had the most trouble with this time was the grommets. They just would not snap. The sample snapped just fine (so fine it would not come apart, my first clue something was ....fiddly).

I broke a couple. I had to use the clamps to wedge them shut, sorta smooshing them together slowly, tightening one clamp at a time.


Now I'm stuck on a point that I had forgotten about from previous experiences with this pattern.

I think that webbing straps look overwhelmed by the bag and the grommets. I want something plushier. And now I have backed myself into a fabric corner because I DON"T have about three or four inches by 36 or so to make a matching strap.

I only have leftovers because I changed up the interior lining pockets in favor of the interior zipped one.
And they ain't big enough to make a shoulder strap.

I have more of this print, from another order. I won't need a whole yard of the other stuff (which is not the same fabric, just the same print), and I'm going to carve off enough to make a different strap.

I saw this ad for the Celine bag today, and I love the shape/contrast of the strap. So I'm going to piece one from my other yardage, scaled to overfit the 1" grommets.
Well, I'm going to after I deliver the choir dresses. 

(the ship hat and the armed leg for Parlor Tricks ate up last week)
(yeah, they will get a post sometime)
The printing time varies, the closer to the holidays the nuttier it gets, but one thing Spoonflower does incredibly well is customer service and support. Their shipping info is accurate, they always give you tracking numbers, and they really do back up their products. I have had problems with ongrain printing and they have always reprinted for me, often overnighting the new print.

It's not perfect, it's not cheap, but for you and me, folks who just want to make something completely their own, it's damn fine.


Friday, October 16, 2015

Sprout Tester

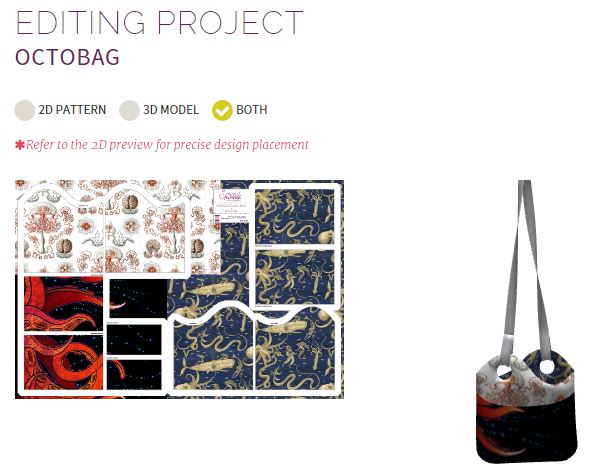
images from Spoonflower website

This is not the first 'cut and sew' trial Spoonflower has done. It's just the first one they've taken to market. 

And like so many things in life, follow the damn directions.

See, it's all there.

If you are a chronic designer on Spoonflower, you probably have a deep inventory of designs you've come up with, but haven't make a swatch to proof them so you can sell them. Like the free swatch days, I pile the test designs on the tester items, get some more bang for my buck.

The downside of this beta was: the early access to the process was not free. It was discounted, but I paid for this.
And it is just as prone to having to wait for printing to catch up with a big influx of orders as any other busy time for Spoonflower. Order went in on October 3rd, and I don't have it yet (although I should soon, according to my order records).

Spoonflower is many things, but one thing supreme: their customer service is redonkulously great. I knew there was a mixup when I emailed a question and did not get a response within the day (I misentered my email! d'oh!).

I've almost bought the Sidekick sling bag pattern on several occasions, I've co-taught a workshop on making it, so it figured that this was finally the time to put words into actions. I honestly think it's too big, but I can trim it down.

Plus it has three potential design choices. Theme Bag!


See those yellow squares around the fabric images? That means you've selected those. This is where I just could not figure out how to select them.
This is what a beta is. People like me stumble over the dumb stuff.

The big difference between this and previous cut and sew trials is the ability to move the design within the pattern template. Example One above.


And Example Two


Or I can make sure that the big red moon does not end up ....in the headlight position.


You do get preprogrammed choices for fabrics, but a nice range and nothing that wouldn't work for the design.

When the pattern/bag arrives, I'll post again on how it turns out.
In the meantime, more Craftyhoppingblogfun


Thursday, February 5, 2015

What have I been doing? THIS is what I've been doing!

PAJAMAS!

Spike heels and 'jamas! Don't mess with Heather Lou!


Tula Pink Bees: this is redonkulously soft cotton. 

 Rick rack! Overwide non corded piping! What is not to like?
Tiny fitting note at top left: I had to drop the crotch for the mom anatomy.

All the deets on stylin' and sizin' later; I am as sick as a pup can be, and should not be typing anything for the interwebs

And they are very comfortable to be sick in (not exactly what I was planning on today....)!
(Stay warm, get that flu shot, and see me later!)