Sunday, August 26, 2018

Plant the flag and declare victory over 8813 Tilton

I have issues. And I'm tired of editing this piece. So we're just going to plant the flag and declare victory, right now.

This dress has potential. Particularly the view on the right, the grey with the contrast center.
Ignore the plaid mismatch. That tshape back seam and the line of the cut on sleeves has real possibilities.

The central gathered panel creates texture, but the vertical line it creates is crucial to the front style lines, which you cannot see in this version, because plaid.  It could break into two pieces.  It could be elasticated.
It should not be plaid.

The v neck needs to be longer. It looks cut off and frumpy up at my adjusted height.

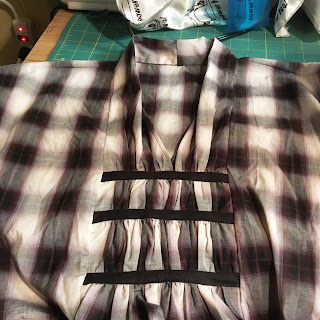
Assembling the center panel first is key, especially with the frailty of that neck line seam. It wants to be pinned out and hand gathered, it wants attention. It's a focal point and can show off some short trims and fancy stitching.
You could even break it up into components and get a folded in effect in the center.
It wants a neckline facing, for structure and to stop cutting into the back of my neck.

The pockets are gappy and huge and useless as pockets. 
Stuff falls out, they catch on anything nearby (oven knobs and chair arms were my bete noire).

On the pattern, view A suggests you fold over 2 inches as a pleat after you sew it up.

I'd take 4 inches in at that point, two inches from the pocket lining and pleat the interior pocket lining to make the bag.
Pleated like a loooong dart.

FYI: that only leaves a 64 inch wide skirt (half section to 32" here).That's plenty wide.

I'd add that lost width to the back skirt central seam, and distribute it in gathers across the back horizontal seam.
(the back of the dress is a straight drop - all the fullness is in the front. 
I don't know about you, but I have plenty of junk in my trunk)
Because of the cut-on sleeve, anyone with boobs is going to need to do an FBA on a dartless bodice.
https://www.paprikapatterns.com/how-to-do-a-full-bust-adjustment-on-a-dartless-shirt/

That gather line looks so sad and pathetic. I should have done it by hand.

Fabric note: lawn weight shirting does not have enough give for this, and makes hard edges.  Wearability note: the back neck seam cuts into the back of my lower neck on that folded seam line.
It wants a facing, not just the roll over twice and stitch edge.
But it folds over at the back neck, and there's those gathers, which remember, provide some texture.

So, going to draft one.
Take center piece


Trace the top section to first gather line.

Add a seam allowance at the bottom edge

Add a seam allowance to the top of what will be the new bottom piece of the center panel
  
Slice

Label
Transfer markings from outside edge


Smooth that line out

Check your work (is it going to be the finished height you want at the back of the neck?)
Try it on. Why not?

Slice off the too wide part. Compare to original.

Now of course I need to sew one.
That's not coming up next, however.  I'm sewing a shirt for the spouse out of this fabric. Like the guy said, this is a battle I cannot really win, so: 

I win I win I win.


And I'm just sewing on buttons.
And there he is. The Spouse. His turned out well.....

Strawberry Thief Washi Tape; I Love Jet Pens

Yes, I have a real post coming up shortly, but this was so pretty, it was hard not to mention. And it's just more whining about the Tilton, and needs one more photo.

And it's so pretty
https://www.jetpens.com/MT-William-Morris-Washi-Tape-Strawberry-Thief-50-mm-x-10-m/pd/24189
You're welcome

also
https://www.jetpens.com/MT-Slim-Washi-Tape-Very-Slim-Matte-Black-3-mm-x-10-m-Set-of-3/pd/24195
$4.50, plus ship, 99feet, 3mm wide


which seems like a better deal than

https://www.amazon.com/Draping-Pattern-Fashion-Plastic-Durability/dp/B00P2YCIT0
23$ for 5 rolls, 49 feet each (that's with shipping)(17 without but there's no without)

23 for 245 ft  0.093 per ft
17 for 245, 0.069

4.50 for 99  0.045 per ft

Plus if you spend 20.5 more (about a couple of nice Koyuko pencils for me, plus that Morris washi tape), you get free US shipping.....

Sunday, August 19, 2018

8813 My Sad French Tilton Tablecloth Maid Dress. I read the directions. All but one.

In plaid. 

Because I have seven yards of beautiful cotton woven plaid shirting fabric from District Fabric's brick and mortar store, at their closing. THE ONLINE STORE IS OPEN.
 Ashley moved, she didn't go out of business.
http://districtfabric.com/espresso-plaid-shirting/

This pattern has been on the top of the pile for a long time. And Pao's creations have made me hungry to try it out.
She has links to them all in this post
http://projectminima.blogspot.com/2018/05/wearing-that-french-housedress.html

But I have issues. So many issues.

Yes, I understand that gathering the central panel before you sew it to its adjoining pieces is the way to go. But the finished neckline looks so wonky in so many versions of this dress, even assembled on it's own. The neckline seam is on a faint curve, folded on itself as it's own binding, and then folded over at the back neckline, as it's own facing.
One of these actions is successful, but not both. The back neck seam is a lot of folded fabric and thread mounted on a single layer of fabric,and SPOILERS: it cuts into the back of my neck. The front V neck is often warped and wobbly.

I raised the opening an inch and change, per reviews that it was too low. I did measure the entire neck opening, because Big Head.

Yes, I unpicked that horizontal gathering seam; it's off grain. 
It looked worse when I gathered it. 

Redone, regathered, and reinforced with fusible bias tape on the wrong side. Thank you Professional Sewing Services, for selling this at SewExpo.


And I sewed bias tape over the front side, because it was still an ugly seam on the right side.

Hrmmm.
This is one place where rick rack would be a good choice. It needs a distraction, because it's at this point where this project becomes a race to scrape it from the recycle bin.

However, I cut it out and did a great job matching plaids across and around the piece. So in for a penny.....

I started assembling the pieces and realized I had mis-altered the pattern and plaids weren't going to line up the way I had thought.
It was going to be perfect. 

The pocket goes in very nicely. Just make sure you notch the seam notches and use them.


The seam to match the sides to the pocket panel got folded in. I'm unclear how this happened, but I resized and made mistakes with seam allowances.

Nevertheless, she unpicked

And I just topstitched them in place. At this point, I just want to finish this.

Those front pockets are lethally large.
Without the center panel, you can see the depth of the droop of the pocket on the right. The pocket lining is almost level with the floor. Gravity will suck things out. 
Bad Pocket.

This is WITH the pockets taken in 7" at their top edge. EACH.


My results:
I made a schmatta here.

There are things I like about this dress. the cut on sleeves and the vertical style lines the front panel creates. Even as a hot mess, it does look like the pattern illustration. It's got some serious decorative handwork possibilities on that inset/gathered section.
I have taken all my alteration issues and gathered them into a second post, because this one is really long and doesn't end with a happy ending of me frolicking in the dress. 
Eventually, I will either pull the central panel out and replace it with NOT PLAID, or I will just scrap this entirely. There are too many points where I didn't get the effect I wanted and what I got is distracting. 
The best way to get the illustration is to make this in a thin and droopy knit. That's the direction I did not follow. You need the knit for the drape, not for the stretch. You'll use a straight stitch and it will be great.

I honestly thought I had a photo of me in the dress, but I don't and the idea of going to get dressed in it and taking a photo makes me sad and I want to get this done. I want to stop writing about it and move on. 
I will put a photo up, just not right now.
Consider this a place holder.
That's me and baby seam ripper. Art on right by Ken Taya @enfu


Sunday, August 12, 2018

Linky Love Edition: You could read these.

It's summer, and that post on the plaid dress has morphed into two, and they are both unruly children who resist editing.  So this week it's the semiannual 'stuff on the desktop you might like' post.

not an illustration from weft design

https://www.weft.design/
Tired of just printed designs? You want more? You want it woven? Here you go. I'm just not made out of money these days, so I can't test this. But you bet I will be following this. 

https://wordsmith.org/words/cabbage.html
4. . Scraps remaining from a fabric that has been used to make a garment.
Who knew?

https://www.thecut.com/2017/03/why-millennial-pink-refuses-to-go-away.html
This is one of those articles that I start shaking my fist at what they are leaving out AND THEN they get to that stuff. And some more stuff. You want a history of a color trend? Read this. Although I am still sad that the equivalent blue just didn't get the love.

https://soundcloud.com/rayharryhausenfoundation/episode-19-the-7th-voyage-of-sinbad-60th-anniversary-special
Because there is not enough Ray Harryhausen in the world. And Scots talking animated work is ....just wonderful. Also, this is an official podcast of the Harryhausen foundation, so you get the word of God as well.
photo of Lucius in concert in 2016, from You Tube, from a Lagunitas Brewing sponsored show. Those capes are just dreamy, but the tights OH MY GOD.

https://youtu.be/pdsv6o9RVqg
Lucius' Dusty Trails. This recording is a little slow vs the album. Or a noisier recording with boss rockin costuming [https://youtu.be/5WiukJYE0nc]They are on tour. Oh .....where are my tissues? This is magical singing. I heard them on Live From Here [https://youtu.be/JxIVtai9n1o] , and I am mad mad mad for them. Turn this one up. [https://youtu.be/PhbQTDDHd8E  - a Kinks cover] Ok, I will stop.

https://www.terrydresbach.com/about/
My sister hepp'd me to this blog, and I went on quite the little internet time hole dive.


after the Big Dress got ripped off six ways from Sunday in knock off patterns.


And then there’s

I guess its licensed.


I'll be editing like a fiend all week, when I'm not at work.

Monday, August 6, 2018

Frida Jeans

This is the result of this project. It's another - here's how I did this, so I don't forget later. It's kinda long. I should put chapter headings on the sections.

This is not the first pair of Frida pants from this fabric. But those got worn to shreds.
Thus, when this print came up on my Fabric.com ad roll, I hadda jump.
The yardage wasn't quite enough to make the jeans I wanted to make.
So I used the one piece jeans pattern I kludged up.


It really almost is one piece. (waistband and pocket bits separate)


Frida will not always be in one piece here, and for that I am deeply sorry.
She deserves better.


That's the stuff. I've bought.... a lot of it over the years.

Had to piece the waistband (curved, natch!)


The theme here is: this fabric is so busy, it's hard to see the mismatches.
Until it's all I can see. Ow.


And had to piece it to get the length. I mean, I'm short, but a directional print like this eats up scarce fabric. I had to add length at the bottom of the legs. THAT's how little fabric  I had: this pattern needs 2.5 yards. I had 2.


Constructing these pants follows traditional jeans instructions.
First, the pocket bag is sewn to the 'front'


Trimmed and flipped to the inside


Rolled a little over to favor the outside over the inside. I've done it the other way to create an edge on the outside, like fake piping.


So, you were wondering about the side seam. Here's where the pocket bag stops - that 'side seam/dart'.


Top stitching


The pocket lining/facing  gets it's corner of main fabric.


Okay, you see where the pins are holding the pocket bag parts together? We'll stitch along that and up to the waist


Sewing over pins again.....


And I will serge those raw interior edges AFTER I've sewn them together.


Now I can sew up that side seam/dart


And top stitch it.


It ends up as a dart. And there's a little dart  to the right of it, over my high hip. Cause I have a BUTT and a little shelf right there


A damn busy print.


Oh Frida, I am so sorry you ended up on the fly.


It's pretty straightforward from here. 
Note how there's no photos of the fly.
Other people have better ideas on that topic than I.


I do have to sew down the outside of the pocket bags to the 'side seam'


I hate having all those seam allowances where I'm trying to install a button hole.
One previous example of the folded over waistband.

So I extend the waistband past the center line and fold it to the inside at the fly edge.


The waistband facing gets ironed over the raw end to make less lumpiness as well (rather than folding over the raw edge of the heavier outside fabric). 


I do a fake welt with woven fusible. Stitch around where the hole is going to be
Trim and turn


See? Prettier already.


Pulled through


Hand picked edges still not perfect, but it's a goal.
And THEN I iron it. It sorta glues the stitching, the hole, and the back altogether.
I have considered adding a bit of webby fusible for more glue. 


THEN I mark for the rivet button with the awl through the finished buttonhole.


Frida, I am so sorry .


Use a piece of scrap wood to do this on, for that very visible hole reason.


I've been using a dowel to hit the back of the rivet button. I can hold it better and be less likely to smash off center, or smash my finger.


Now we're going to need to finish the interior waistband
I made bias trim from the leftovers from the same fabric in a quilting weight (leftover from the shirt) for the raw edge of the waistband facing.


It doesn't match up, but you are only going to see a little of it.


Folded over and stitched in the ditch. This facing will get stitched to the bottom of the waistband on the outside when all is done.


 The last bit is the most boring: stitching the back center seam, and then stitching the legs to themselves - up and over.


My goal is to do a menswear back seam: up the back and through the waistband and facing all in one, so when I have to alter these, I have topstitching and the back seam to unpick and redo.
The seam allowances should be facing up, so they get stowed away in the waistband. Like in the photo below.
These pants were a fail, but the photos aren't too bad, This one certainly.
The lesson from those:  It does not pay to use a fusible woven to stabilize barkcloth and expect the results to have any flexiblity. At all.

THEN I can stitch the waistband down, sew the leg seams and hem them.
Which goes lickety split.

I like that jeans are very detailed in the beginning (the fly, the pockets) and get less detailed and faster as you get to the end.
Kind of like my attention span on this post.