

It's a little weird to be writing about this project after it's ended.
It started out with great ambitions, and
I've been participating for awhile now
 |
| January 2015 email |

Check out all that white space! I used a dalek robot pattern for a cosplay I was cooking up.
https://erniekdesigns.blogspot.com/2015/08/rusty-dalek-culottes-culotta-playola.html

Eventually, Sprout Patterns was born, and they added patterns from independent pattern companies such as
Betz White and the SideKick bag.
 |
| October 2015 email |
https://erniekdesigns.blogspot.com/2015/11/side-kick-sprout-patterns.html

This bag remains mostly sewn together and unfinished. The ecocanvas was too heavy to be used for the exterior and the lining of the bag, and the grommets were a mess. Nobody's at fault, sometimes things just don't work out. Self-lined bags are not my jam.
You've seen a few posts from me about how Sprout stuff doesn't work.
https://erniekdesigns.blogspot.com/2016/05/sprout-grows-appleton.html
Theoretically, using a combination of layout software, pattern software and digital art should produce the future of sewing. Or a direction it can go in (nothing replaces me, the fabric, altering the pattern on the fly to fit the fabric, adjusting the layout). With enough coding savvy and bandwidth, it should be possible to match fabric pattern and design so that the plaid or the design matches across seam lines.
Another example is 'Bags of Love' products.
https://erniekdesigns.blogspot.com/2017/04/online-digital-printing-contrado-bags.html
They couldn't do it (you have to line them up yourself as well)
And I think Spoonflower is closer than they think, given the amount of offset repeats and variations on DPI they can handle now.
There are, however, too many variables at play at one time. Pattern repeats, pattern pieces, different sizes of pattern pieces and repeats - it's a ton of data to manipulate and code for.
It will happen. Just not today.
So, with the discount they tossed onto the pile, I finally ordered one of the projects in my queue.
 |
| That's three yards kids. And the design is flipped sideways for the skirt panels. |


This is where the design areas around the pieces turns.

Pieces are labeled in the margins. The seam allowance is baked into the piece, so you'd trim at the edge of the print (cutting off the words 'front bodice' in this illustration). I wanted a wider seam allowance for a little manipulation ability and size flexibility.

Yeah, I put clear elastic in the waistband for stretch recovery. I probably sewed over the pins, too.
The Turner dress has a complete front and back set of bodices, plus duplicates for a fully self-lined bodice. In a light fabric like the Modern Jersey shown here, it's genius. Cashmerette, you're a smarty!
In a heavier fabric, it would be insanity!
I cannot remember if I had an option for a princess neckline, or just the v-neck. I was trying to do two things at the same time AGAIN.
I didn't want the v-neck, and IF I HAD BEEN THINKING I could have cut the bodice pieces differently to make my own neckline choice (could have used the v-neck printed pieces as the interior facing pieces).
But.... I cut one of the v-necks before I thought about this, and then it was too late.
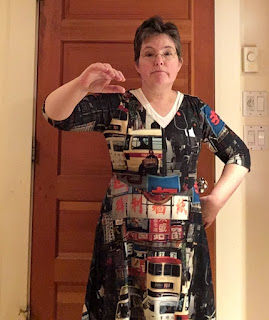 |
| One of the goals for 2019 is to create a selfie set-up for photos. |
And yes, I am wearing a v neck t-shirt under this. The dress fits very nicely without modifications, but I am just not comfortable with a v-neck dress.
This is where being able to make small modifications in the pattern is key: my ideal neckline is a little narrower than this (my bra straps are always going to show with this). The fabric is very smooth around my hips, so adding pockets at the side seams is going to be .... lumpy. Lumperiffic?
As my middle expands, maybe I do want to add saddlebags at the sides now, to create the illusion of a waist.

I could wear it backwards.....
I'm not in the habit of doing end of the year round-ups, as the end of the year is always a scramble of family fun and bookkeeping and work. I'm editing this from work right now.
Shhhhhh!
I wish all of you the best. I really do appreciate the conversations I've had with you, and hope to have many more.
And at least one will be posted remotely from Disneyland this year.


