Sunday, June 25, 2017

Another story from the House Of Dud

Sometimes whatever I do just turns into a fail. They tend to run in packs, these failures, and it gets pretty demoralizing. "Who the hell am I, what do I think I'm doing writing about sewing when I can't even: blah blah blah.


And then there's the actual item itself. Do I consider making it into something else, and consign it to the UFO tub or do I just recycle it? And is this a scrap pile recycle, or a hard 'send it in the bag to the thrift' expulsion?


No, I didn't forget the seam allowances. I graded up 7 friggin inches for my spacious behind. And no, just no.

Or could I burn it in some ritual sacrifice? Sigh. No. I'd have to pull the nylon zipper out so I wouldn't be making some toxic stuff to accidentally breathe in; because when you burn a failure, you are always downwind. Always.

This is when I turn to mending. Generally, if it's in the mending pile, it's not carrying a heavy weight of expectations. And I am better at mending that most things. 

Edgar Martinez Day is coming up. I bought this back in the days before children, when I weighed as much as a sack of dog food.
I also smoked like a chimney; it was not all good times.

Going to have to open the whole seam out to widen it for my adult frame. That's what I said and that's what I'm calling it now. The sleeve gusset is just not enough.

Making another shirt for the blond one.  This is the same pattern I made the purple plaid jacket from. Apparently I did not write about the plaid shirt jacket, cause I can't find it on here. How can this be? It was EPIC.
He's just taller, not wider, and it's short sleeved. This is an easy peasy make, from some hoarded linen (two years? It was foisted on me at Pacific Fabrics and I could not stop myself from buying it because POLKA DOTS).

He makes the next one.


Sunday, June 18, 2017

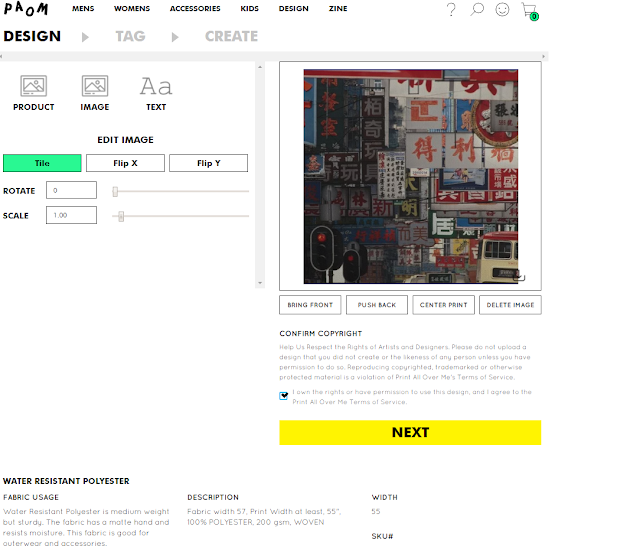
PAOM digital fabric printing

Vogue Patterns Magazine, June July 2017 ran a story on digital fabric printing.

They mentioned a company I had not known about, PAOM (Print All Over Me)
So I went online.
SJ, Gal Reporter, at your service.

Like Zazzle and friends, you can print your designs on preselected physical items, 
tshirts and backpacks and such.
But Vogue mentions yardage and gave prices.

So let's go.

It looks a lot like the other sites' pages. They do let you rotate and scale up, which is pretty rocking. Spoony don't do that.

In the name of reducing the "long posts with too many screen shots" I'm guilty of, 
I'm skipping all the front pages. I want to make yardage, and their Basic and Current Editions do not contain fabric 

I gotta go to the PAOM plan editions


This looks like what I want


I'm saving


And I'm redirected to a membership page. That's cool. There's a free standard option.


And that standard use option won't open. 

But the pay options are open


So i write an email

I get an auto response with helpful links and I go to wholesale, because that might be interesting.

and i get a funny 404 page. Love that collection!


So more email. And this is what you need to know about yardage printing with PAOM.


This is the actual link you need:
You fill out a form, and they will respond. Response time was good. 
So that's your door in. It seems better suited for printing on objects, and the selection is interesting. If you're looking for big yardage, this might be your source; they print in Shanghai and the US, and this is great news for someone. 

At this point, I'm already so far into Spoonflower, I need to have someone drive a parade float into my house and let me play on it to dig me out.

And they just made their deal a little sweeter: I had it confirmed from Spoonflower:  you can proof your designs for sale using the quilt cheating function. They count! 42 samples at one blow for $17.50 on basic cotton! 

(click on pics for bigness if you wish)


This is where I just get giddy. You have 42 squares, and they can be filled in with 42 different things from one collection. Or you can fill in adjacent squares and it continues the entire image, not just the corner of the basic image you uploaded (see the red on light orange or the odd white dots on brown).
Damn!

Sunday, June 11, 2017

Drafting my own one piece pattern pants: the epic tale continues with a twist ending

We are going to make us some pants.

There will be math involved. 
I am sure I have made some mistakes in this. Please correct me in the comments, I will edit to suit. And sorry, it's a long post. 
We'll need another cup.
follow link to other great works
(I'd like to thank my sister for sending me this gif link. She is very right, I do like it very much.)

Okay. Let's jam.


We need to know the usual stuff. Because these are pull on pants, round your measurements up. When in doubt, add an inch; you can always take it off later. You want wearing ease in these. 
You want fitted? Make jeans.
-------------------------------------
Write this down in pencil.

To get A, take your hip measurement, add 2" and divide that total by 2.

B is your thigh measurement at its fullest,  plus 2". These are pants after all.

C is your crotch depth. Sit down on a flat seat, get a ruler, and measure how far from the seat to your navel. 
You can go to your waist for this number, I always argue for a bigger looser crotch in these pants (lemme guess, you're making them for summer. 
Yup, so am I).

Your total crotch curve measurement, from the waist point at the center of your back to your navel will be D
E is your outseam, from your ankle bone to your waist, plus 2". You can always take it off...but it will be hard to add it later.

F is math. Take your crotch depth, double that (Cx2). Subtract that number from your total crotch measurement. Divide that by 2 = F.

I know this gets confusing, but here's my chart, and here's my math.

My hip is 44". Plus 2" = 46, divided by 2 is 23 = A.
My crotch depth is 10" = C
My thigh is 27 plus 2 =29 = B
My total crotch curve is 28. 
My outseam is 28, plus 2 = 30 = E
B 29 - A 23 = 6. However, my total crotch curve is 28 and 28 minus 20 (two crotch depths) is 8. So I gotta go with the bigger number here, so F is 4. 
I can always use a little more at the thighs.

I've filled in my measurements and drawn lines and did a little crotch curve.
I also added a measurement at the hem.

Getting closer, but still not a pattern.

Unless you are absolutely positively without any butt at all (thinking of you, Mom), 
tilt the top line to raise the back seam by about an inch  (keeping it the same height in the front). I add two inches in width to the whole piece (yes, I know, I added inches when I took the initial measurement) and add a 2" dart above the  high hip bone. Just trust me about that one. 

At this point, we're good. You can adjust for taste, you can reduce the numbers and give yourself a negative fit for tights, they'll just fit. You can add inches to make em baggier. You can make shorts. 

You will need a waistband, though.

I prefer a sewn on waistband for these pants; I can cut it lengthwise or crosswise, depending on what yardage I have left. I'm also pleating and gathering these pants into that waistband. I cut it waistband  2" shorter than the full hip measurement. 
Why?  
I've read this numerous places, and its true: we wriggle into our pants. Even my can is not 44" all the way around every which way. It is that size as a horizontal circumference, it's how they will hang around me. But that is not how I put my pants on. This waistband is going to be a casing for some pretty heavy duty elastic, and the less material I can have in it, the better. You could replace this waistband with a knit material. 
You could also just extend the top seam up the distance of a foldover waistband, and that works for pajamas, but I think it gets twisty and awkward in the long run.

The waistband height is up to you (I use a 1.25" wide non roll elastic, and I will topstitch the edge, plus I need space to get the elastic threaded in: that's 1.50" inches 'tall' now, so math:  3" plus seam allowances...call it four inches for 'getting the elastic through' room. Length = my hip measurement - 2"  + seam allowances = 43" long by x 4" wide.

But I need pockets. 
 I like big pockets.
I know where I like em.

So we are moving the seams to the side front.
Wha?
Hang on! Get your scissors!
1) Cut off the top of the pattern at the crotch line. Split it into two pieces on it's center vertical line.


2) Move them so the crotch makes a U shape.

At this point, the seams are on the sides and you can just add onseam pockets and be good.
But why stop there?
(sfx: mad laughter/lightning)


3)Now I move the crotch U forward so that it's about 6 -8 inches from that right edge, and I tape it down to the legs.
I add another couple of inches in the back 'half', and smooth out the seams. I've been rounding them out a little but a little goes an indecently long way
Then I use my handy pocket pattern piece (and you know I have one) for pockets. I will need four.


I'm showing this with the pockets attached there, and you can, but it's a nicer pocket out of a lining fabric, not your 'fashion' fabric.

And NOW add the seam allowance and a hem. Whew! It's a pattern!
I'd make a pair without pockets to test, make em out of an old pair of sheets and at the worst, you've got a pair of pajama pants. 
Easiest construction order is to sew the darts, sew on the pocket piece to each seam, sew each leg into it's own tube while you sew the pocket's outside seams together (mark how big you want that pocket opening to be FIRST so they are the same on each side).
Then turn one leg right side-out and put in the other leg (right faces together) and sew the crotch. 

Yours will not be able to store canned hams in the knee 'well'

You will probably have excess pant fabric to pleat and you can decide where you want that to go. I suggest in the front over the pockets so you have lots of space for treasures.

Then add the waistband, sew it on, fold over and topstitch the top edge fold. Stitch in closed, leaving a couple inches opening to insert elastic, and test that out. You may find you can go with the least amount of elastic to go around you, but you want elastic that won't stretch out any time soon. When you're satisfied, join the ends and close that seam.
Once I've got all the elastic evenly distributed in the casing, I will stay stitch through all the layers at  the center back and the center front; this is to prevent elastic rolling in the casing tube. 

I add a button to the center front waistband because I do get dressed in the dark.
And a label in the center back inseam cause I'm vain.

And now excuse me, I gotta lie down. I had too much coffee.

Sunday, June 4, 2017

One piece pants patterns and me

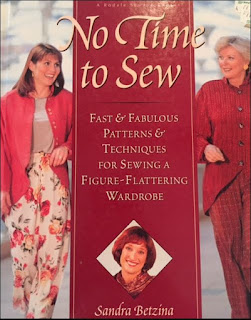
Rodale Publishing is, of course, the home of Organic Gardening (Mike McG forever!). Sandra Betzina is, of course, Sandra Betzina. So this pattern set always caught my eye, but I kept passing on it. I had no idea it has a one piece pants pattern in it.


 I learned about this courtesy of Ms Ranch House on ReFashion Coop.

I had no idea it came with a book. Clearly I need to get out more often.


There are lots of one piece patterns out there. An afternoon of pinning resulted in this
There are a LOT of these things.

I don't have either the pattern or the book*,
but I do have this:
They are bigger. The one on the right has outgrown the jams on the left one. They weren't even wearing the size pattern I use this photo for; that ship has sailed long ago.
I don't want to give away the store here, but these are pants you could draft for yourself in under an hour.  

The original pattern keeps growing to make jams for the men. That's where the Star Wars Xmas flannel went.

I do make pants for myself. The one piece Jeans pattern (more like trousers than jeans)
Curved waistband makes all the difference with jeans.


So I make a lot of pants for myself.
And once I get a pattern, I will use it over and over again. 

I do like pockets, I don't like them all the way to the sides (the shoulder injury really moved me to move the pocket openings).

But on seam pockets, where the seam is on the front of the thigh.... now that's speaking to me.
This is roughly the new pants pattern I'm sewing now. 

But sweetie, where the hell is the crotch?
It's in the center, so the pocket/side seams are shifted to the front. Keeping it one piece, even if it kills me.

(I have another post for next week on drafting this pattern)

The red vertical line indicates where the side is. I've wrapped that seam edge around more to the front (about five inches from the center seam - eight inches of actual pant). Darts in the back to take in some slack across my enormous bum, just like Loes Hinse basic pull on pants. The rest is gathered by the elastic, and since these have enormous pockets, I'm using 1.25" width nonroll elastic. Extra heavy duty support.

Laid down, without elastic. I used the cool selvage edge for the attached waistband and leveled out the hems to take advantage of it. Tucked and pleated into that waistband, which will gather more when the elastic goes in. Also milked these out of less than two yards of fabric.


We're just not going to have nicer photos today.  Sorry.
The angle on the lower front makes these bag waaaaaaaaaaay out in a really interesting way. I could hide entire families just under my knees. It feels like I should be able to cut these down and use that excess fabric on something else. And the back seam is ripping out, so even though the crotch is super deep, it needs to be scooped out an inch or so. Or two.

Yes, that very Ren and Stimpy print. I wore them everywhere, I posted them on Instagram and my son liked them and my husband liked them IRL. And no, no one made a peep. No one looks at what I wear anymore I guess.

How can you not see this? I cannot unsee this.

* I did just buy the pattern on Ebay, and it came June 1st. I am not going to open it until I'm done beating this topic to a pulp. Cause that is cheating. And I have to screw this up for myself before I will ask for help.