
We are going to make us some pants.
There will be math involved.
I am sure I have made some mistakes in this. Please correct me in the comments, I will edit to suit. And sorry, it's a long post.
We'll need another cup.
 |
| follow link to other great works |
Okay. Let's jam.

We need to know the usual stuff. Because these are pull on pants, round your measurements up. When in doubt, add an inch; you can always take it off later. You want wearing ease in these.
You want fitted? Make jeans.
-------------------------------------
Write this down in pencil.
To get A, take your hip measurement, add 2" and divide that total by 2.
B is your thigh measurement at its fullest, plus 2". These are pants after all.
C is your crotch depth. Sit down on a flat seat, get a ruler, and measure how far from the seat to your navel.
You can go to your waist for this number, I always argue for a bigger looser crotch in these pants (lemme guess, you're making them for summer.
Yup, so am I).
Your total crotch curve measurement, from the waist point at the center of your back to your navel will be D
E is your outseam, from your ankle bone to your waist, plus 2". You can always take it off...but it will be hard to add it later.
F is math. Take your crotch depth, double that (Cx2). Subtract that number from your total crotch measurement. Divide that by 2 = F.
I know this gets confusing, but here's my chart, and here's my math.

My hip is 44". Plus 2" = 46, divided by 2 is 23 = A.
My crotch depth is 10" = C
My thigh is 27 plus 2 =29 = B
My total crotch curve is 28.
My outseam is 28, plus 2 = 30 = E
B 29 - A 23 = 6. However, my total crotch curve is 28 and 28 minus 20 (two crotch depths) is 8. So I gotta go with the bigger number here, so F is 4.
I can always use a little more at the thighs.
I've filled in my measurements and drawn lines and did a little crotch curve.
I also added a measurement at the hem.
Getting closer, but still not a pattern.
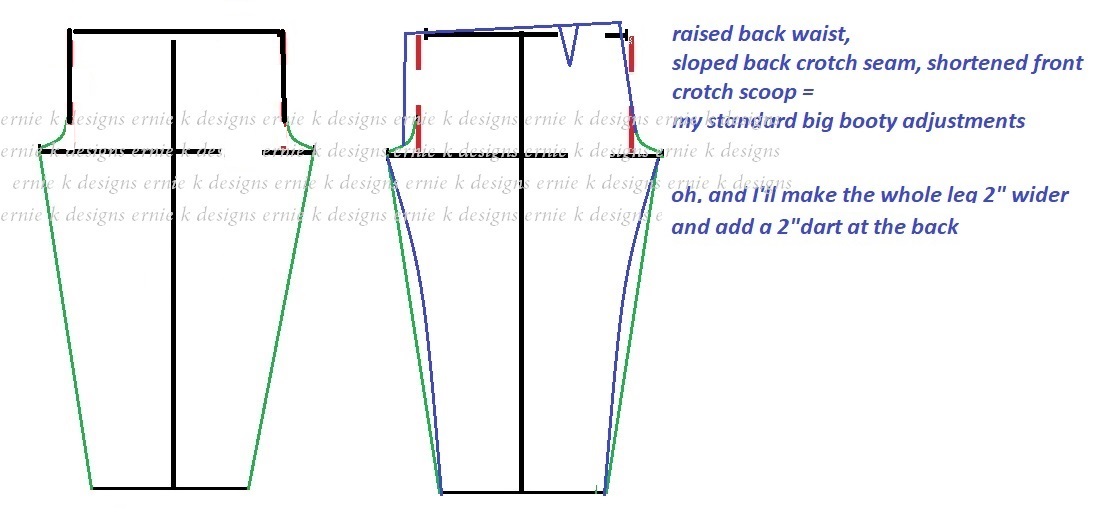
Unless you are absolutely positively without any butt at all (thinking of you, Mom),
tilt the top line to raise the back seam by about an inch (keeping it the same height in the front). I add two inches in width to the whole piece (yes, I know, I added inches when I took the initial measurement) and add a 2" dart above the high hip bone. Just trust me about that one.
At this point, we're good. You can adjust for taste, you can reduce the numbers and give yourself a negative fit for tights, they'll just fit. You can add inches to make em baggier. You can make shorts.
You will need a waistband, though.
I prefer a sewn on waistband for these pants; I can cut it lengthwise or crosswise, depending on what yardage I have left. I'm also pleating and gathering these pants into that waistband. I cut it waistband 2" shorter than the full hip measurement.
Why?
I've read this numerous places, and its true: we wriggle into our pants. Even my can is not 44" all the way around every which way. It is that size as a horizontal circumference, it's how they will hang around me. But that is not how I put my pants on. This waistband is going to be a casing for some pretty heavy duty elastic, and the less material I can have in it, the better. You could replace this waistband with a knit material.
You could also just extend the top seam up the distance of a foldover waistband, and that works for pajamas, but I think it gets twisty and awkward in the long run.
The waistband height is up to you (I use a 1.25" wide non roll elastic, and I will topstitch the edge, plus I need space to get the elastic threaded in: that's 1.50" inches 'tall' now, so math: 3" plus seam allowances...call it four inches for 'getting the elastic through' room. Length = my hip measurement - 2" + seam allowances = 43" long by x 4" wide.
But I need pockets.
I like big pockets.
I know where I like em.
So we are moving the seams to the side front.
Wha?
Hang on! Get your scissors!

1) Cut off the top of the pattern at the crotch line. Split it into two pieces on it's center vertical line.

2) Move them so the crotch makes a U shape.
At this point, the seams are on the sides and you can just add onseam pockets and be good.
But why stop there?
(sfx: mad laughter/lightning)

3)Now I move the crotch U forward so that it's about 6 -8 inches from that right edge, and I tape it down to the legs.
I add another couple of inches in the back 'half', and smooth out the seams. I've been rounding them out a little but a little goes an indecently long way
Then I use my handy pocket pattern piece (and you know I have one) for pockets. I will need four.
Summer Dress side seam pocket drafting in action

I'm showing this with the pockets attached there, and you can, but it's a nicer pocket out of a lining fabric, not your 'fashion' fabric.
And NOW add the seam allowance and a hem. Whew! It's a pattern!

I'd make a pair without pockets to test, make em out of an old pair of sheets and at the worst, you've got a pair of pajama pants.
Easiest construction order is to sew the darts, sew on the pocket piece to each seam, sew each leg into it's own tube while you sew the pocket's outside seams together (mark how big you want that pocket opening to be FIRST so they are the same on each side).
Then turn one leg right side-out and put in the other leg (right faces together) and sew the crotch.
 |
| Yours will not be able to store canned hams in the knee 'well' |
You will probably have excess pant fabric to pleat and you can decide where you want that to go. I suggest in the front over the pockets so you have lots of space for treasures.
Then add the waistband, sew it on, fold over and topstitch the top edge fold. Stitch in closed, leaving a couple inches opening to insert elastic, and test that out. You may find you can go with the least amount of elastic to go around you, but you want elastic that won't stretch out any time soon. When you're satisfied, join the ends and close that seam.
Once I've got all the elastic evenly distributed in the casing, I will stay stitch through all the layers at the center back and the center front; this is to prevent elastic rolling in the casing tube.
I add a button to the center front waistband because I do get dressed in the dark.
And a label in the center back inseam cause I'm vain.
And now excuse me, I gotta lie down. I had too much coffee.


