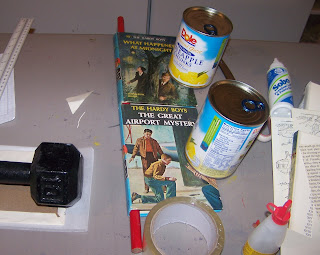
Now before you get all pure on my keester, I need to say that these editions are in no way special or precious. They are hardcover, and they do have the endpapers with the adventurous tykes getting into all sorts of scrapes.
Those ten pound weights have been very handy around the house. I wrapped the boards in wax paper to keep them from gluing themselves to the surfaces; peels off nicely and can be coaxed off with a little moisture if they get glued good and proper.
I have made back pieces out of chipboard and covered them with the table of contents and related images. I can wrap and glue elastics, or I can do the velcro/mounting tape attachments as necessary. Though the Kindle Fire would mount better without elastics (hope recipient is not looking at this page!)
All in all, going to be handsome.
BTW, great directions for this project on www.instructables (see linkbar)
Monday, December 12, 2011
Kindle cover project
In another case of "if you can't beat 'em, join 'em", I've been working on covers for the family of e readers and the e readers themselves.
First, find a book at the thrift store that sums up your feelings:
Then carve it up and put the thing in it. The marbled paper was a stash piece from a million years ago, and the perfect thing for the gift cover. Elastic straps hold it on, but you could use adhesive-backed velcro (I find the velcro is stronger than the glue that holds it on) or those removable adhesive tabs for hanging stuff on walls. Don't know about residue on surfaces, but I do know it's better than the velcro glue.
Try variations on a theme, this one in neoprene. I didn't need to cut slits on the sides for the page tabs, but I will mark for them in the future (push down on the fabric and the buttons work fine).
I have put a cord pocket on the back.
Of course, this is the one I use. Kitchen safe and I can always stuff some spare neoprene in the back for padding (gravity works better in my house). Or bubble wrap for that real DIY look
My next ebook is all about making bags from vinyl. So this meme will continue, I am sure.
Monday, October 3, 2011
More remodeling work
Further along with remodeling the fab dress, I took off the top 3 inches of the skirt, grained them up, patched them into a strip which was folded and sewn, and attached to center of bodice.
Of course, I am still camping in the boy's room, using the exercise equipment from the garage sale for it's standard use.
Friday, September 30, 2011
An old friend comes to the table of remodeling
A happy surprise was finding this dress in a bag of clothes I just don't fit (the "I'm Skinny" collection from 1982 through 1995). Most of the rest lies in the donation bin, but this gem -AH!- a pleasure to revisit an old friend.
I've already undone the waist stays and seams (my, I was careful when I repaired this in 1987, and while I had a billion stitches to undo, it was worth it). I am never going to have a 26 waist again, so I need to find about five or more inches of extra fabric somewhere to make it work. I get four of those out of the darts I'm removing from the bodice, but I am going to figure out a center bodice insert to make up the bulk of that (I'm not quite that flat chested, and I don't want to turn a graceful triangular shape into a square). Some gusset work for the sleeves (yeah, those arms ain't going back there either) and I should be in business.
I will have to move the skirt up to get more waist width. I had a big back porch then, and I have it still, so that's not quite a tragedy. I want to wear this, I missed it. The blessing of mending: I can make it work for me again.
Wednesday, September 28, 2011
Waaay too much thinking about pants
I can’t help but try to mess around with any pattern I find; you should see my knitting results (big frown). Sewing has been more rewarding for going off-pattern, and these pants are definitely the result of too many nights reading Dressmaking books. Why not graft two pieces together to eliminate the side seam?
Well, plenty of reasons, but I have done my best to eliminate those troubles. There is a part at the waistband where the seam goes off-grain, and eventually that will make these pants start to twist and roll there. With kids pants, this isn’t often an issue because they either wear out or be outgrown before that can happen (washing #2345666…..). Topstitching by the waist edge will control this for the time being. If you WERE to adapt this idea to grown up pants (anyone I know?), you would need to make a separate waistband, not just roll the top of the piece over (and you could use the selvedge edge of the fabric for an applied waistband…)
Additionally, there is a front and a back to these pants. I could make it reversible, and run the risk of making them into clown pants. You can add or subtract ease for diapers and training pants (I have added it, and added the ruler at the crotch to aid in customizing the fit for different sizes of kids).
The pattern has been drafted with the intention of cutting it out on a table with a rotary cutter. You could cut out a stack of them if your cutter is sharper than mine. It’s not a fine-tuned thing by any means.
Now, those pants with pockets….
Trace a copy of the pattern. Cut it out per chosen size. Slice it up the middle on the side seam. Tape it back together making a U-shape for the crotch. Since you want the grain line to run with the front seam (makes the crotch run truer to grain, and eliminates twistiness) you are adding a lot of width to the pants leg. There will be some patching and adding of pattern here between the leg parts, but that's what the newspaper is for.
Choose a pocket shape (I vote for the droopy capitol D with the beer gut). It should be about the size of a kid’s open hand (hand tracing is a good idea here), and the finished opening should allow for hand with stuff in it to enter and exit the pocket; okay, you should be able to fish stuff out of it, as well as be able to check for stuff before you wash the pants (and now you’re thinking: does the kid need pockets, and what will those pockets hold? There’s a reason why my kids don’t get pants pockets until age 6). Make a pocket piece, and add it to the pants with the top seam at the lower stitching mark for the waist elastic (you can catch the top of the pocket in the waist seam to keep pockets facing front, or you can leave em swinging from front to back).
NOW you add the seam allowance.
I would make a waistband from the selvage of the fabric. The waist line is already off grain, and mostly because threading elastic into a tunnel with more than one obstruction is going to drive you crazy. It will make a stronger support for the use of the pockets…and now you know why I don’t make pants with pockets for kids. But it can be done.
Final words: Get a pattern making book out of the library. Ponder the different basic shapes and how they fit together. You are only limited by your imagination and your patience. It’s just as hard to sew for kids as adults, as patterns usually have the same number of pieces and seams, but kids require less yardage and fewer alterations. It’s a great place to start messing around. I learned how to sew for my dolls (the non curvy fashion dolls) and as I got older and my skills improved, my needs increased at a relative rate. Don’t be a slave to fashion; sew for yourself.
Tuesday, September 20, 2011
Rearranging the House
While I process this pattern idea (which is a nicer way of saying: ignoring housework, kids and spouse while I hammer one idea into the ground after another), I have been on the move in the house for a new sewing spot.
I have landed in the kid's room, because he and I tolerate each other's clutter
I still have to use the iron out in the hall, though.
I have landed in the kid's room, because he and I tolerate each other's clutter
I still have to use the iron out in the hall, though.
Pattern drafting
It starts with an idea: hey, make a rain slicker that pulls over a kids' head and packs into a pocket. After puzzling how you get a kid to pull a thing over their head (big head, easy arms, little or no hardware to hurt anyone), the work starts.
These photos are from the last phase of the project: I've made the pattern, I've remade the pattern (I am glad that we resumed subscribing to the local paper because it gives me lots of newsprint to mangle on endless versions before I commit to flimsy drafting paper) and now I try to put it together.
I am trying to make a round object go into a round hole, which involves measuring the shaped edge to make it match the other shaped edge. I am growing fond of this new tool I have repurposed for the job. When I get really bored or desperate, I'm going to mark the beads for measurements.
While I work on smashing divergent items together, I am correcting my written instructions to detail any REALLY ANNOYING points along the way. This is one of them.
Wish me luck! And lots of coffee!
Tuesday, August 9, 2011
One piece pants in action
Onepiecepants pattern Toddler Edition
This is a multi-sized (12mos, 2,3,4T) one piece pants pattern for toddlers (those wearing diapers or pull-ups). All four sizes are included on the one pattern sheet. It takes a yard of fabric per pair of size 3T and 4T pants, 3/4yd for sizes 12mos and 2T, plus 18” of 3/4inch wide sport elastic.
I love to sew, and love to figure out ways to make sewing more interesting and results-oriented. How many of you have had a pants emergency with your kids? My goal is to provide you with a pattern that results in pants a child will enjoy wearing. If this means animal pants, sports logo pants, strawberry pants, one-use Halloween costume pants, flannel pajama pants – the results are only limited by your imagination and the extent of your stash at 1am. This pattern came from years of pants emergencies and kids who just didn’t fit into standard pants or wanted something special (those animal pants).
I have included more than enough instructions to make this a good first sewing lesson.
Since fabric stores are full of thousands of yards of quilt fabrics in about a jillion prints, why not use those prints to make your kids bottom halves match their interests? Fewer seams make more comfortable wearing and faster results. You can make these up in any fabric that a child would want to get into.
I’ve made and sold several patterns (Sewbaby Wonder Coat, for reviews see www.patternreview.com); this is my first foray into the all digital pattern world.
The pattern is available for sale on Craftsy (search on toddler onepiece pant pattern) and is in PDF format (meaning you print it out and tape it together, instructions to do so in email sent with pattern) and will be emailed to you within 24 hours of receiving payment. If you don't hear from me within 24 hours, something has gone awry and please email me as such.
Pattern c 2010-12, ErnieK designs S.J. Kurtz; all rights reserved. If you are considering making pants to sell from this pattern, please finish them nicely and give me a credit.
Subscribe to:
Posts (Atom)