Monday, May 27, 2013

Going back to the jobsite


The cat is not pleased that Plastic Slinky has been requisitioned back into mail sorter mode for the summer as the seasonal phone job returns.

Sewing will be slower, but I've got a pattern I'm tinkering with that I plan to put up for sale on Craftsy.  Meanwhile....


Mail sorter: drill holes in paint stirrer or cheap wood about a foot long.
Attach with them plastic covered wire ties you saved from the kids' toys 'cause you're cheap.


Works remarkably well for business envelopes. Not for bigger stuff that will flop over, but that's not what I'm swimming in on my tiny desk.

See ya later!


Monday, May 13, 2013

Now with wood trim


And later that day, it was done.


I derped up, as the kids say, and the skirt was too short! I had to use my saved out piece to add two inches around the bottom (I could have used the bias trim I always cut, but this way I got that nice crossgrain effect. Maybe next time I use the table saw....

Pockets will come tomorrow. Time to parent and go to bed.

Summer dress 2013; drafting from a dress


Every summer I make myself a new dress. It has to be cool, it has to have pockets, it has to cover my unsightly bits, it has to be wash and wear, and usually ends up being inspired by some strange novelty fabric.

This summer, there are many to choose from, but for this specific item, the winner is


WOOD! 
Since it's a really veritical print, I'm going with the boxy top/gathered skirt design. Few if any darts (none visible), straight up and down. I'm pretty straight up and down, so this works for me.

I'm drafting from a loved dress that has some issues (the back is too wide, I spend too much time pulling up the sleeve caps). I've turned it inside out (the better to read the seams on a busy fabric) and laid it out so I can trace onto flimsy to make a sketch pattern.

Bringing in the back  but maintaining sleeve head.

Measuring the skirt.


The dress removed, I'll tidy up the lines.
And remember to date the piece.

I've folded it in half along the back seam/fold line.

And traced the front to match it, changing the neckline. Going with the same one; it was flattering but not gappy. Seam binding to finish neckline. 


Drafting the sleeve from the armsceye.  I've mirrored the outer end so I have the same distance, just flipped the way I know it should go.

I am going to add seam allowances and front facings and tidy up the sleeve (retrace with a sloper I have for reference). 

I should mention I am as flat as a board, so I don't need darts. It will button down the front, and have patch pockets that I will match and cut when the dress is done (so I put them in the good spots AFTER the skirt is lightly gathered). This means: I put on the dress and put my hands where I want the pockets to go. I need to leave enough fabric to at least try to match the print.

I will add two darts in the back of the gathered skirt; the Textile Studio Brussels pull on skirt does this, and it's a habit I have hung onto. It takes some of the fullness out, smooths it out in back a little, and hides well in a vertical print, such as this one.

Sunday, May 5, 2013

Origami Skirt gets an edit and some pocket abuse

So this is what is left of the instructions for Sewing Workshop Origami Skirt.


I just couldn't do it. I got the Origami skirt pattern on Thursday, from Nancy's Sewing Basket (I think it had gotten lost in the shuffle of envelopes, it was the LAST one in the pile). I hadda make it right away.

Mocked it up in sheeting. Adjusted for my shortitude, checked width, determined I could add width and give it an elastic waistband. Changed the marks around. Made a new tissue pattern. Slashed that up.

My usual paper mayhem. No photos, moving too fast.

So I wore it on Saturday night to the opera. Kept smacking my hand on my hip: where is my pocket? Pocket? I NEED A POCKET!!!!!

I am a pocketaholic.

Came home, and slapped it around today and now it has a pocket. The red line on the diagram is where I slashed the fabric and added it. In the one I wore last night. I did try it first on the sheeting mockup, which I had taken apart to make the new pattern for the elastic waist version.


Adding to happy, I scored a copy of the Origami shirt (also Sewing Workshop) off of AMAZON. ?? This pattern is from the Marci Tilton era of SW, and sorry but it's a total copy of Miyake Vogue 2056. Which Tilton did an article on, for Threads, with an out of scale drawing of the pattern piece (there is but one). I suspect that is why it is not in the catalog anymore.

I've been scaling that, making little models, and now I don't have to anymore! 

I can torture myself with that Vionnet bodice again!

Thursday, May 2, 2013

Jasmine is a bleah


I am sure that by this point, you've figured out what styles just don't suit you.
The middy blouse does nothing for me.
This is the 1980's Princess Diana take on it.


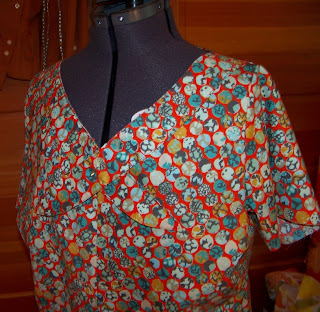
This is the Jasmine top from Colette Patterns. I've highlighted the tie, as the Fassett marble print is too busy for it to show up by itself. And yes, I sewed up the side seams here. 

I have made a sack.

Partly it's the ratio of neckline spread (9 1/2" neck to 2 1/2" shoulder.


 Partly it's the huge angle at the shoulder seam. When I was at this point in finishing, I got that awful deja vu sensation, when I remembered the last time I did something with this angle there and it SUCKED.

It could be the rise in the back neck line (to offset the width of the opening, a rise prevents the shoulders from diving off you)


After I brought up the neckline, the angle and width of the collar makes it look like a nurse's smock.

 I didn't finish the bust dart, but it will accomodate a B cup easily. As a AA cup, I don't need the dart.
 I took the excess height out of the sleeve (also don't care for puffy sleeve heads) and should have angled the hem line up more.

I will salvage this, as I love the fabric and there's some good in here.  I'll shorten the sleeves to caps, take off the collar, undo the side seams and eliminate the dart, bring in the front and back seams at the top to close up the yawning gap of a neckline, smooth out that crap transition at the shoulder seam. A good simple bias top will result.

I'm burying this comment at the end of this post because no matter how I slice it, no matter my changes (brought up the neckline an inch, sewed down the collar, didn't run the collar around the back but inserted it into the shoulder seam, used a light cotton shirting in a busy pattern) it still stinks. I had hoped the bias cut would take the boxy out of this pattern, but it doesn't.

Right now there's a lot of new pattern companies making stuff and this is great!
A lot of what they are making are sacks. Tubes with arms. No styling, no ingenuity, just sacks. I applaud new endeavors, I'm making patterns myself, but why clutter up the landscape with unimaginative stuff that can only be pulled off by people who look good in sacks.

A cute girl, a pretty girl, will look good in anything. The rest of us need styling. Sewing Workshop and Textile Studio have designs that really sing, because of details and construction inventions, and great instructions to boot. So far, I'm not seeing much that isn't a tube. Which is the kind way of saying 'sack'.

I did like the booklet. Well, I downloaded this pattern, but I did like the instructions. Reviews I'd read all mention how the back is too wide, and putting darts to take care of that. I would be cautious making this up if you are flat chested or don't like a plunge on the neckline (that inch I brought it up has screwed up the proportions of the neckline).