You're welcome, but these should be on the outside of the envelope.
I think this is the first time in awhile I've opened a McVoguericity (the One Company to Rule Them All?) pattern and cut into it. I tend to read the directions and look at the layout and then fold them back up and make something else.
I cut the 16 because booooooty
Not suitable for plaids, stripes....WELL!
Challenge ACCEPTED.
(saving the plaid for later)
That neckline is way too wide
So I slashed and brought it in
Checked it against my recent successful neckline/shoulder seam
Drew a new neckline in green Mr Sketch (mmm minty!)
Cut it
Trued it up with the back bodice
And let's just say I messed around with the grain directions.
Except when I didn't
My working plan. Patterns are cheap - this didn't even get to the sketchbook level.
I used a yard and a half of each and goofed around a lot. This was an evening.
A fun evening. Really. Listened to "Science AF" with Jesse Klein and Dave Ciaccio. A science podcast by improv comedians who really like science. http://www.scienceafpod.com/scienceaf
Lots of f-bombs. Not for the kids.
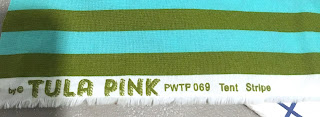
Oooh. Tent stripe? Oh.
Not exactly the same turquoise bluish green. I didn't check this until I was taking photos.
Oh.
Matching the pieces up precisely was not an option after my slapdash cutting job. I had about an inch of slop width, and I put that at the sides, choosing to line up the center line as straight as possible. The original pattern has a bend there, as mentioned.
Looks okay.
It should look eye-catching, not stomach turning.
Now, this is the trick I learned, pattern testing for Cake Patterns
(MISS YOU STEPH C)
when you want to get something exactly where you want it, and also want to sew it together on a seam edge.
I could pin it and top stitch the pieces together.
But I don't want that flappy edge.
So...
You line up the pieces, with the raw edges ironed over to their finished seam allowances.
Keeping them in proper relation to each other, you're going to iron them in place
I do love this stuff.
Wonder Tape is great, but it won't hold well enough on anything with a texture,
and fusibles will fail well enough, you can pull them apart and re-iron them.
And then I open it up and stitch the seam line (the crease)
I pin them on the dress form to take a long look.
I will be honest: there are a lot of dresses that just stop here. The Infinity War novelty cotton dress dropped dead here recently. It's now a top, and you may see it eventually.
I am old enough to know when to say when.
But this isn't it.
I didn't like their pockets, so I drafted my own.
I could have made much cooler ones, but I was going to run out of fabric.
Action shot
And then I decided I wanted facings for the rounded cuts by the hem.
Which required pinning the dress to the ironing board to work out.
(dress dangling upside down onto floor not shown)
I used the printed selvage down the back seam (another reason to straighten that out)
The floor shows it off well. I tried to alternate the dots and stripes from quadrant to quadrant. The hem facings are not in the original pattern, and I like them better.
I need to stress here: I did not follow proper bias/ongrain alternating. The dots are ongrain, the stripes are on bias. In a year or two, this is going to look like hell.
This is NOT heritage sewing.
And I will have worn it to bits by them.
And I wore it to work today.
It was a little heavy for 90F, but the skirt (which is a little long for me) swishes nicely. The hem side curve facings, plus a 1.5 " hem really gives it some body.
And for once, everyone in the family and at the job liked it.
So I guess this is the most sedate dress of the summer, even with Tent Stripes. And Pom Poms
I am entering it in the Pattern Review Stripes and Dots challenge, just in time.
If you like to vote, you can vote for me.
Or you can vote for someone else. Or not at all.
But remember, if you live in the USA, you had damn well better vote in November.
Not a link.


